Creating your own reversible jacket is an exciting project—perfect for adding style, versatility, and a polished finish to your wardrobe. This step-by-step tutorial will guide you through the entire process, from organizing your pattern pieces to final construction, using proven techniques for professional results.
If you’re looking for a user-friendly pattern designed specifically for reversible jackets, the Winslet’s Romy Reversible Jacket is a fantastic choice. Its thoughtfully drafted pieces, inclusive sizing, and clear instructions make this modern cropped jacket with clean seams and handy pockets achievable for all skill levels.
Why Sew a Reversible Jacket?

-
Double your style: Simply flip it for an instant second look.
-
Year-round layering: Warmth and breathability for all seasons.
-
Maximize your favorite fabrics: Show off two prints or textures in one piece.
-
Polished results: Bound seams mean no raw edges, so your jacket looks great inside and out.
-
Unique customization: Choose contrasting fabrics, add details, or play with binding colors.
Why Choose the Winslet’s Romy Jacket Pattern?
 Get the pattern here
-
Beginner-friendly: Step-by-step instruction and helpful illustrations.
-
Tailored for reversibility: Every seam is designed to look perfect on both sides.
-
Modern silhouette: Cropped, round-neck, drop shoulders, and practical pockets.
-
Flexible fabric choices: Use both pre-quilted or self-quilted wovens and stable knits.
Supplies & Notions
-
A reversible jacket pattern (the Romy Jacket from Winslet’s is recommended)

-
Two main fabrics (pre-quilted or stable, non-stretch wovens/knits like poplin, linen, cotton jersey, fleece, or velour)
-
Binding strips (matching or contrast; can be self-made)
-
3-ply polyester thread
-
Sewing machine (binder foot optional)
-
Fabric shears or rotary cutter
-
Iron, measuring tape, pins, marking tools, hand-sewing needle
Pro Tip: Two high-contrast fabrics make your jacket pop on both sides!
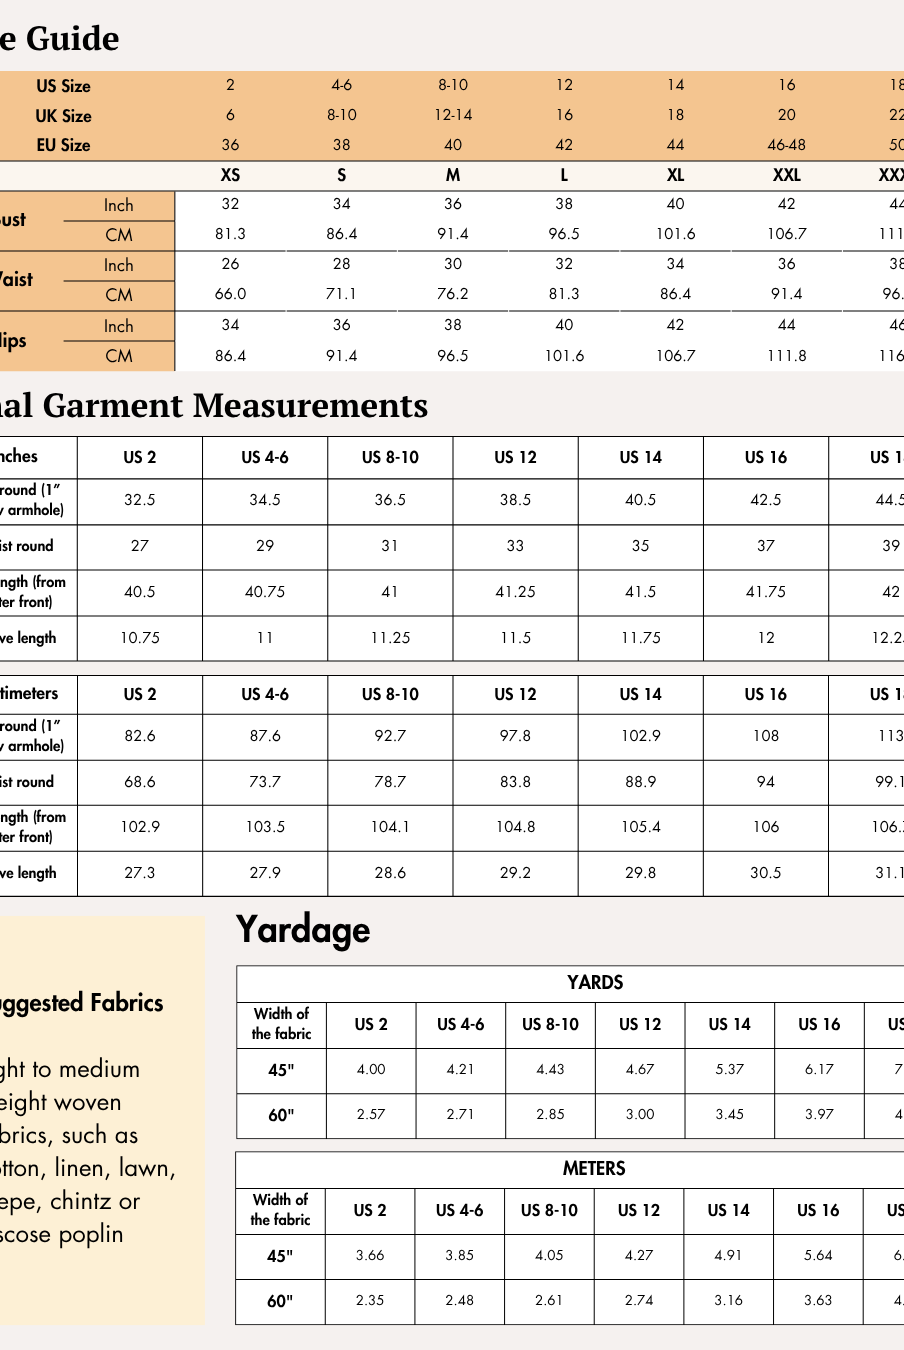
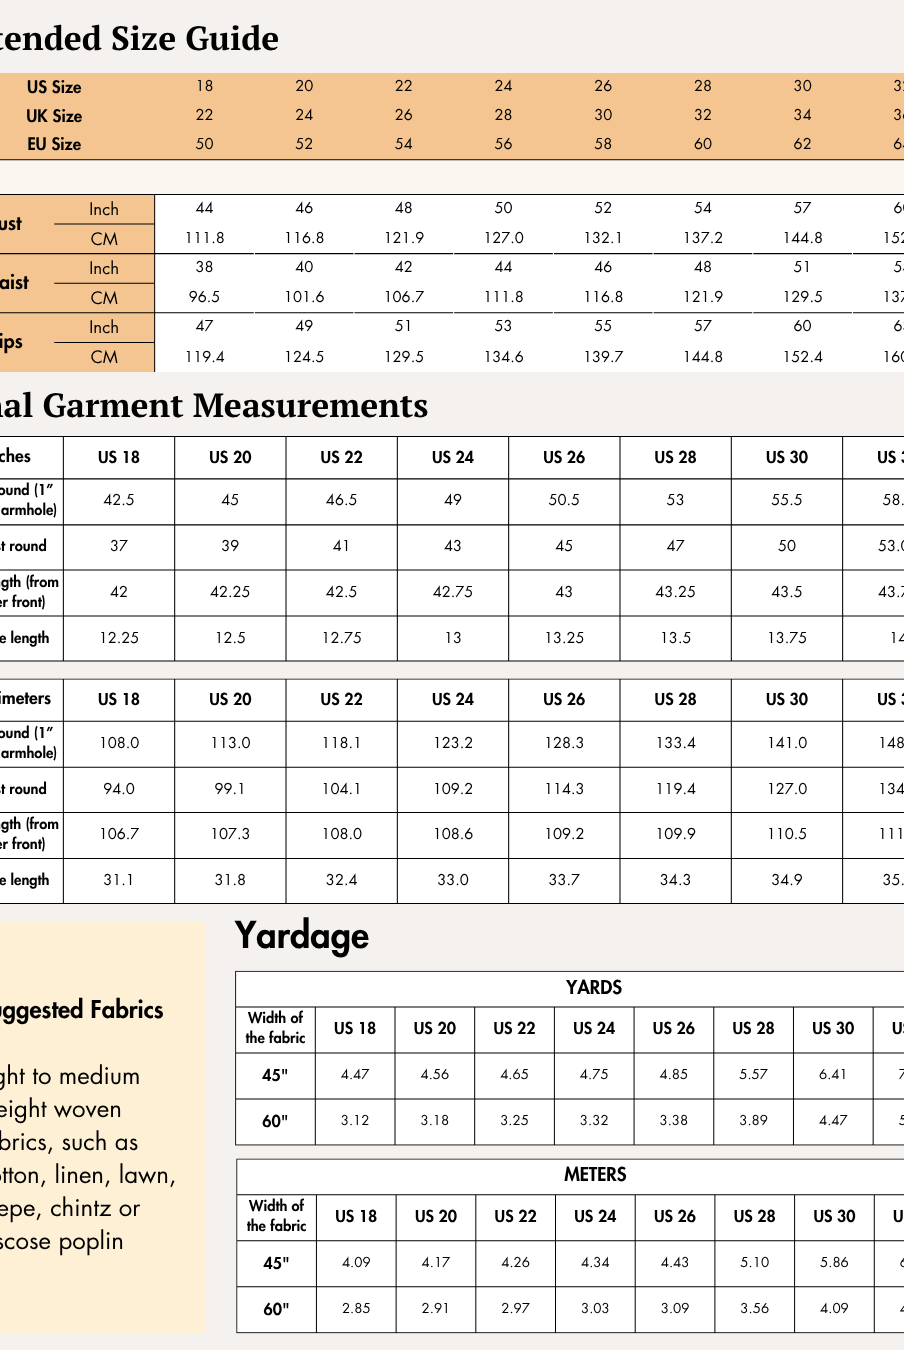
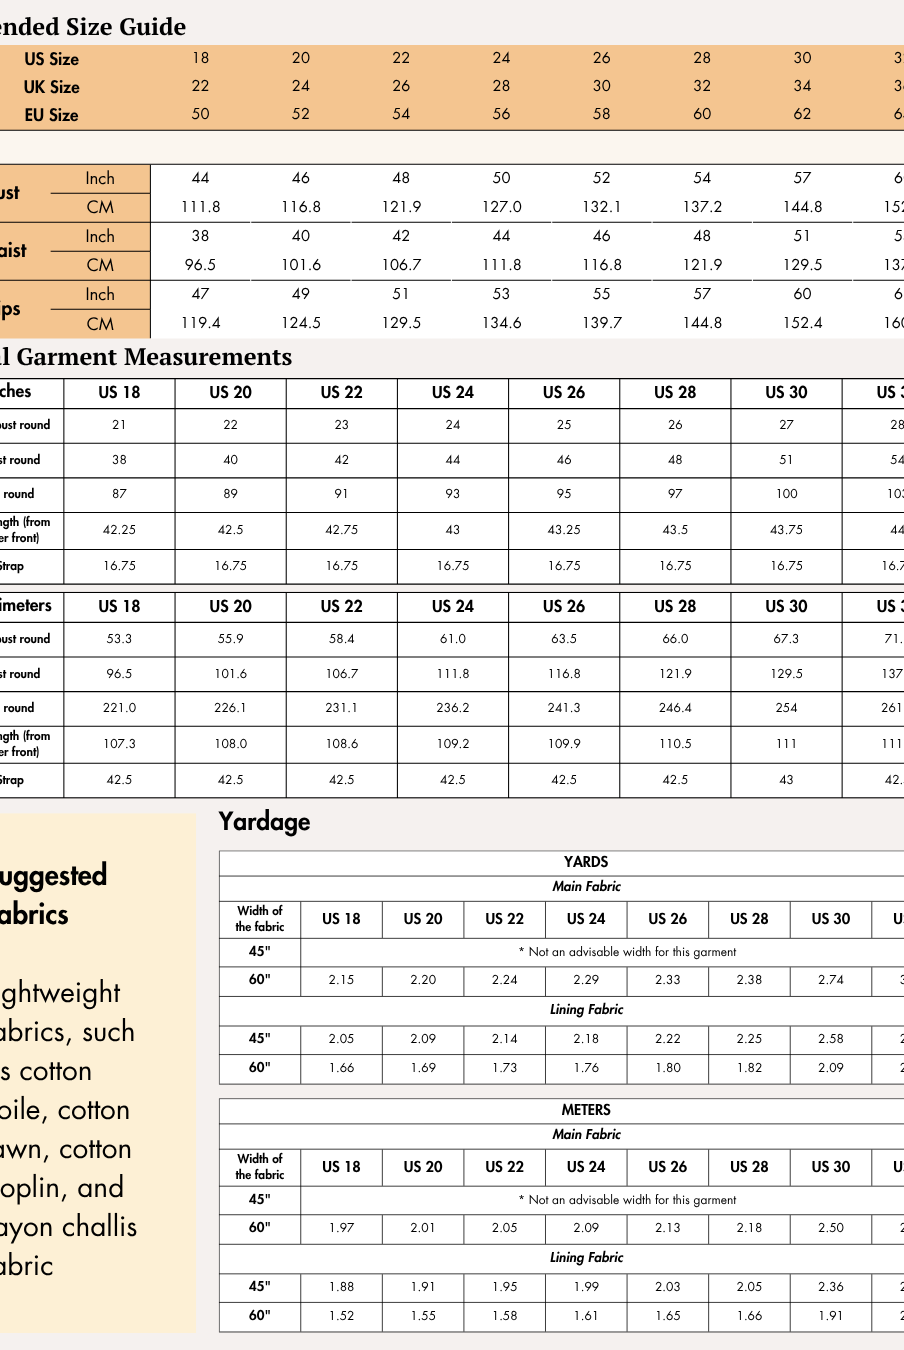
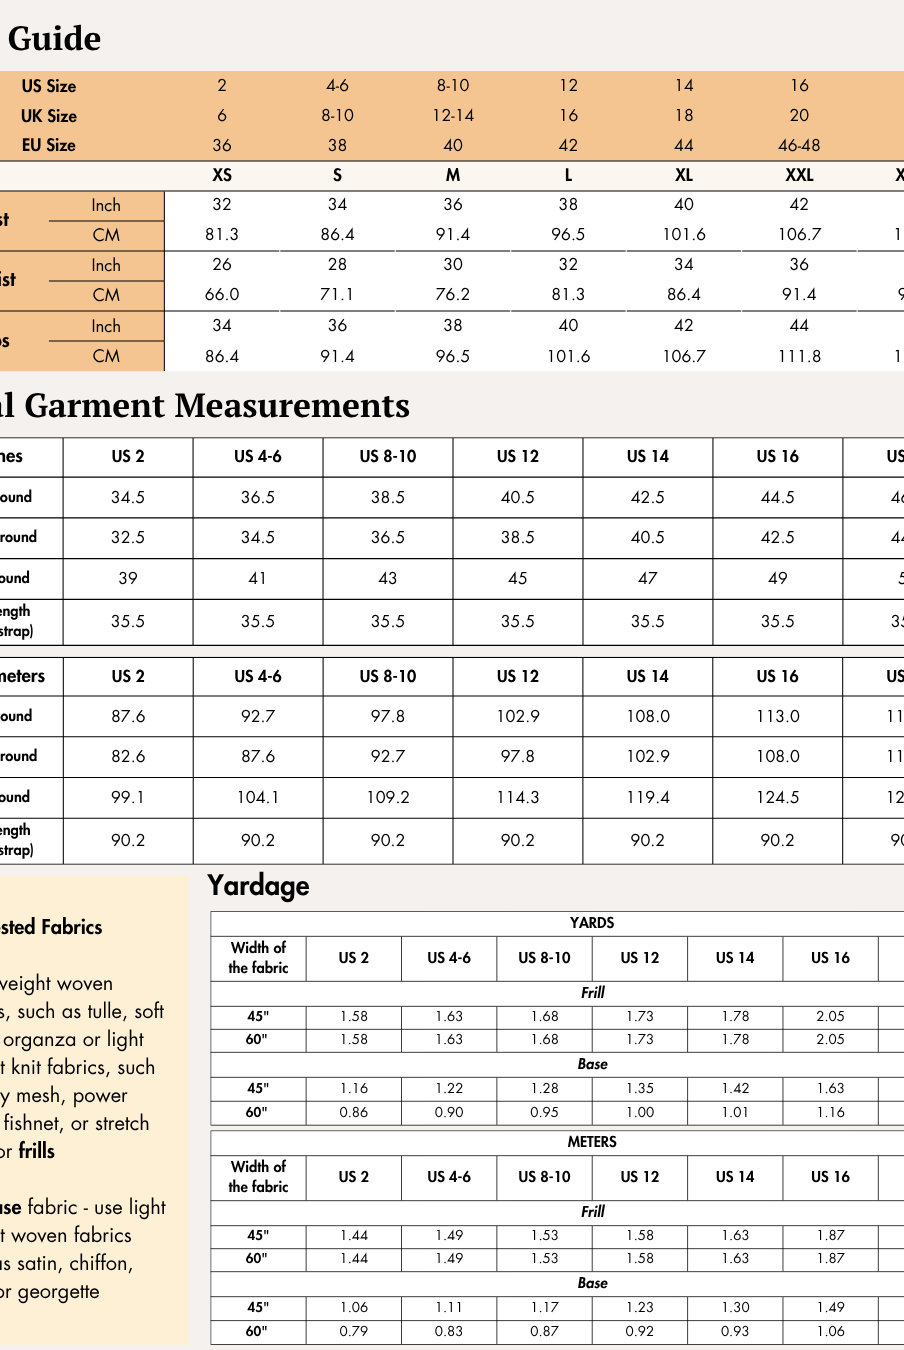
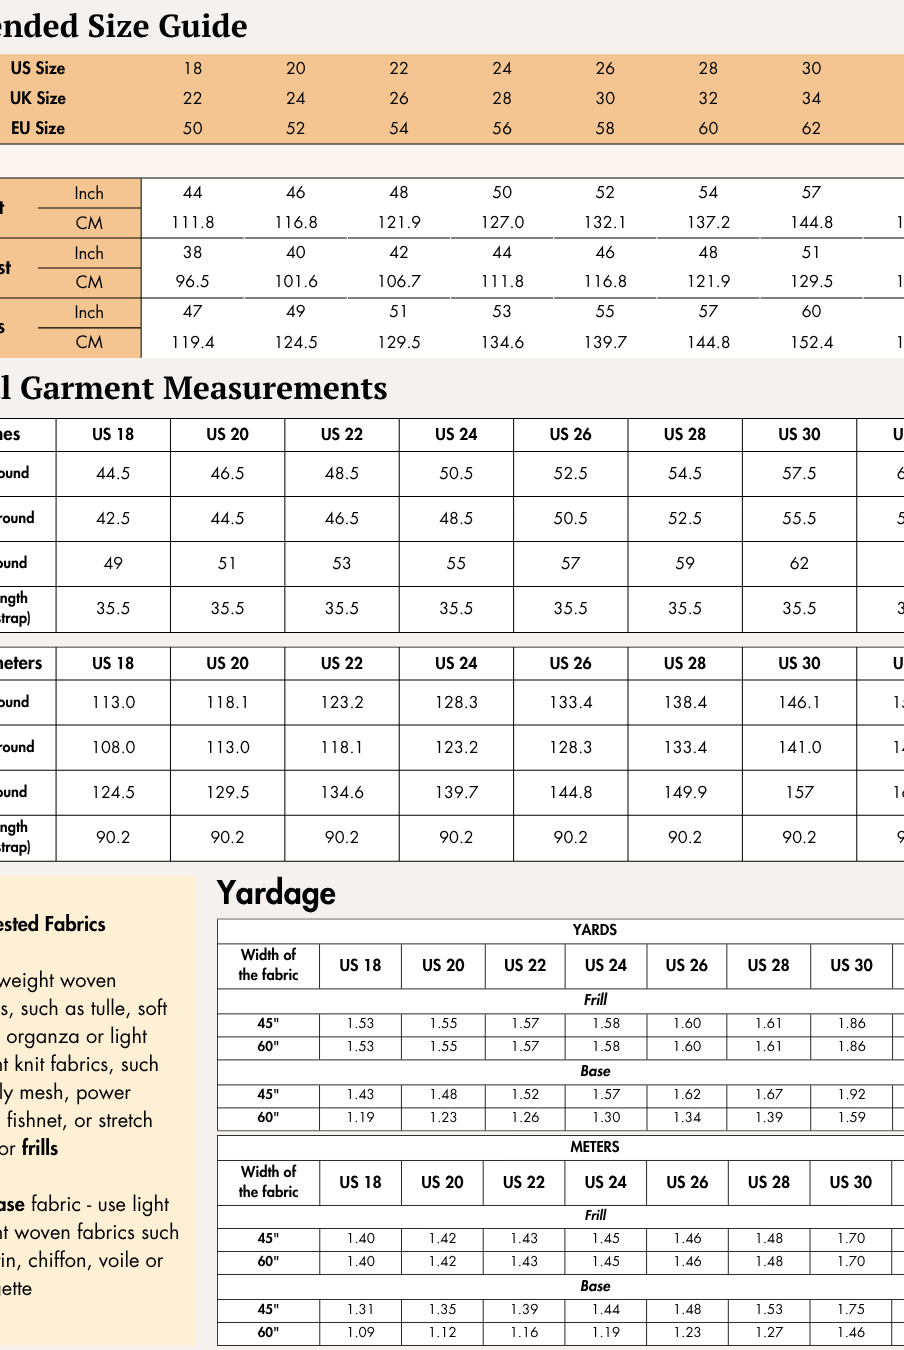
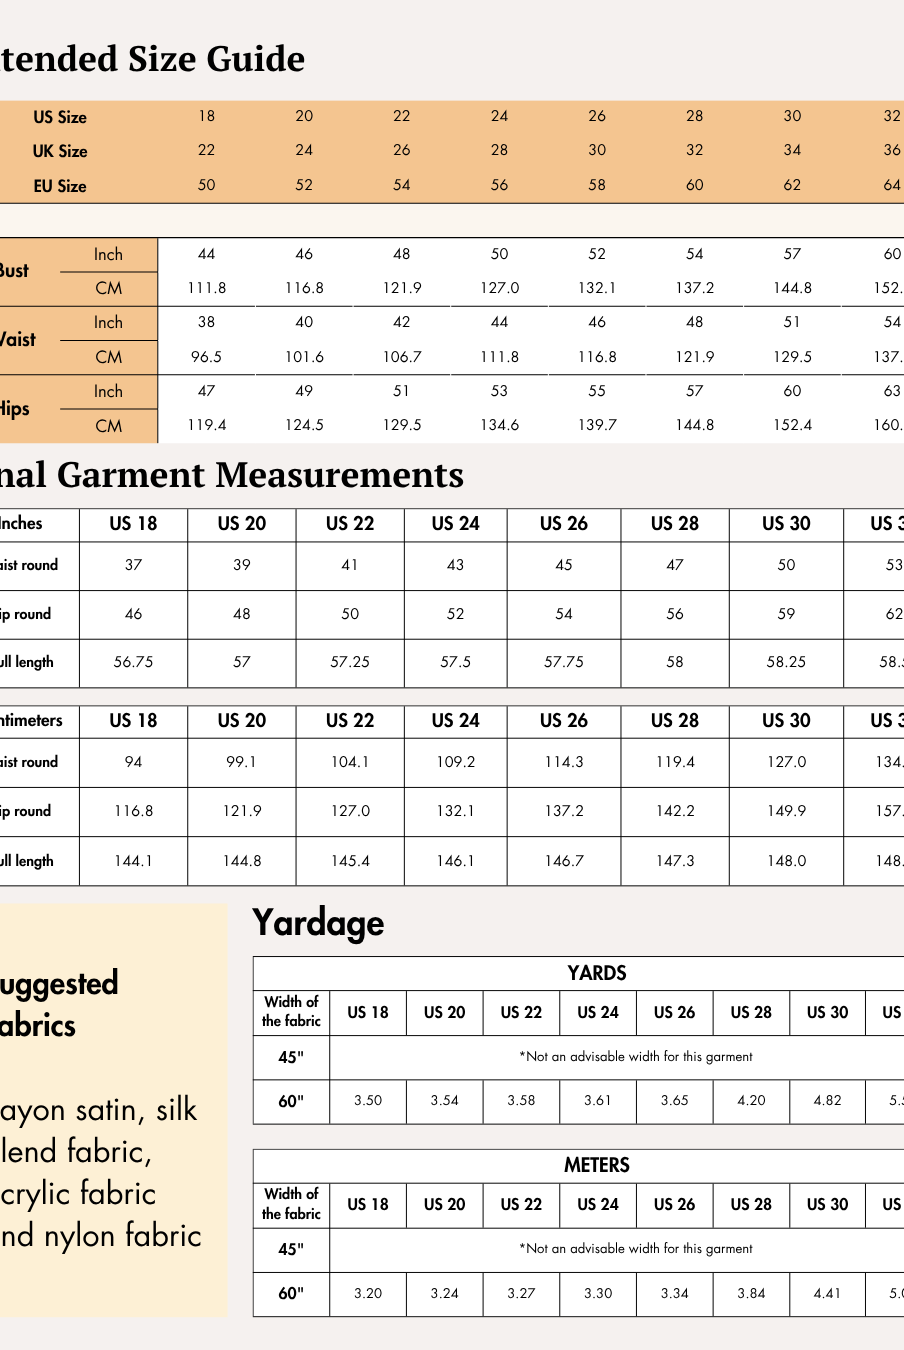
Size Charts
The Romy Jacket pattern is available for sizes US 02 - US 32 | UK 06 - UK 36 | EU 36 - EU 64. Check the Romy Jacket Size Chart and measure yourself to select the correct size (see the garment and body measurement tables).
Verify how much fabric you need by referencing the fabric yield table.
Printing Your Digital Sewing Pattern
Before cutting your fabric, print your digital pattern at 100% scale on the correct paper size (usually A0 or A4/US Letter). Once printed, trim and tape the pages together following the pattern guide. Now your pattern is ready to use!
If you want to learn more about how to Print Digital Sewing Patterns, click here.
Pattern Inventory: What Pieces to Prepare
For sewing the Romy Reversible Jacket, cut all of these pieces:
- Front - cut x2 fabric (A)
- Front - side cut x2 fabric (B)
- Center back - cut x1 fabric (C)
- Side back - cut x2 fabric (D)
- Upper sleeve - cut x2 fabric (E)
- Bottom sleeve - cut x2 fabric (F)
- Back pocket - cut x2 fabric (G)
- Front pocket - cut x2 fabric (H)

Note: The pattern inventory lists cut pieces for a single fabric. To make a reversible jacket, use the same number of pieces for each of the two fabrics.
Pattern Marking


-
Lay out all pattern pieces as shown in the guide’s cutting diagram. Line up grainline arrows perfectly with the fabric selvage.
-
Transfer all markings: Notches, fold lines, center marks, pocket placement, circles, and any darts to the wrong side of the fabric using chalk, fabric pen, or tailor’s tacks.
-
Cut notches in each spot—these ensure perfect alignment during construction.
-
Mark the center front on all pieces cut on the fold to help with precise assembly.
Cutting Layout
-
Reference the correct layout diagram in the Romy Sewing Guide for your chosen size and fabric width (45” or 60”).


-
Directional prints or naps require extra fabric so you can place each piece in the correct direction.
-
Pin or use pattern weights to keep pieces from shifting while cutting.
-
Cut all pieces with precision and transfer any additional pattern markings needed.
Fabric Cutting and Preparation
-
Cut out all pieces using fabric shears or a rotary cutter for best accuracy.
-
Cut all notches as marked on the pattern edges.
-
Verify that you have the full set of pieces in both fabrics before moving on.
Seam allowance: Use a 1cm (3/8”) seam on all seams, except at the hemlines, front panel, front pocket top and back pocket top—these have no allowance.
Step-by-Step Sewing Instructions

The entire garment will be sewn together using binding. Cut bias strips for each seam length from both fabrics, adding 2 cm to each strip as a safety margin. There are two binding options:
- Attach Binding Strip Without a Binding Presser: Refer to Step 1 for an example of this method.
- Attach Binding Strip With a Binding Presser: Refer to Step 3 for an example of this method.
Note: Either binding option can be used to sew the entire garment together. If you want your finished bias edge to be 1 cm wide, cut a 3 cm wide strip (on the fold). If you're comfortable sewing a 0.5 cm seam, cut the fabric 2.5 cm wide (on the fold).
It is recommended to test on sample pieces to determine your desired binding width.

1. To prepare the pocket pieces:
1a. Place the bias strip of the second fabric on the top seam of the back pocket piece (first fabric), with their right sides facing each other. Sew along the back pocket seam, 1 cm away from the edge (the bias strip width is 6 cm).
1b. Fold 1 cm of the unsewn edge of the bias strip towards the wrong side. Iron to crease..
1c. Turn the bias strip from the sewn seamline to the wrong side of the pocket piece.
1d. Adjust the bias strip neatly on the wrong side, iron it and sew along its edge to secure and finish it.
1e. Repeat steps 1a-1d for the other back and front pocket pieces.

2. To attach the prepared pocket pieces:
2a. Place the wrong side of the prepared back pocket on the right side of the side back piece. Align the pocket back side notches.
2b. Sew along the sides of the pocket using a lock stitch.
2c. Repeat the step 2a - 2b for the other side back piece and prepared back pocket piece, and all front side pieces and the prepared front pocket pieces.

3. To prepare front piece and back piece:
3a. Place the prepared back side pieces on the center back piece with their wrong sides together. Match the center back panel notches together.
3b. Insert the binding strip into the binder. Stitch about 1 inch to secure the binding, then insert both center back panel seam into the binder. Start sewing along the top of the center back panel, from one end to the other. Cut the excess strip.
3c. Bind both back side pieces to the center back piece.
3d. Press the bound seam towards centre back with an iron to set the prepared back piece.
3e. Repeat the 3a -3d steps for the front and front side pieces. Create two prepared front pieces.


4. To prepare the sleeve:
4a. Place the bottom sleeve and upper sleeve together with their wrong sides facing. Match the sleeve panel notches together. Bind the sleeve panel along the seam.
4b. Iron the bound seam.

5. To attach the collar seam:
5a. Place the prepared front pieces with their wrong sides together. Align the collar seams.
5b. Bind the center collar to secure it.

6. To attach the shoulder seam:
6a. Place the prepared front and back pieces together with their right sides facing.
6b. Bind the shoulder seam and neckline using a single binding strip.

7. To attach the armholes:
7a. Spread open the shoulder seam of the jacket. Place the sleeve and jacket armhole with their wrong sides together. Align the armhole edges and bind them to secure.
7b. Repeat the same process for attaching the other sleeve to the other side of the jacket.


8. To attach the side seam:
Align the side seams of the jacket and bind them in one continuous stitch from the sleeve hem to the bottom hem at the both sides of the jacket.

9. For the second fabric pieces:
Repeat steps 1 to 8 for the second fabric pieces, using binding strips from the first fabric.

10. To attach both prepared jacket panels:
Insert the second fabric jacket into the first fabric jacket. Align the sleeve hems, front panel seams, and bottom hem. Bind the bottom hem and front open panel seams of both fabrics together in a single process. Then, bind both sleeve hems of both fabrics to secure them.

Note: If you’re not making the jacket reversible, you can simply bind the hemline and sleeve hems with a binding strip for a clean and polished finish.
Pressing & Final Touches
-
Press all binding and seams for a crisp, professional appearance.
-
Add snaps, buttons, or other closures to suit your style.
-
Show off your custom-made, truly reversible jacket.
Winslet’s Sewing Guide for Romy Jacket includes clear diagrams that walk you through each step, making it easy to follow and complete your project with confidence.
For an overview of Winslet’s Sewing Guides, click here.
Ready to Sew Your Own Reversible Jacket?
For the easiest route to success, consider using the Winslet’s Romy Reversible Jacket Sewing Pattern. It’s meticulously designed for professional results, with detailed support every step of the way.

Purchase your Romy Reversible Jacket Pattern today and enjoy creating a jacket you’ll wear with pride—two looks in one!
Join the Community & Get Support
Show your creation on Instagram or Facebook with #MadeWithWinslets for a chance to be featured! For any questions or issues, email the Winslet’s support team at support@winslets.com.