Looking to sew a comfy yet stylish long sleeve tee with a little something extra? A Henley-style t-shirt might be just what your wardrobe needs. With its classic buttoned placket, fitted sleeves, and round neckline, it’s the perfect blend of casual and polished—ideal for layering or lounging.
In this tutorial, I’ll walk you through how to sew your own Henley-style long sleeve top and show you why the Riley Long Sleeve Henley Pattern by Winslet’s is the perfect starting point for this stylish staple.
 Get the pattern
Why You'll Love a Henley Top
-
Timeless design with a round neck and front placket
-
Comfortable fit with stretch fabric
-
Perfect for layering under overalls, cardigans, or jackets
-
Intermediate skill booster (hello, placket!)
Minimal pieces and no zipper—a stress-free make!
Step 1: Choose the Right Fabric to sew a Henley
A henley is best designed for light to medium weight knit fabrics with good stretch and recovery. Ideal options include:
-
Rib knits (1x1, 2x2)
-
Cotton spandex jersey
-
Viscose blend knits
The Riley Henley uses 2x2 rib viscose, which is soft, breathable, and drapes beautifully.
Step 2: Use a Well-Drafted Pattern

The Riley Long Sleeve Henley Pattern by Winslet’s includes:
-
Long sleeves
-
Round neckline
-
Two-piece placket with optional buttons
-
A0, A4, US Letter, and projector-friendly formats
-
Clear, illustrated instructions for every step
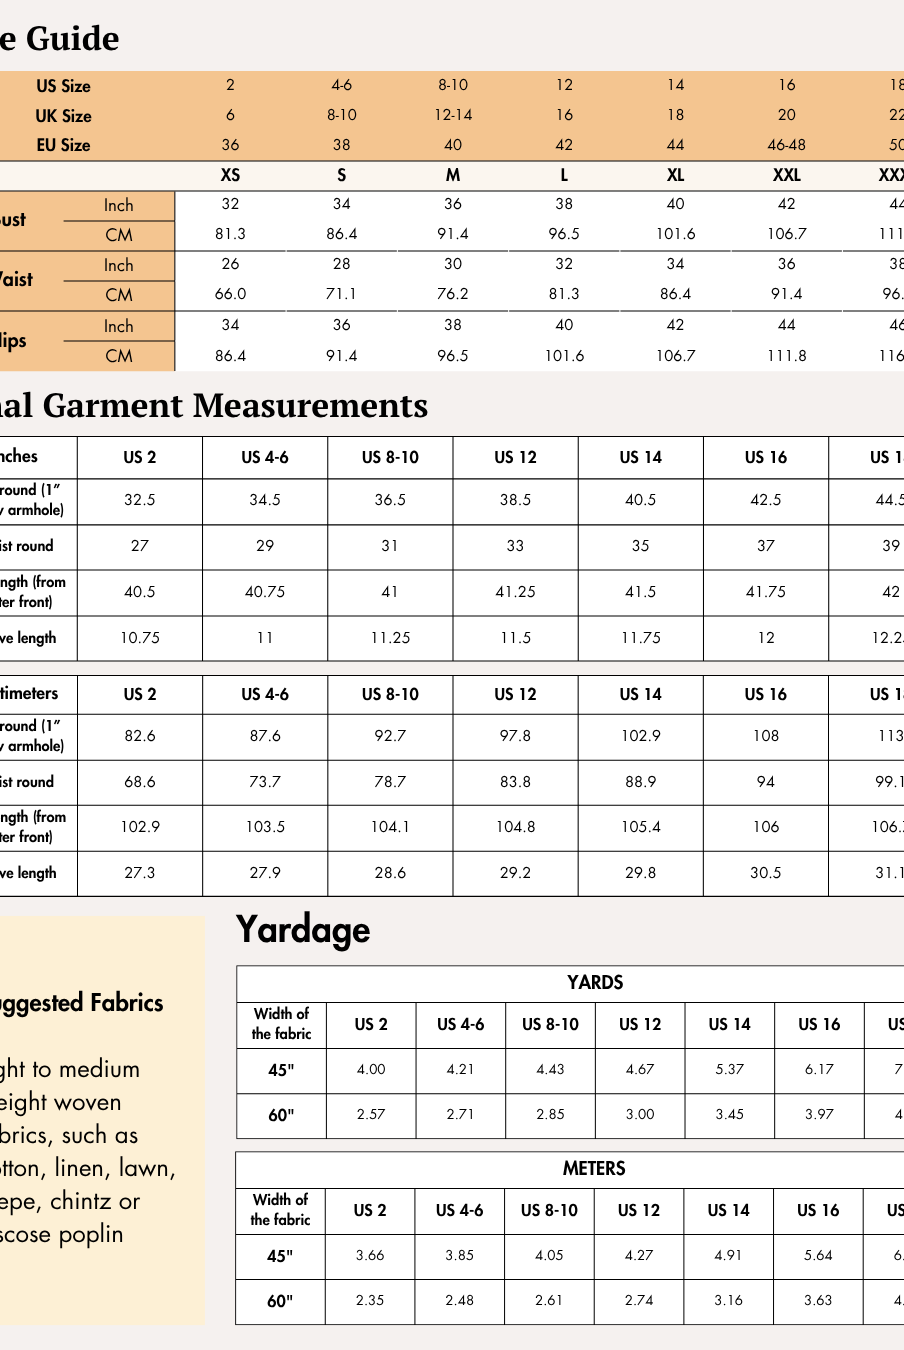
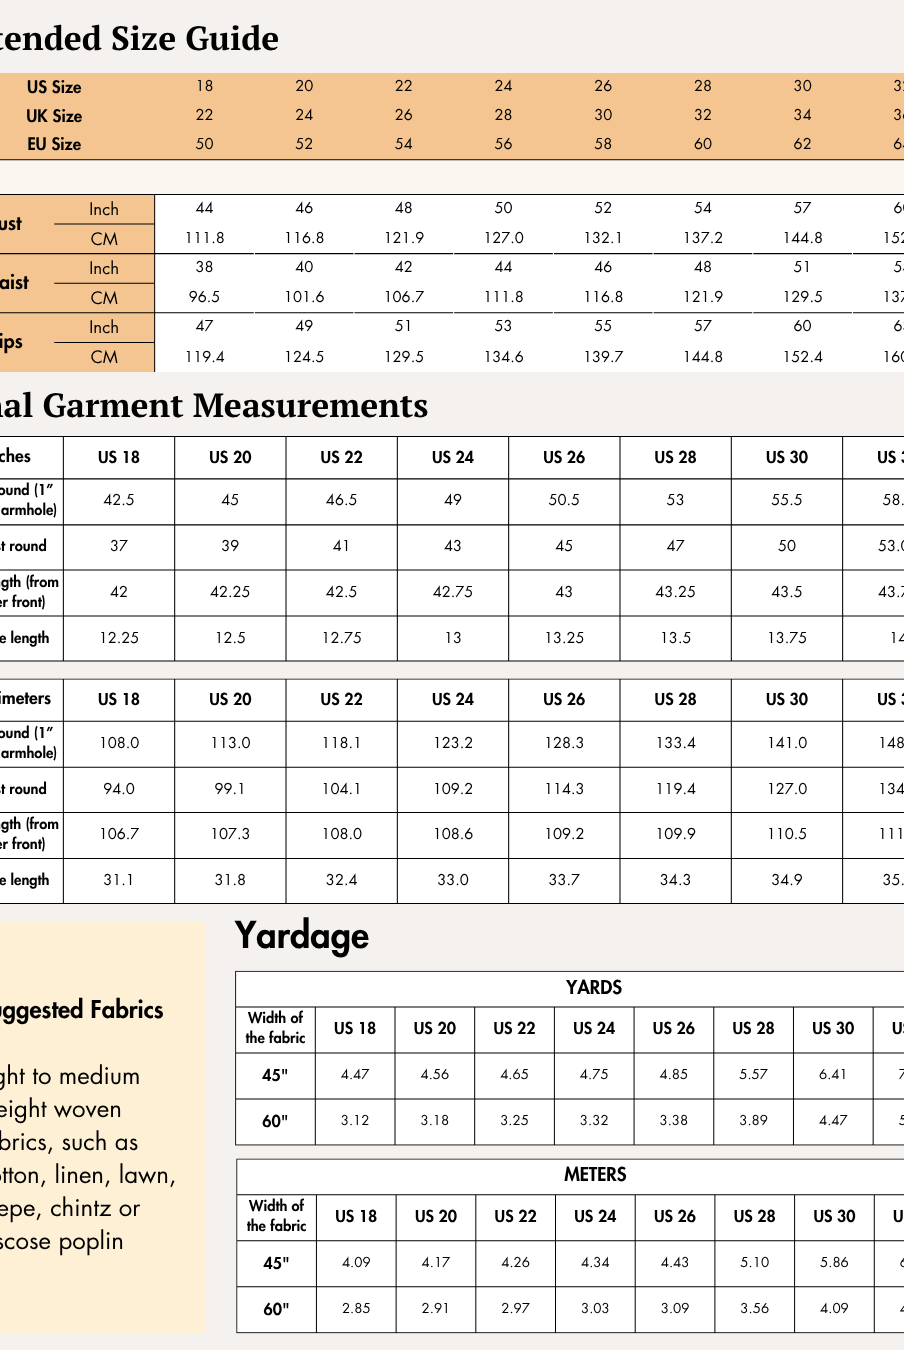
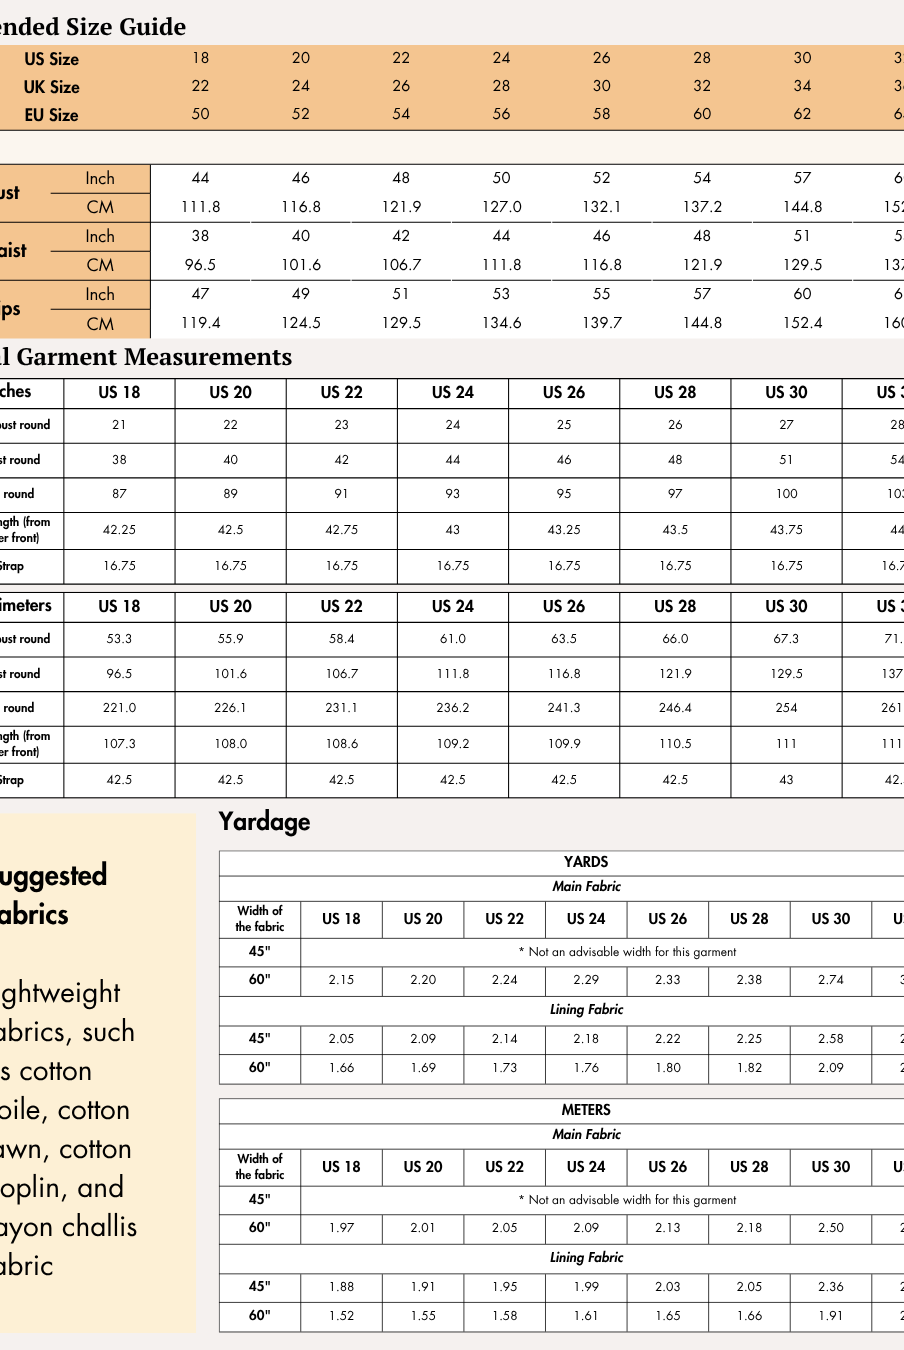
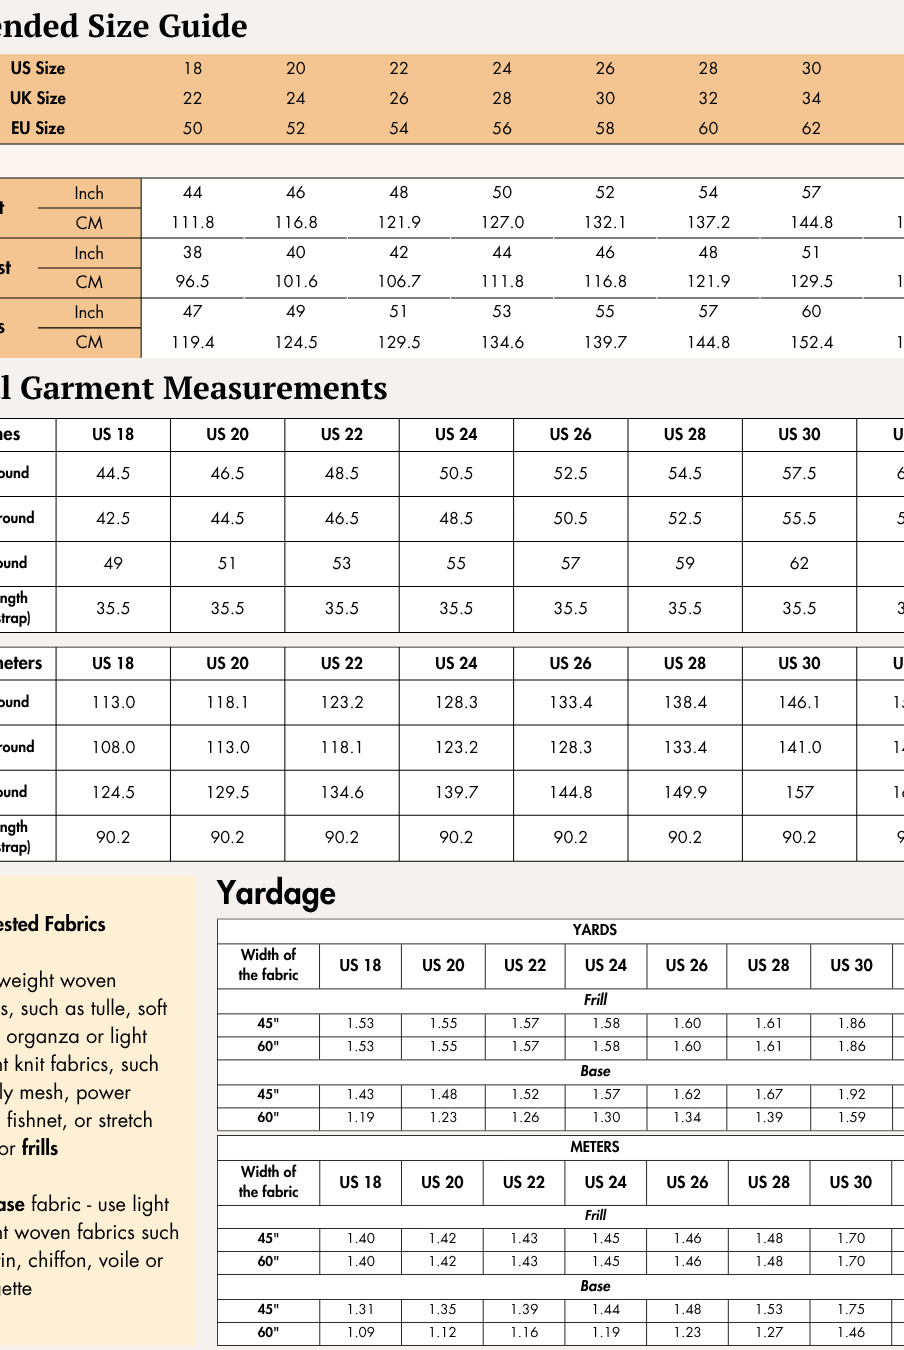
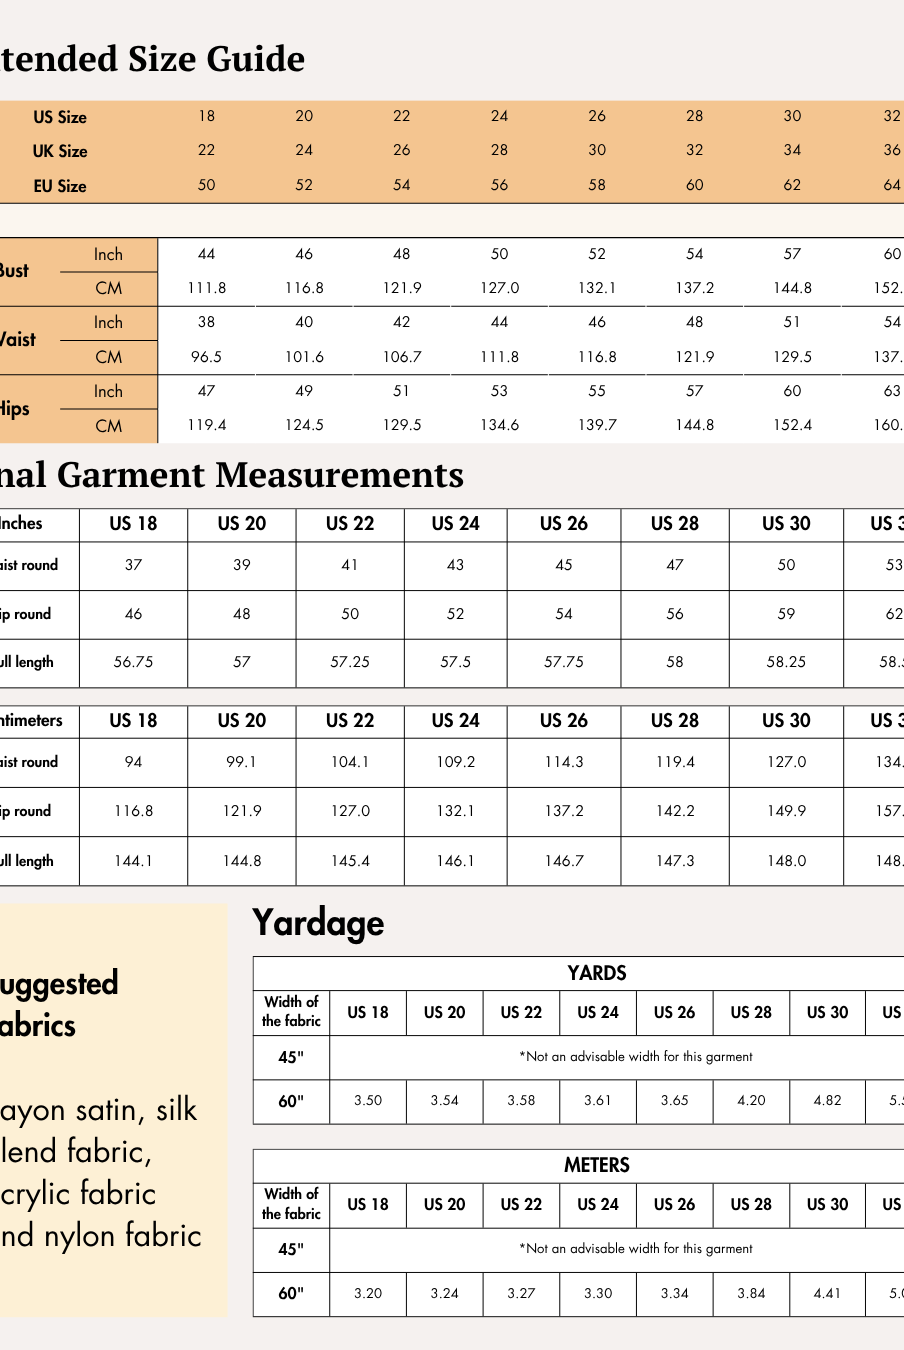
The Riley henley pattern is available for sizes US 02 - US 32 | UK 06 - UK 36 | EU 36 - EU 64. Check the Riley Henley Size Chart and measure yourself to select the correct size (see the garment and body measurement tables).
Verify how much fabric you need by referencing the fabric yield table.
Step 3: Printing Your Digital Sewing Pattern
Before cutting your fabric, print your digital pattern at 100% scale on the correct paper size (usually A0 or A4/US Letter). Once printed, trim and tape the pages together following the pattern guide. Now your pattern is ready to use!
If you want to learn more about how to Print Digital Sewing Patterns, click here.
Step 4: Pattern Inventory: What Pieces to Prepare
For sewing the Riley Henley, cut all of these pieces:
A. Front - cut x1 fabric
B. Back - cut x1 fabric
C. Sleeve - cut x2 fabric
D. Placket - cut x2 fabric

Step 5: Pattern Marking

-
Lay out all pattern pieces as shown in the guide’s cutting diagram. Line up grainline arrows perfectly with the fabric selvage.
-
Transfer all markings: Notches, fold lines, center marks, pocket placement, circles, and any darts to the wrong side of the fabric using chalk, fabric pen, or tailor’s tacks.
-
Cut notches in each spot—these ensure perfect alignment during construction.
-
Mark the center front on all pieces cut on the fold to help with precise assembly.
Step 6: Cutting Layout
-
Reference the correct layout diagram in the Riley Sewing Guide for your chosen size and fabric width (45” or 60”).


-
Directional prints or naps require extra fabric so you can place each piece in the correct direction.
-
Pin or use pattern weights to keep pieces from shifting while cutting.
-
Cut all pieces with precision and transfer any additional pattern markings needed.
Step 7: Fabric Cutting and Preparation
-
Cut out all pieces using fabric shears or a rotary cutter for best accuracy.
-
Cut all notches as marked on the pattern edges.
-
Verify that you have the full set of pieces in both fabrics before moving on.
Seam allowance: Follow the seam allowances as indicated on the pattern file layers. These are provided specifically for each piece to ensure accurate construction. This pattern uses a 0.76 cm (0.3 inch) seam allowance all around and a 2 cm (0.75 inch) at the hem.
Step 8: Step by Step Instructions to Sew a Henley Top

1. For attaching one shoulder seam:
Place the front and back pieces, facing right sides together (fig.1a). Align one of the side
shoulder seams. Overlock them together along the seamline to achieve figure 1.

2. For finishing the neckline:
Cut the neckline strap: Cut a 3.25 cm or 1.5 inches wide strip on bias (at a 45-degree
grainline), with its length equivalent to the neckline of the pattern. Fold it into three equal parts along its length to create creases, then open it flat. These creases will serve as stitching guidelines
2a. Lay the top flat, spreading it open from the shoulder seamline to reveal the neckline. Place the neckline strap along the neckline of the top, such that the right sides of the fabric are facing together and pin the pieces in place.

2b. Turn the strap to the wrong side of the top and press the neckline seamline flat. Fold the raw edge of the strap inward towards the neckline, iron it, and pin it in place.

2c. Sew the strap in place to close the neckline binding. To finish the binding, sew along the open edge of the strap, stitching close to the edge for a neat finish.

3. Stitch the other shoulder seam of the top together with an overlock machine.

4. Place the sleeve on the prepared front and back armhole (fig.4a). Align both pieces’s armhole together. Pin the armhole evenly.

Sew the armhole with an overlock stitch (fig.4b).
Repeat the same process for the other sleeve to achieve figure 4.

5. Turn the top with the wrong side out. Align the side seam together. Sew from the sleeve hem to the top hem, along the side seam with an overlock machine.

6. Fold the hem of the top and the sleeves to the wrong side of the fabric and iron them. Flatlock the hem on the right side such that the neat double stitch line is on the front.

7. For preparing the plackets:
7a. Cut a piece of fusible interfacing using the placket pattern, but without the seam allowances. Place it on the wrong side of the placket with the adhesive side facing down and fuse it using an iron.
7b. Fold the placket in half lengthwise with the right sides facing each other.
7c. Sew along the top (width) edge of the placket.
7d. Turn the placket right side out. Repeat the same process for the other placket piece.

8. For attaching the plackets:
8a. Mark a trim line in the middle of the placket, creating an inverted V-shape that touches the corners of the bottom placket. Use chalk for accuracy.

8b. Place the open edge sides of the prepared placket on the long side of the placket seamline.
8c. Sew them together. Repeat the same process for the other prepared placket.

8d. Then, snip the marked placket trim line.
8e. Turn both prepared plackets to the wrong side from the seamline and press them flat. Sew along the edge to secure them in place (understitch).
8f. Adjust the right-side placket on top of the left placket, aligning it with the bottom of the placket. Pin them in place, then sew a rectangular box stitch at the bottom to secure the plackets in position.

9. Use a button presser foot and create a buttonhole using zig-zag stitches at the provided marking. Then, sew all the buttons on the left side at the designated markings.

Winslet’s Sewing Guide for Riley Henley includes clear diagrams that walk you through each step, making it easy to follow and complete your project with confidence.
For an overview of Winslet’s Sewing Guides, click here.
Why You Should use the Riley Long Sleeve Henley Pattern

✅ Beginner-friendly with room to learn new techniques
✅ Stretchy and comfortable fit
✅ Optional buttoned placket for added detail
✅ Designed to work with knit fabrics you probably already love
✅ Quick to sew, easy to wear
👉 Download the Riley Long Sleeve Henley Pattern here and stitch your way to a fresh handmade favorite.
Show Off Your Make!
Show your creation on Instagram or Facebook with #MadeWithWinslets for a chance to be featured! For any questions or issues, email the Winslet’s support team at support@winslets.com.