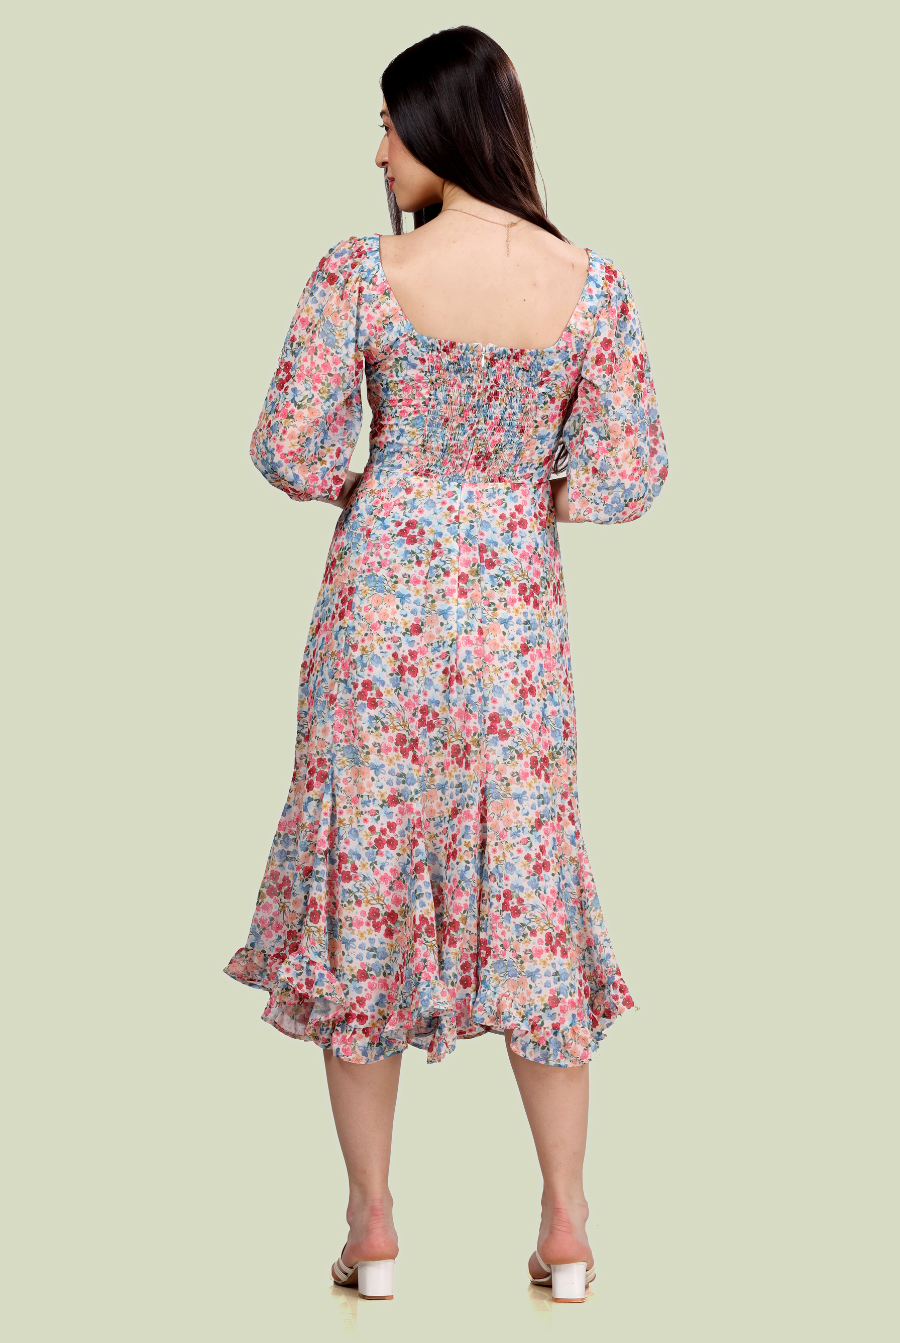
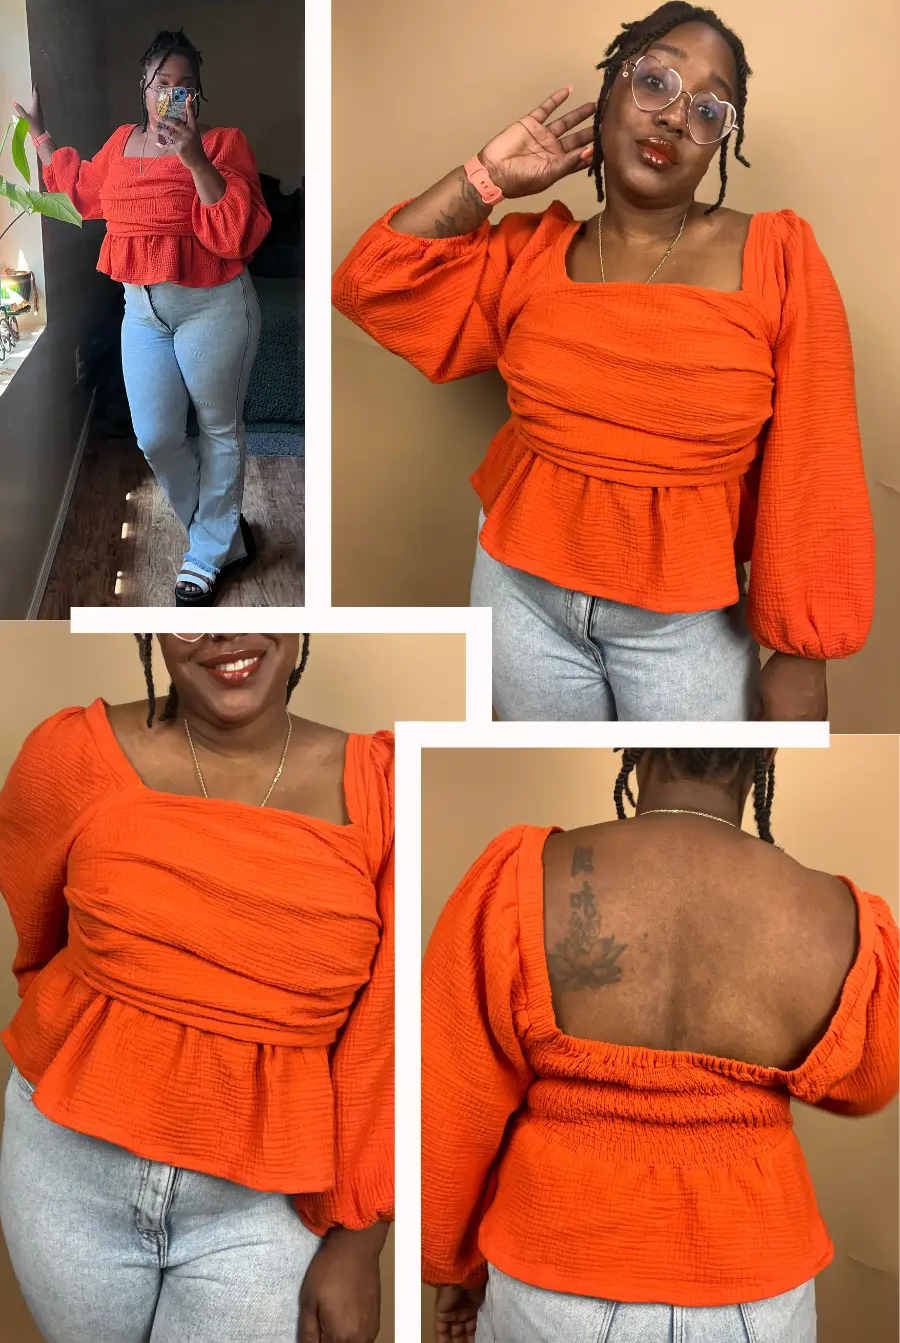
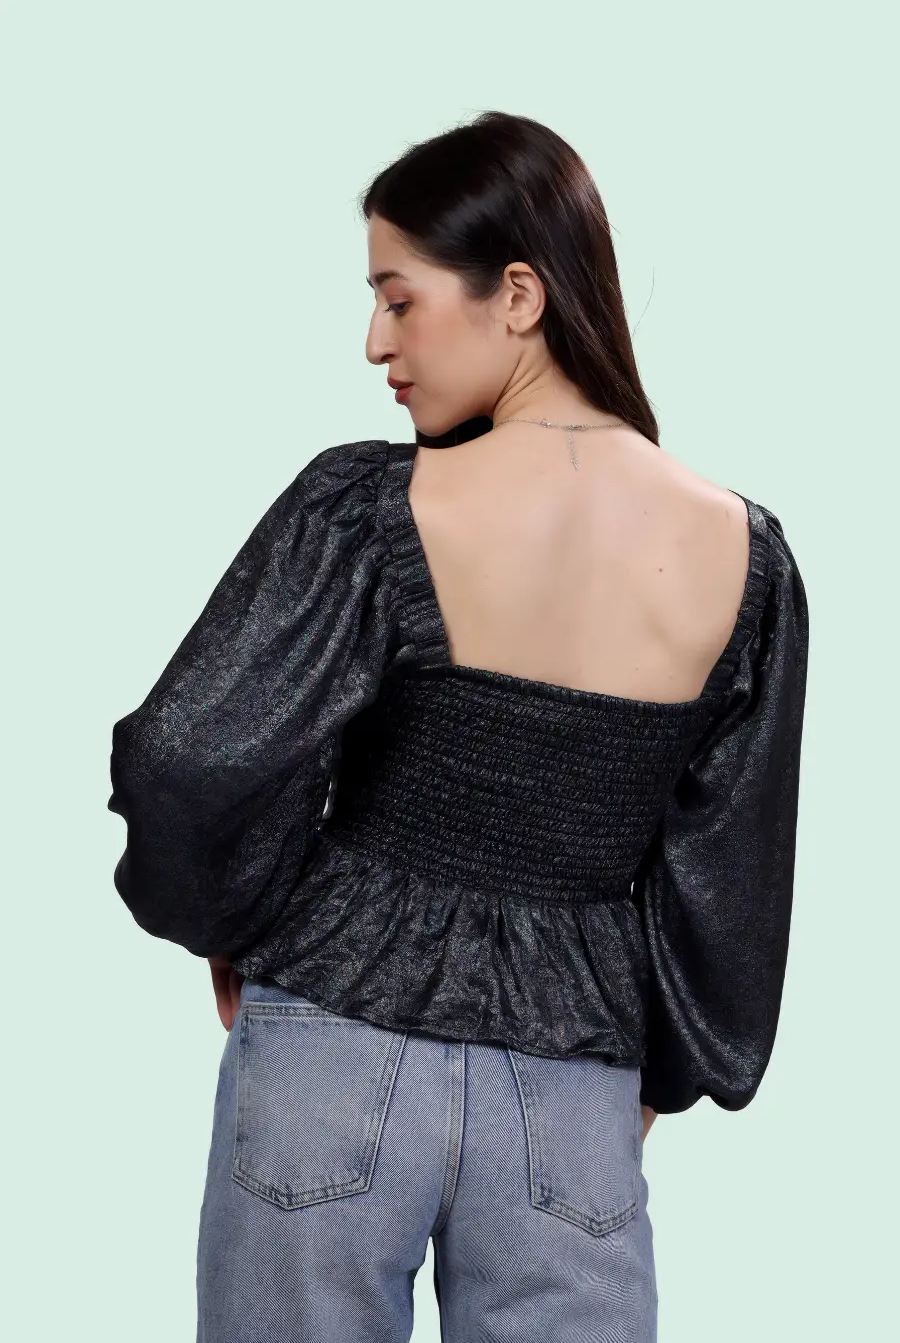
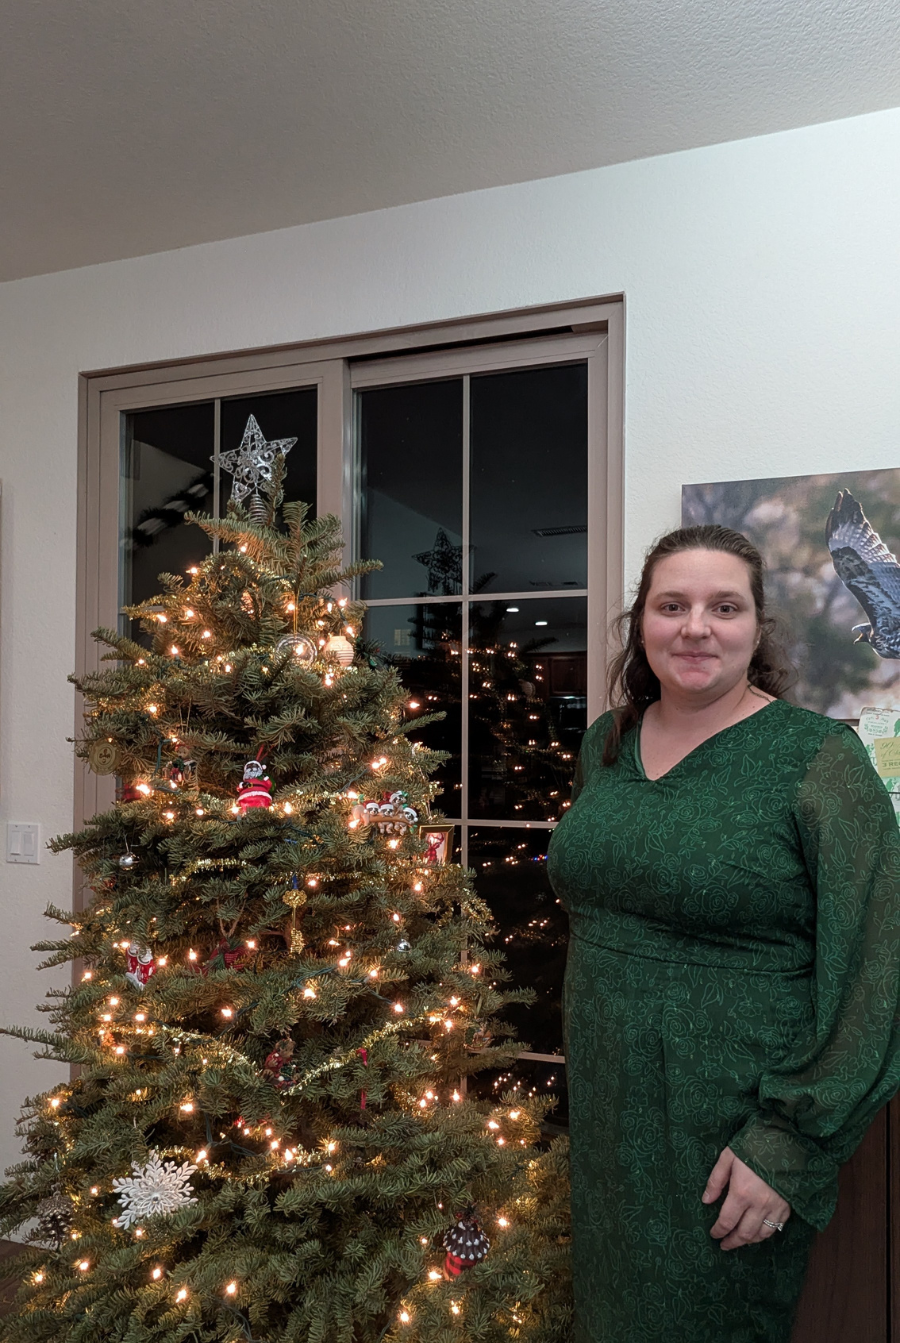
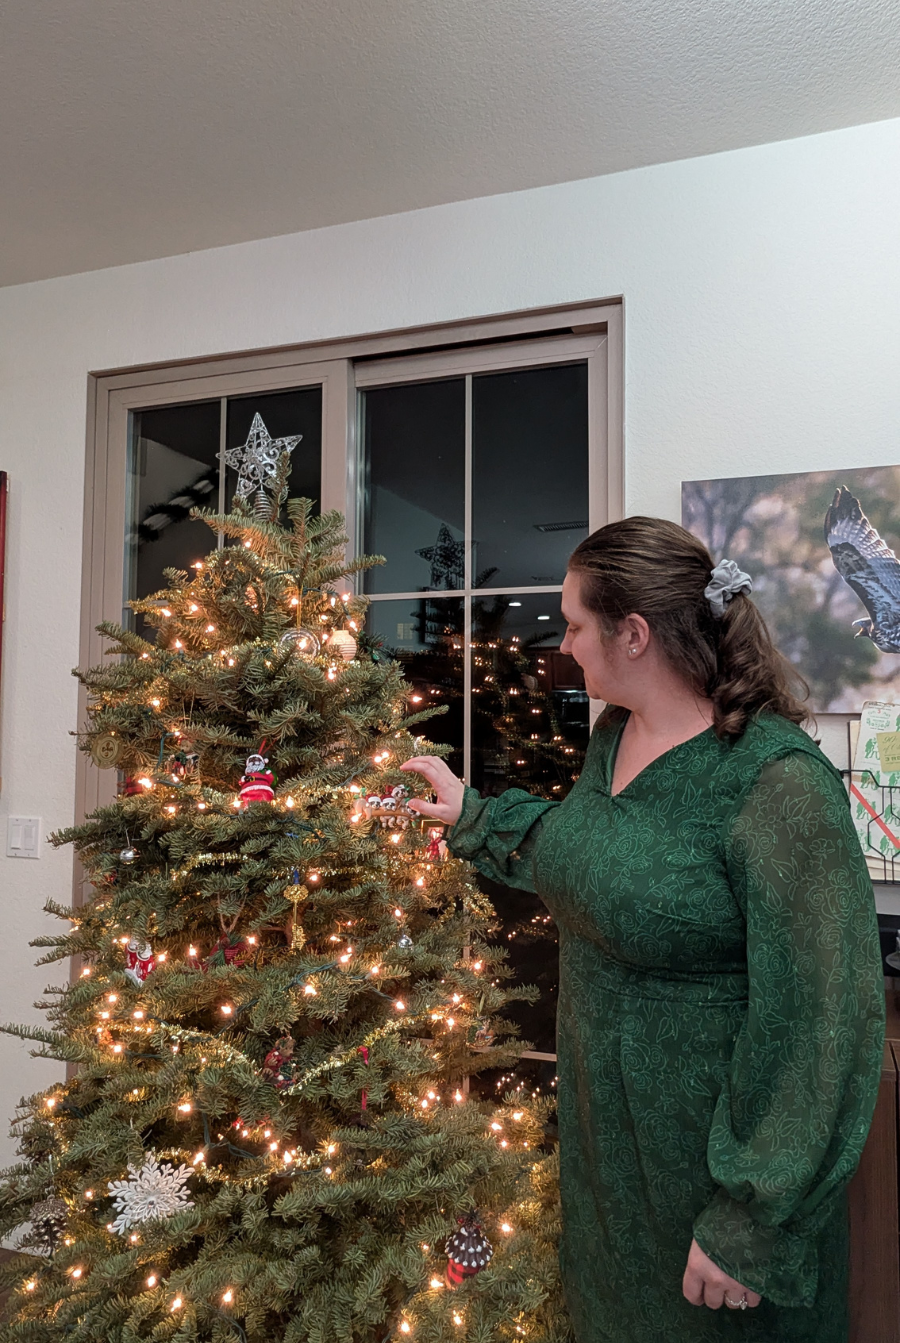
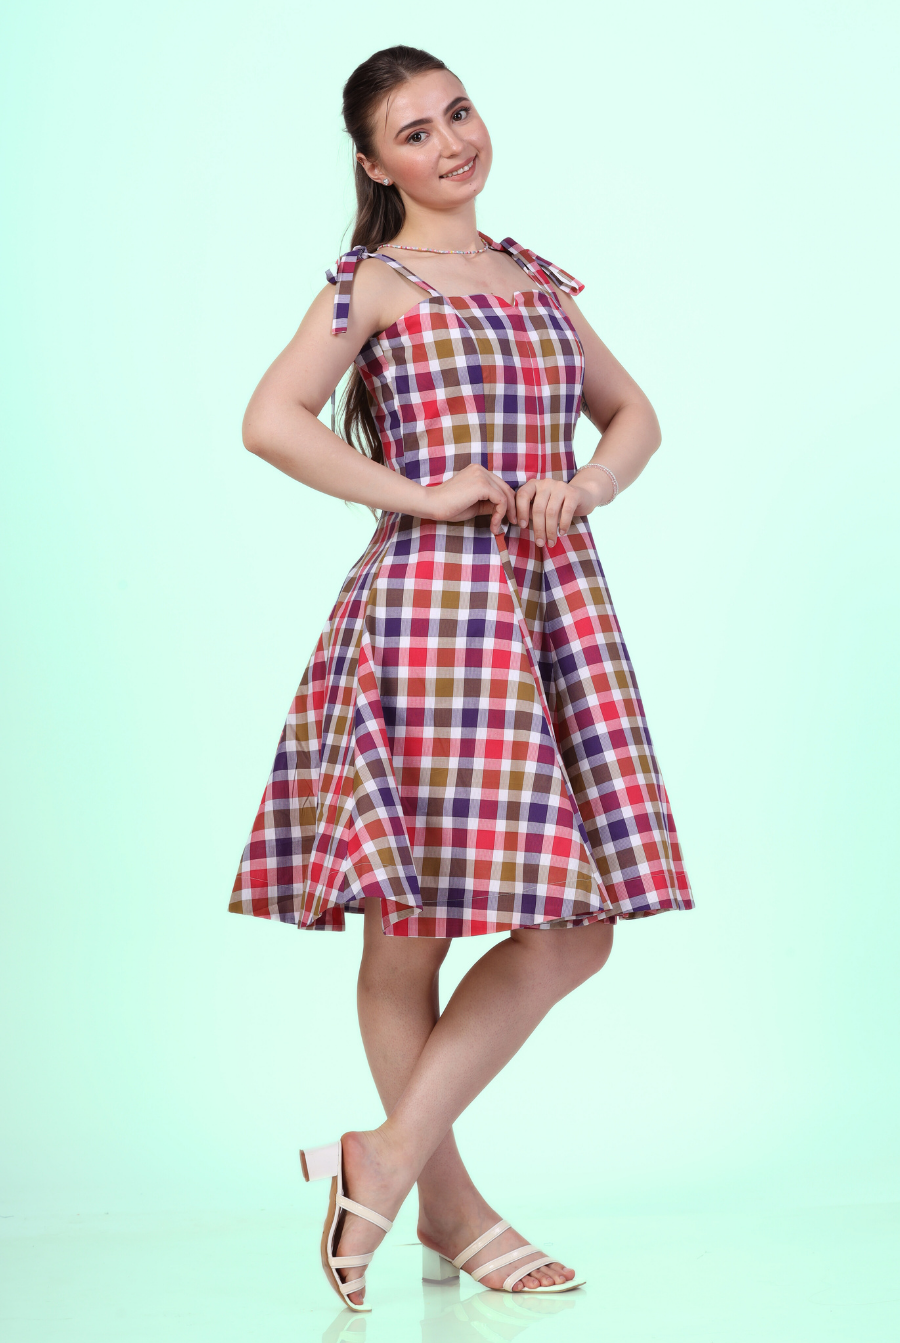
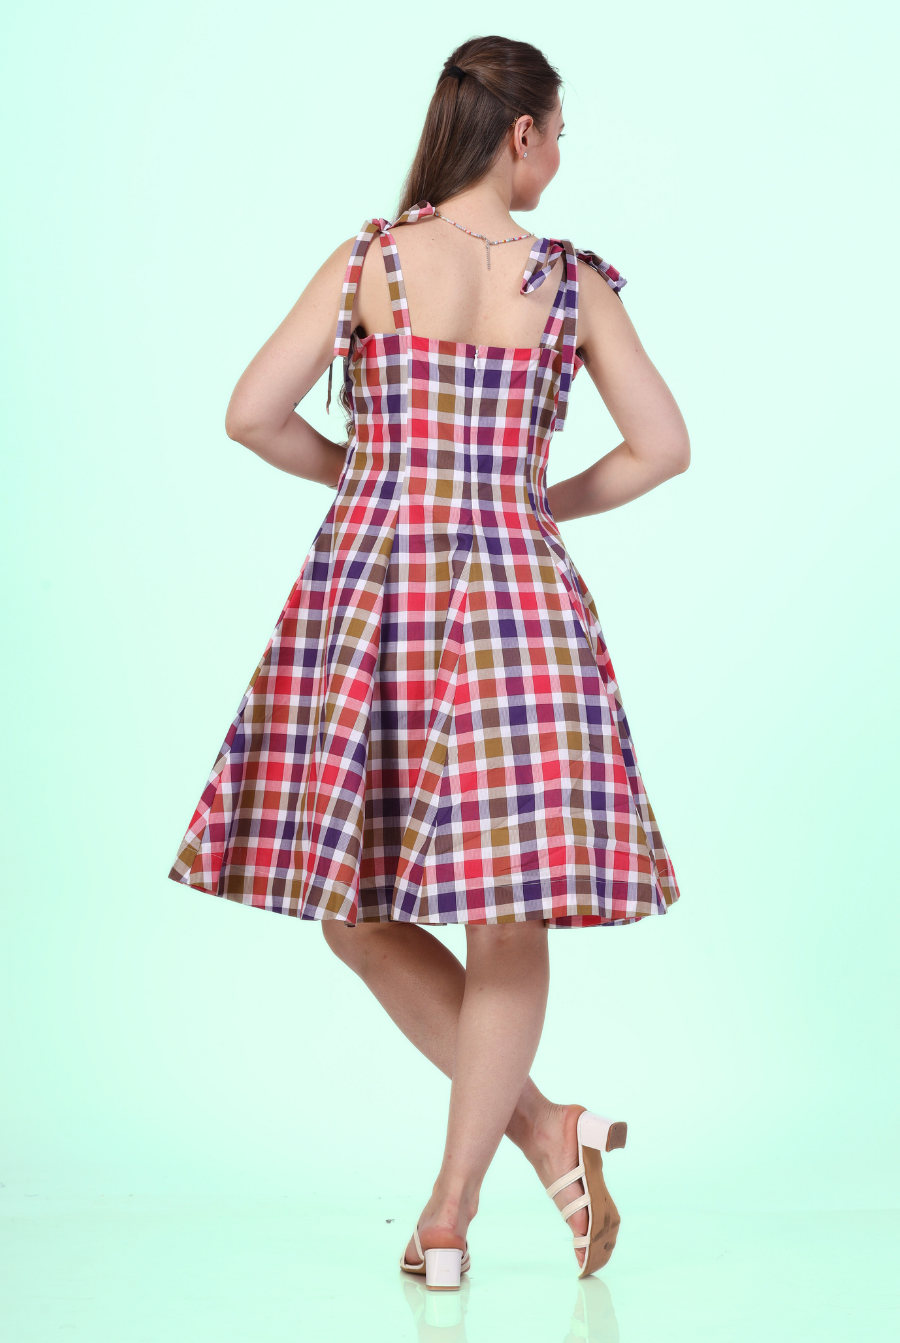
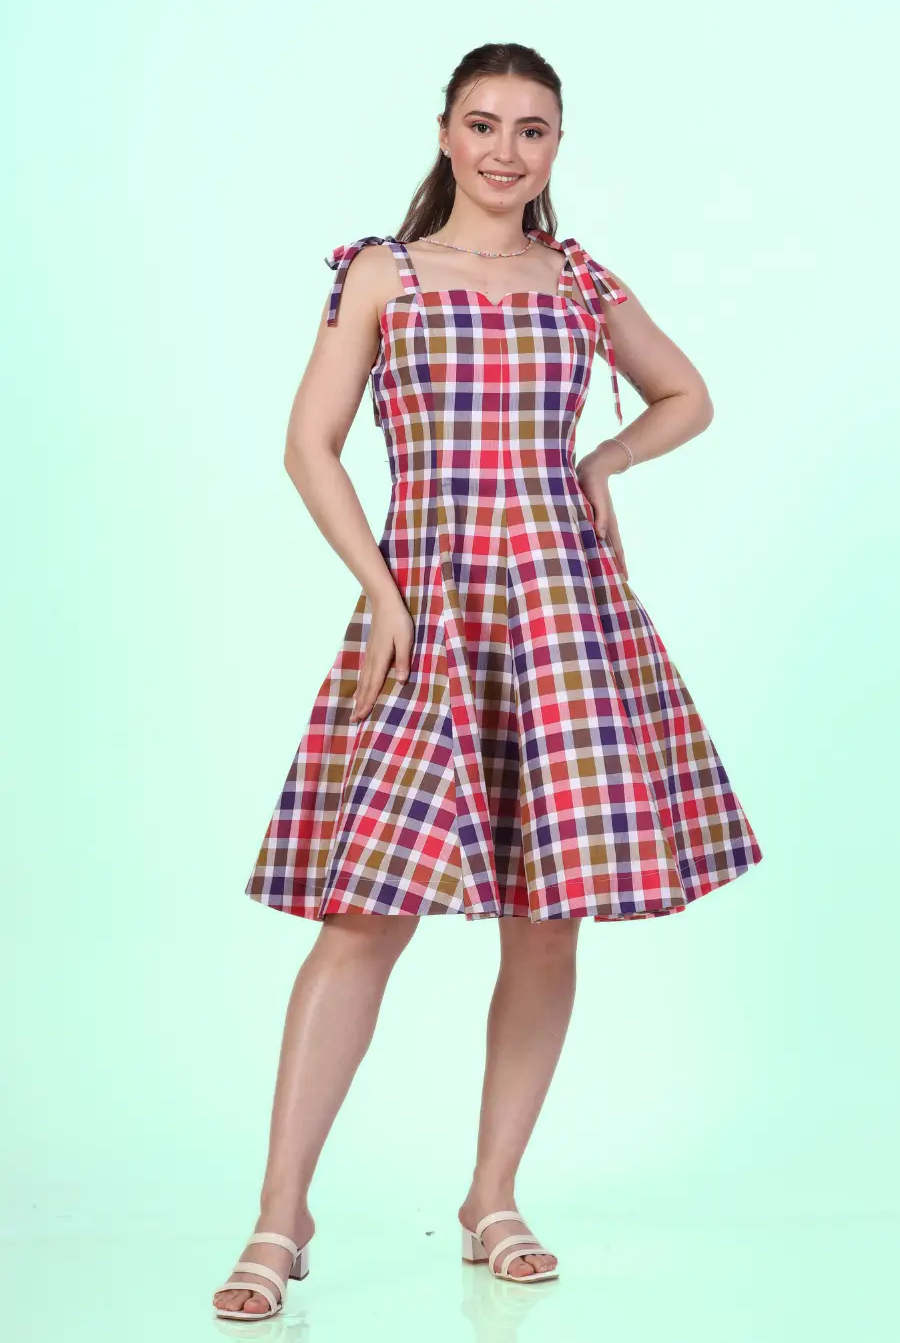
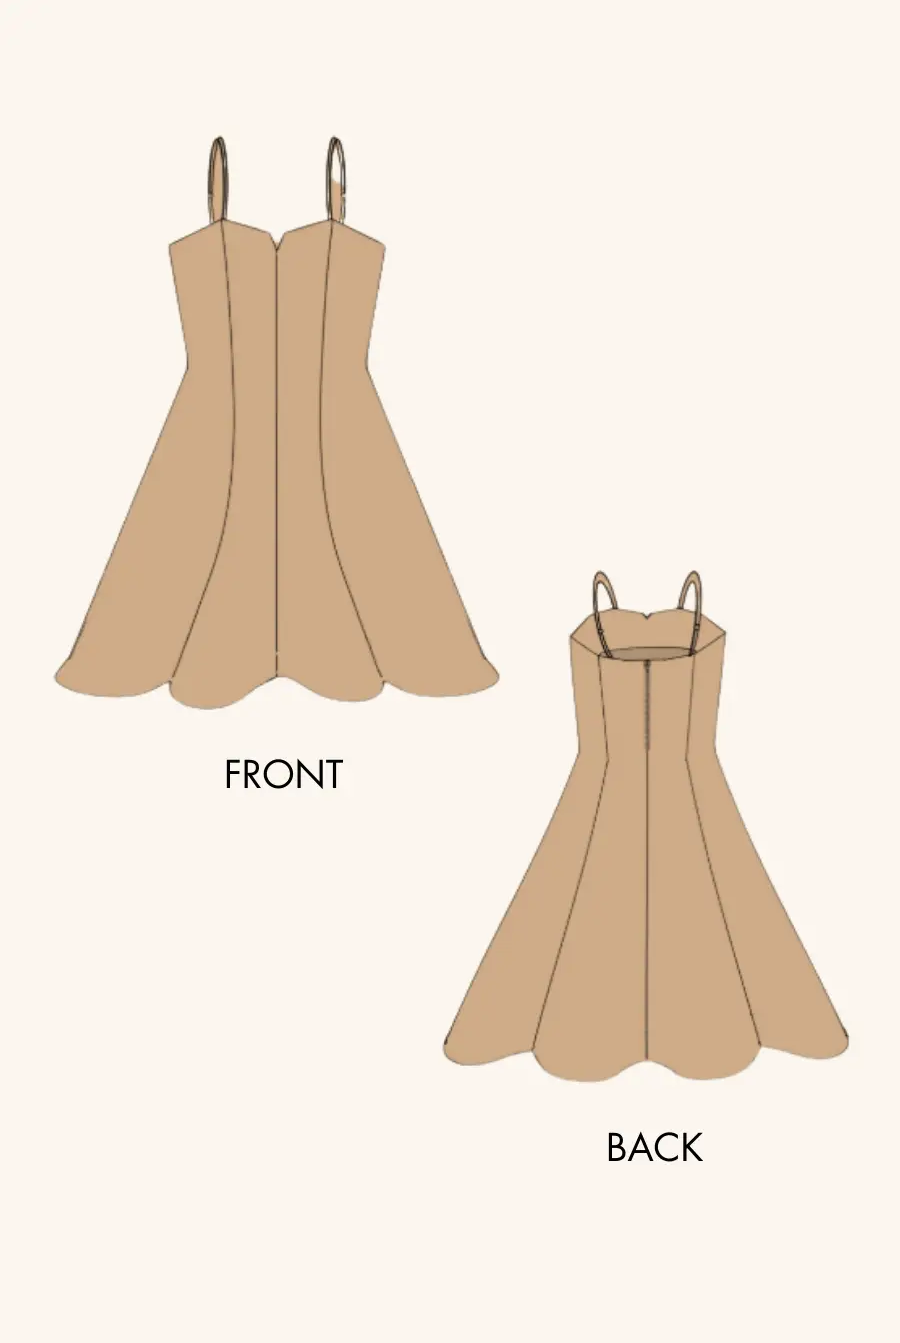
From cottagecore vibes to modern elegance, the milkmaid dress is a timeless favorite that’s flattering, feminine, and fun to sew. With its puff sleeves, smocked back, and gathered skirt, the milkmaid silhouette blends old-world charm with everyday wearability—and if you’ve ever wanted to make one yourself, this is your sign.
In this post, I’ll walk you through how to sew your very own milkmaid-style dress. Whether you're upgrading your summer wardrobe or trying your hand at smocking and gathered panels, this project is a satisfying step up for confident beginners and intermediate sewists.
What Is a Milkmaid Dress?
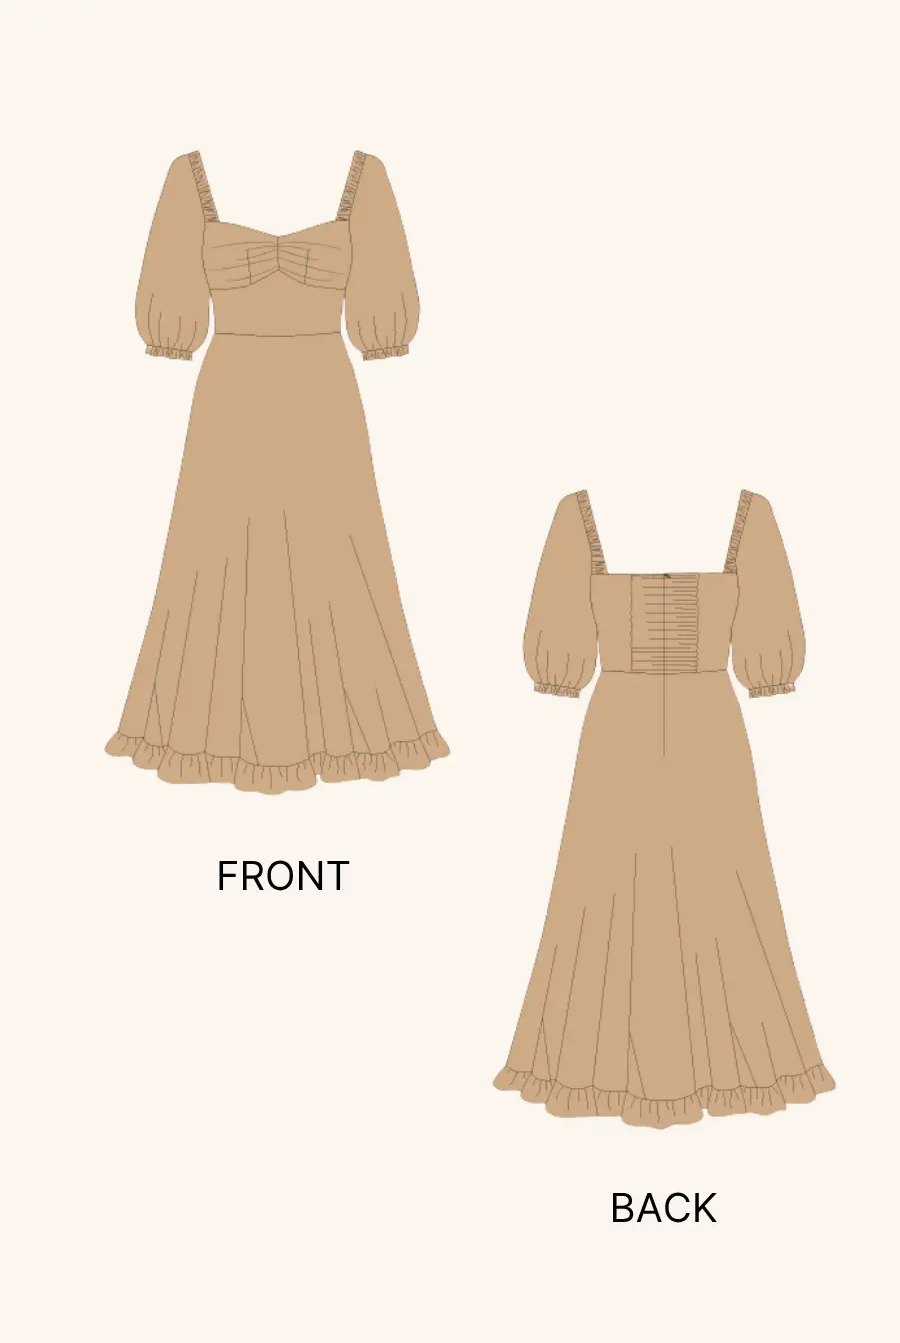
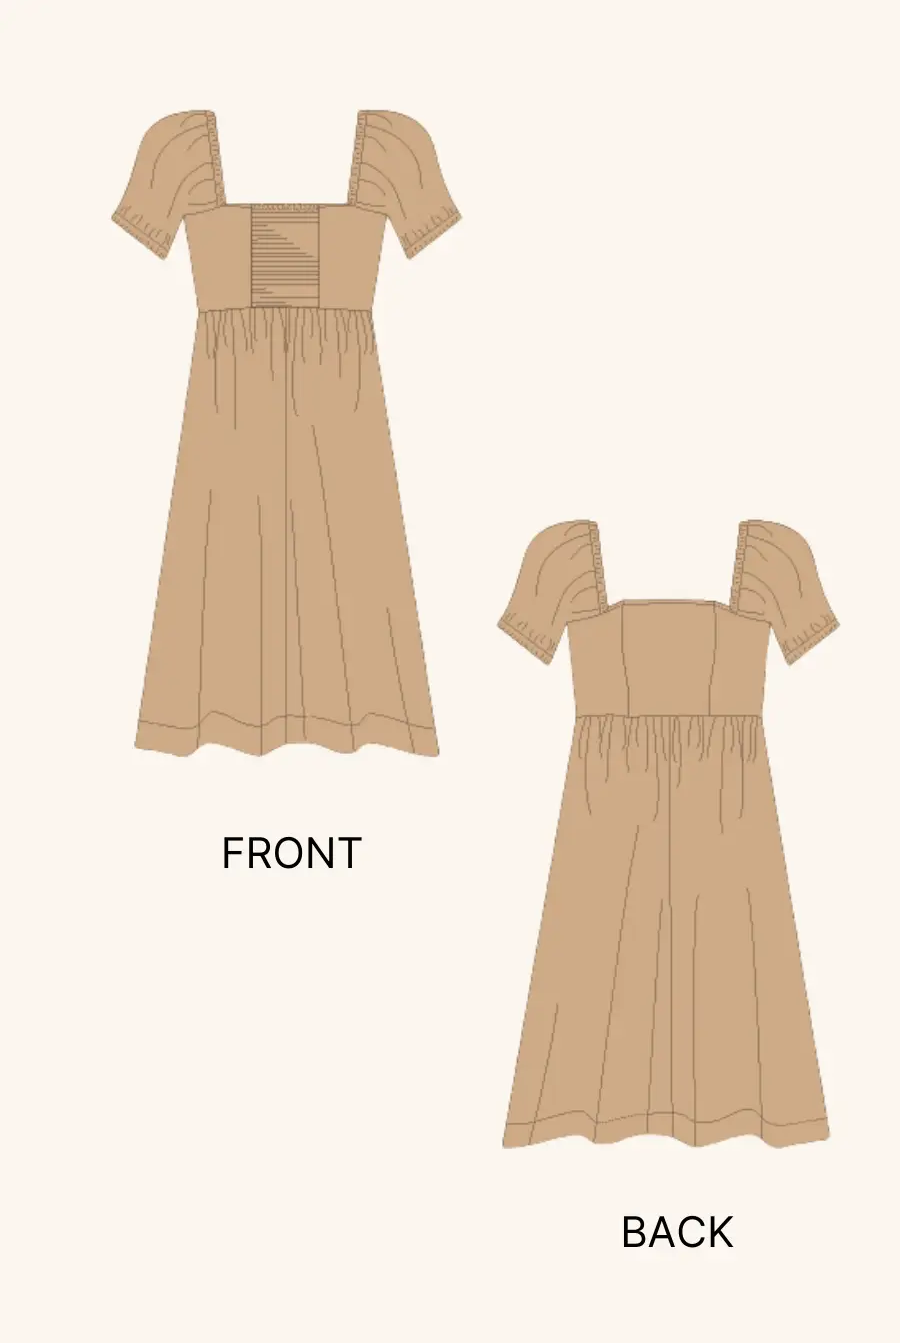
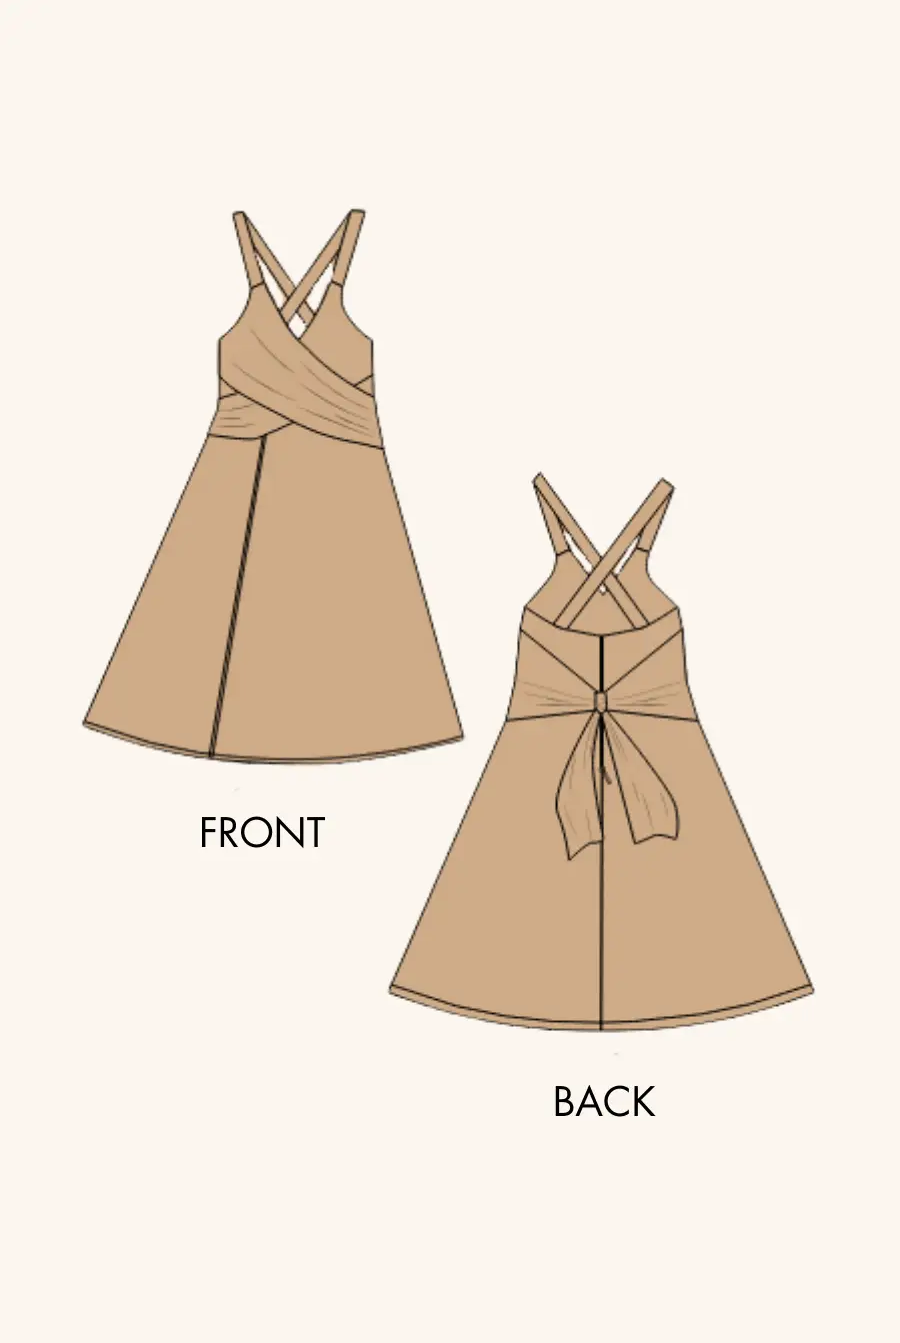
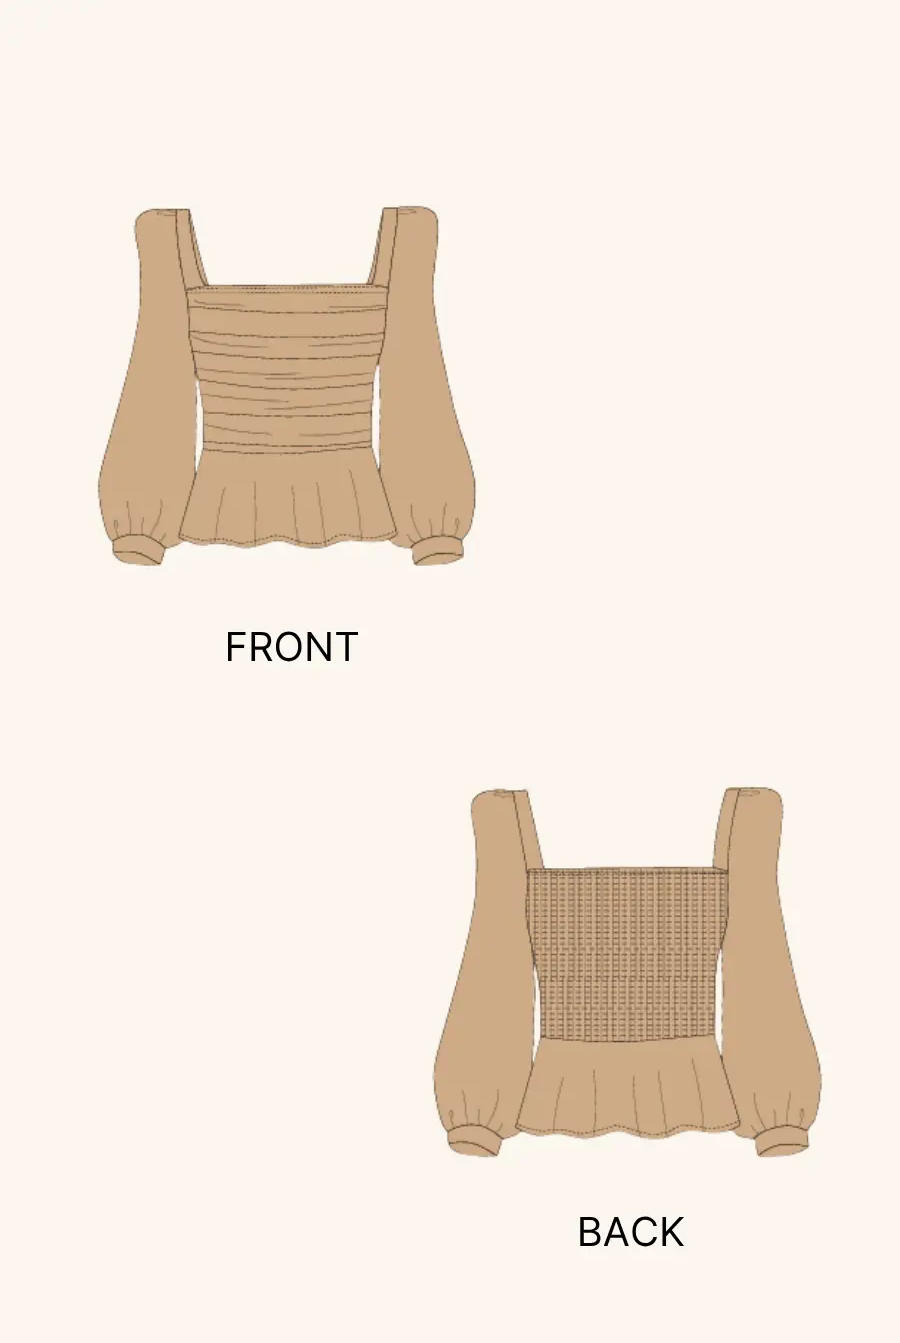
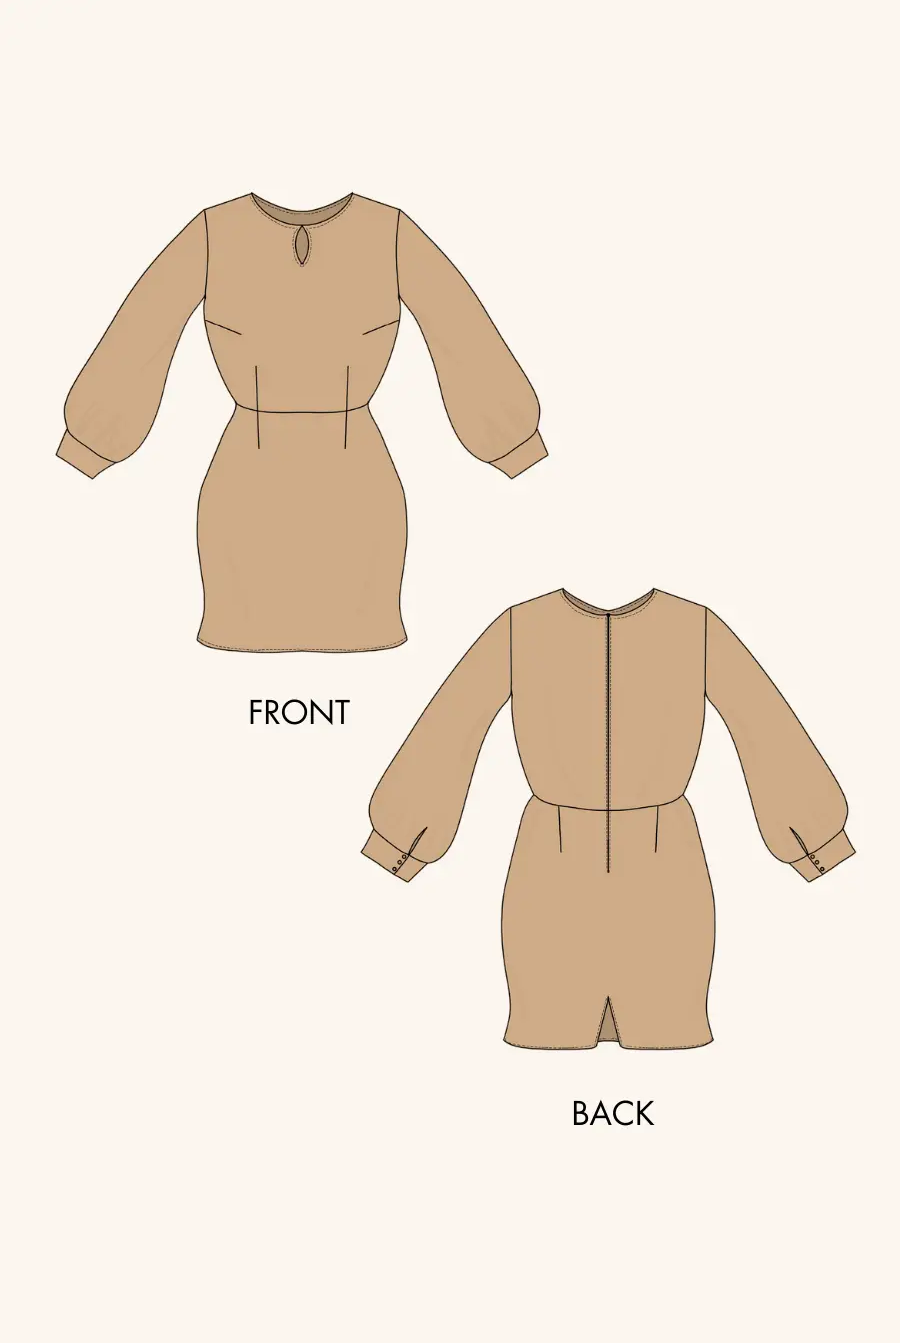
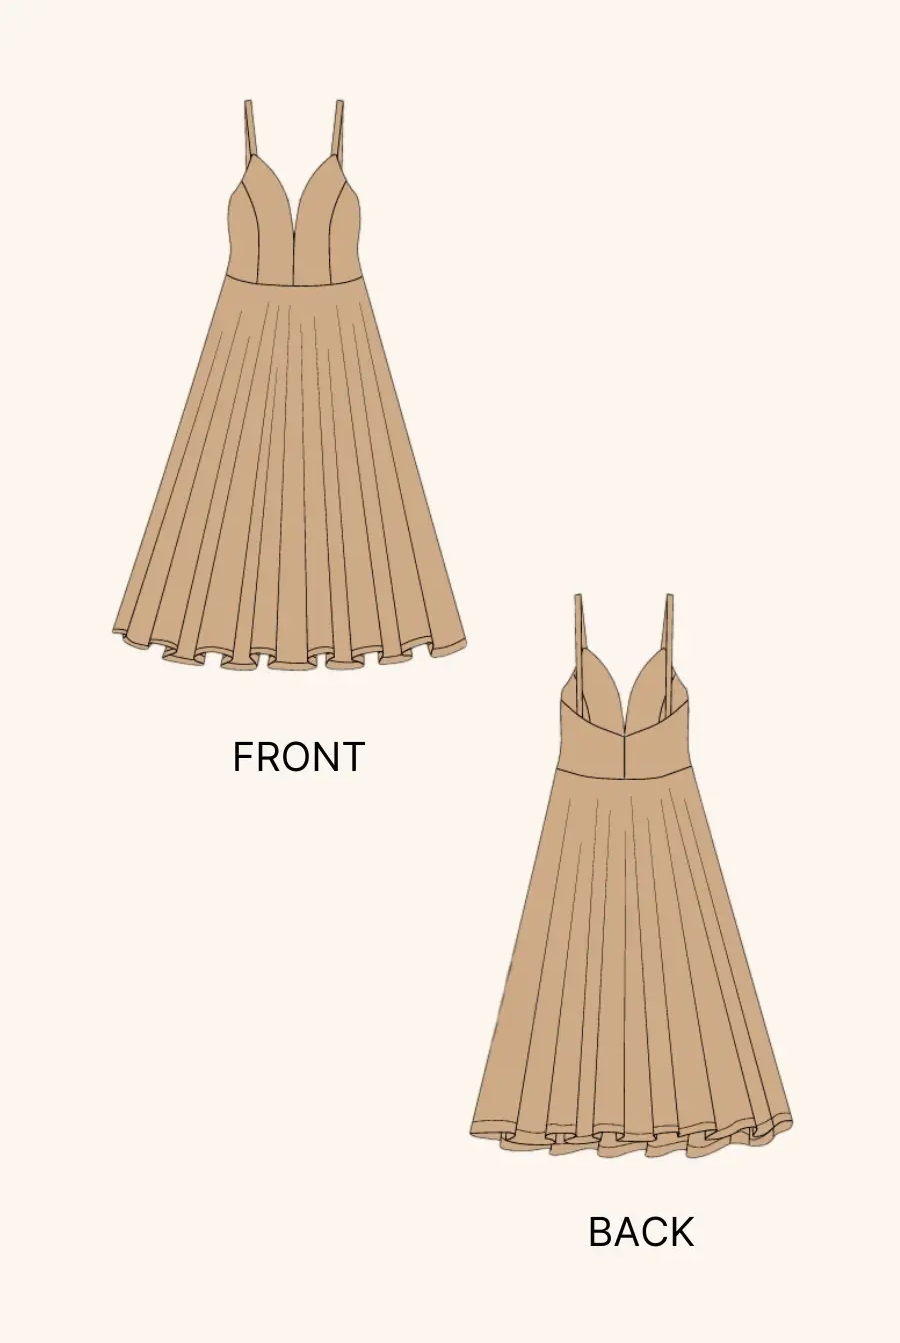
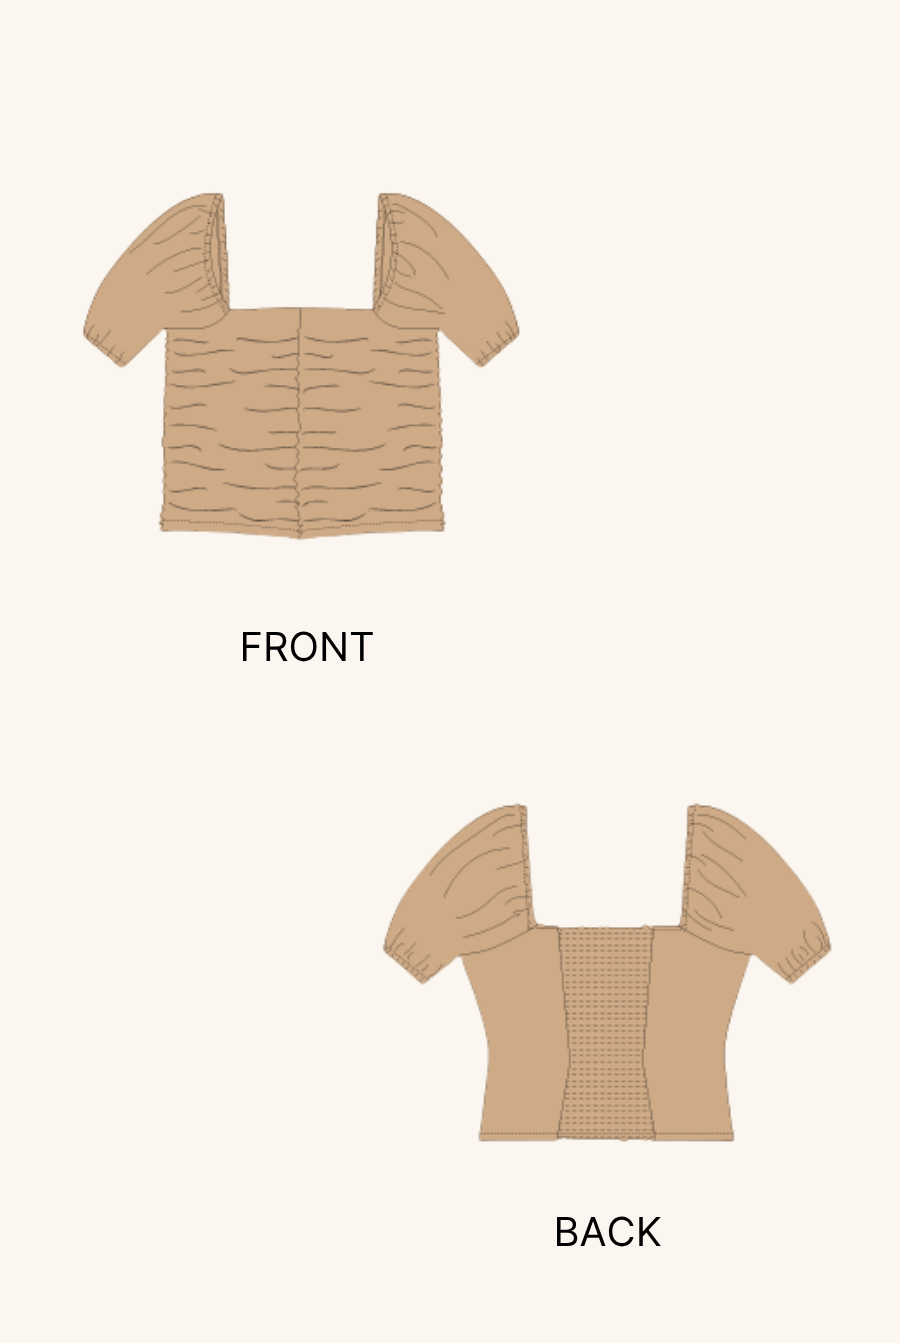
A milkmaid dress typically features:
-
An empire waist or fitted bodice
-
Puff sleeves or gathered shoulders
-
A smocked or fitted back
-
A flared, gathered skirt
-
Optional details like elastic casings, sleeve cuffs, or a square neckline
It’s ultra-wearable and looks great in both solids and florals. Style it with sneakers, sandals, or boots depending on the season.
Looking for the perfect pattern? We highly recommend the Rosaline Milkmaid Dress Sewing Pattern by Winslet’s. It’s beautifully drafted, packed with details, and comes with clear instructions that make sewing a dress like this surprisingly approachable.
Step 1: Choose the Right Fabric to Sew a Milkmaid Dress
Lightweight woven fabrics are ideal for this style. Here are our top picks:
-
Cotton or cotton lawn – crisp and breathable
-
Linen or cotton-linen blends – soft with natural texture
-
Crepe or viscose poplin – great for fluid movement
-
Chintz – for a vintage-inspired look
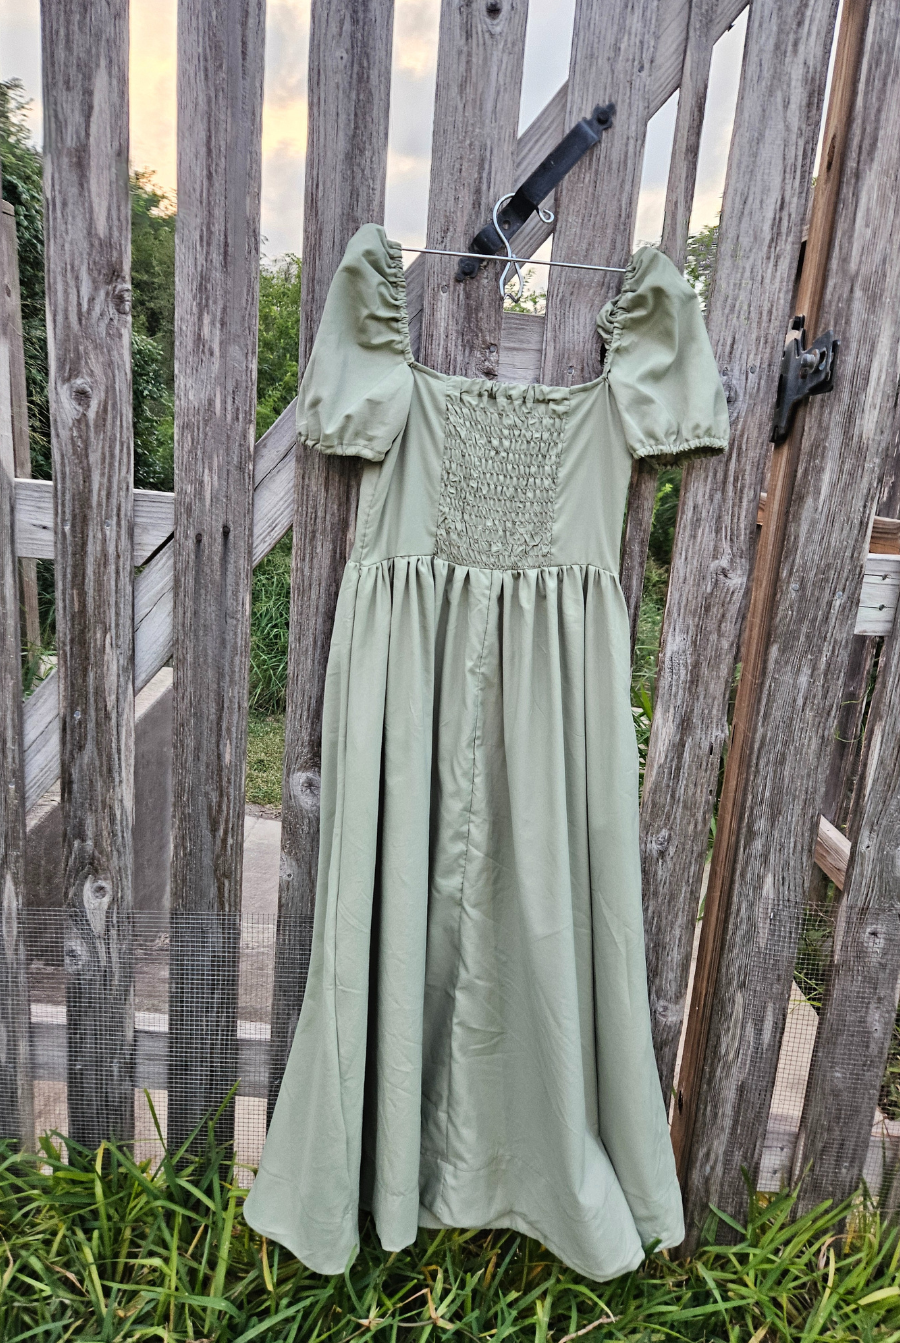
The Rosaline pattern was designed with these fabrics in mind. In fact, the sample dress was sewn in a breathable cotton-linen blend—perfect for warm weather.
Step 2: Find a Great Sewing Pattern
There are many milkmaid dress patterns out there, but if you want a flattering fit, thoughtful construction, and step-by-step support, I used Winslet's Rosaline Milkmaid Dress Pattern.
Why we love it:
-
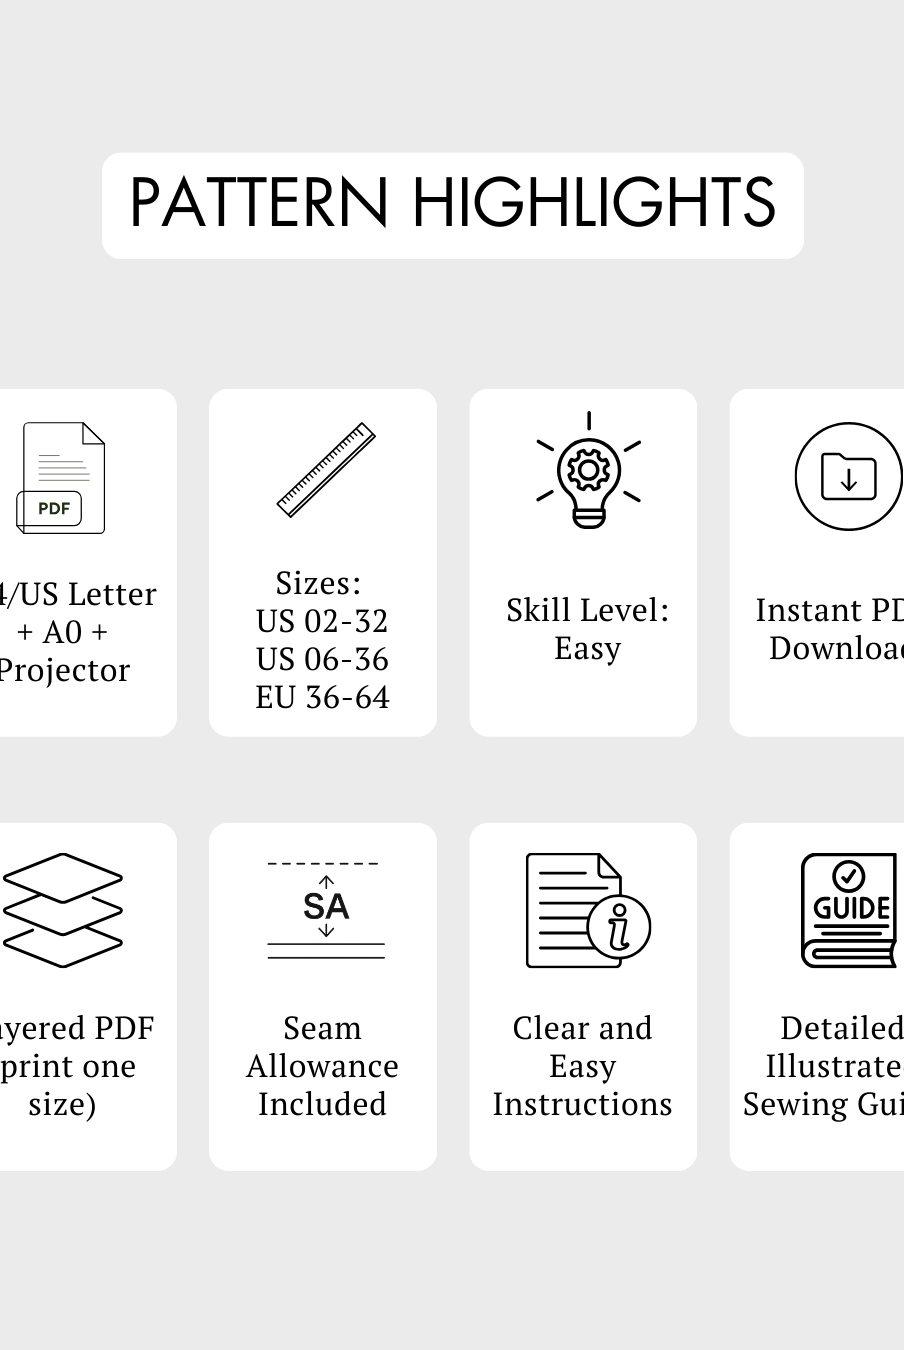
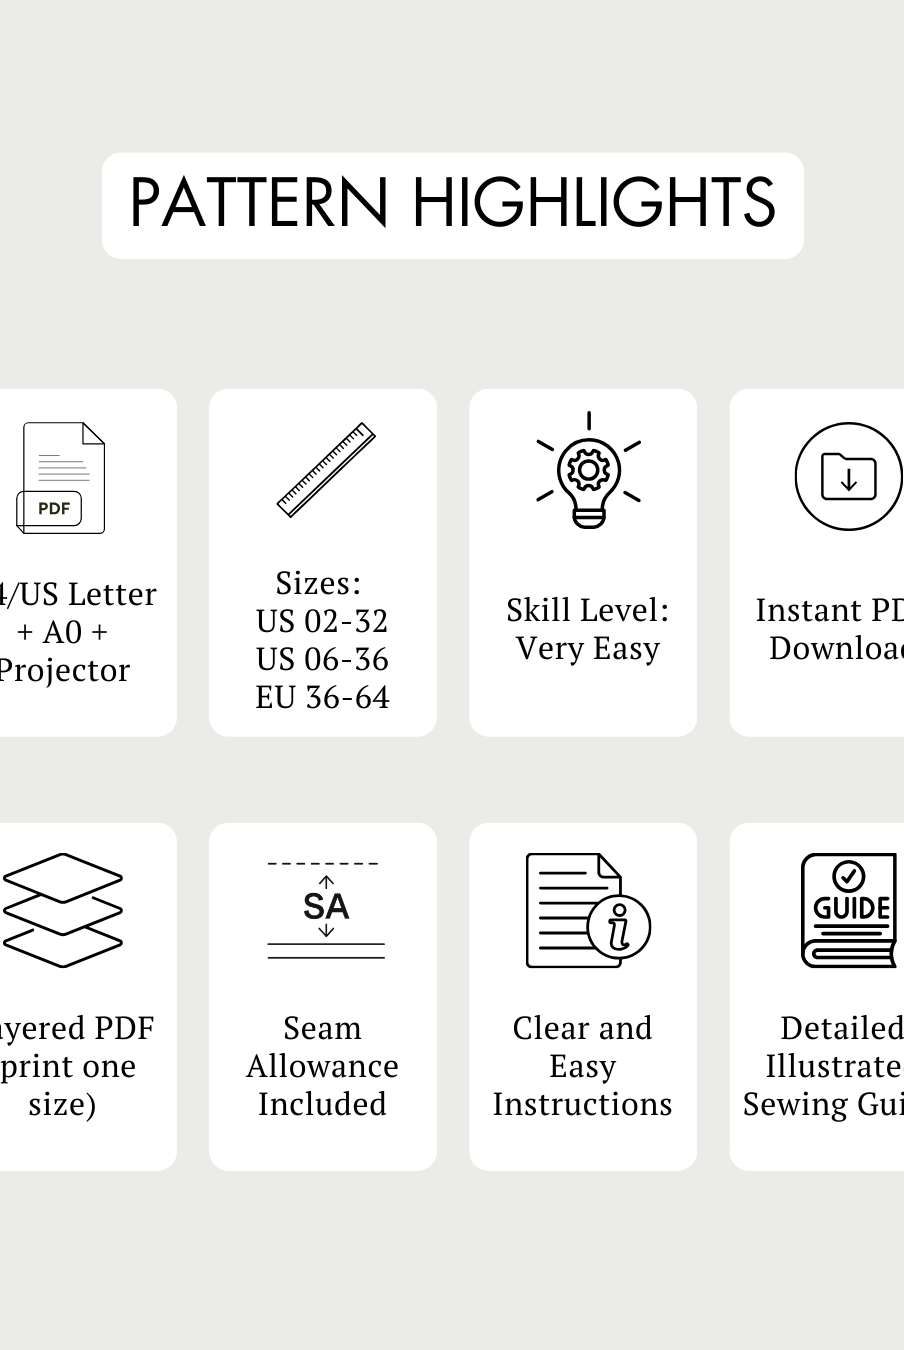
Printable in A0, A4, US Letter, and Projector formats
-
Features smocked back, puff sleeves, elastic casings, and a gathered skirt
-
Includes step-by-step illustrations and beginner-friendly explanations
-
Built for sewists looking to advance their skills without overwhelm
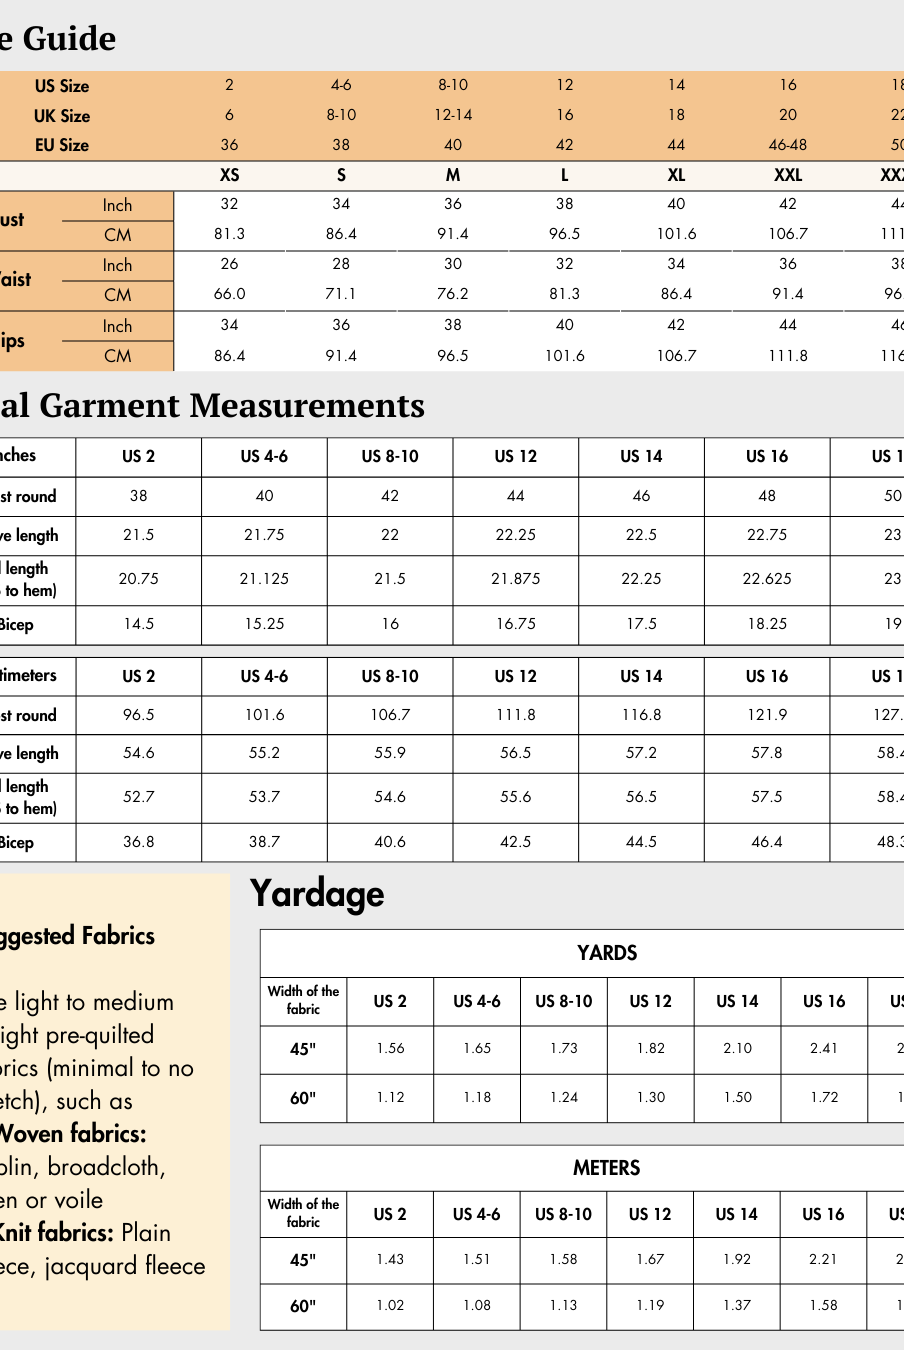
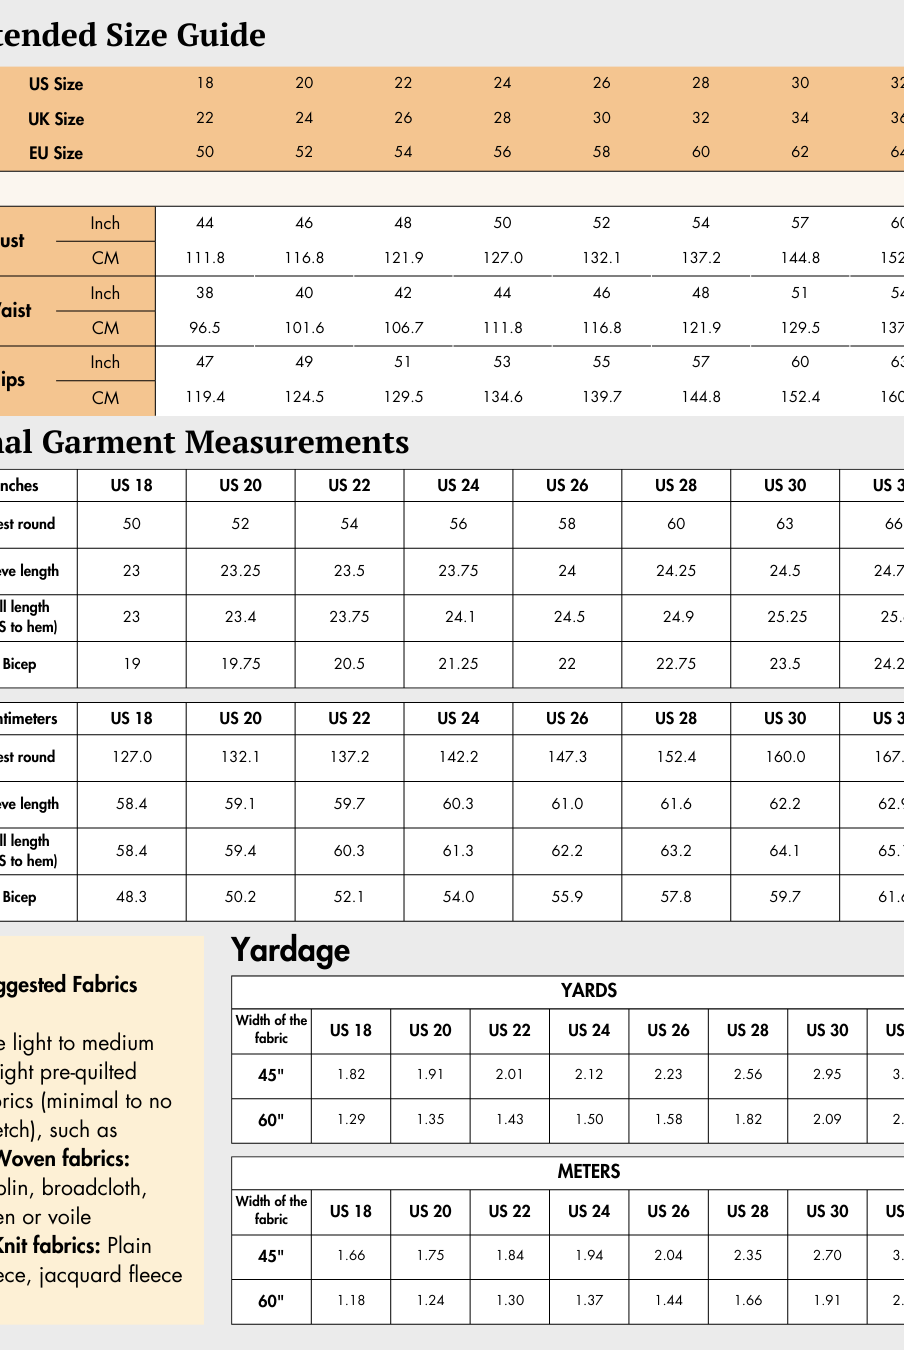
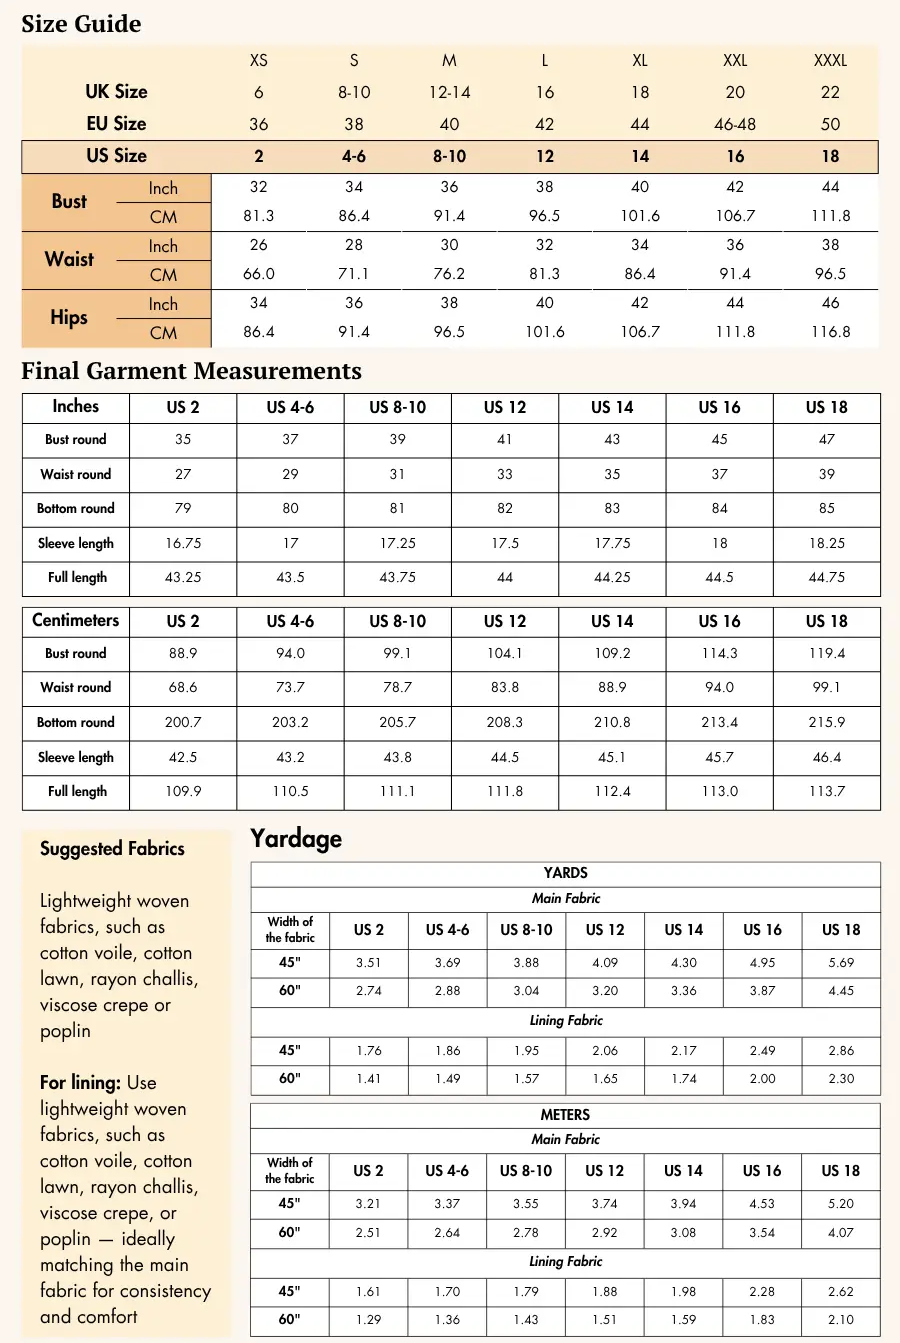
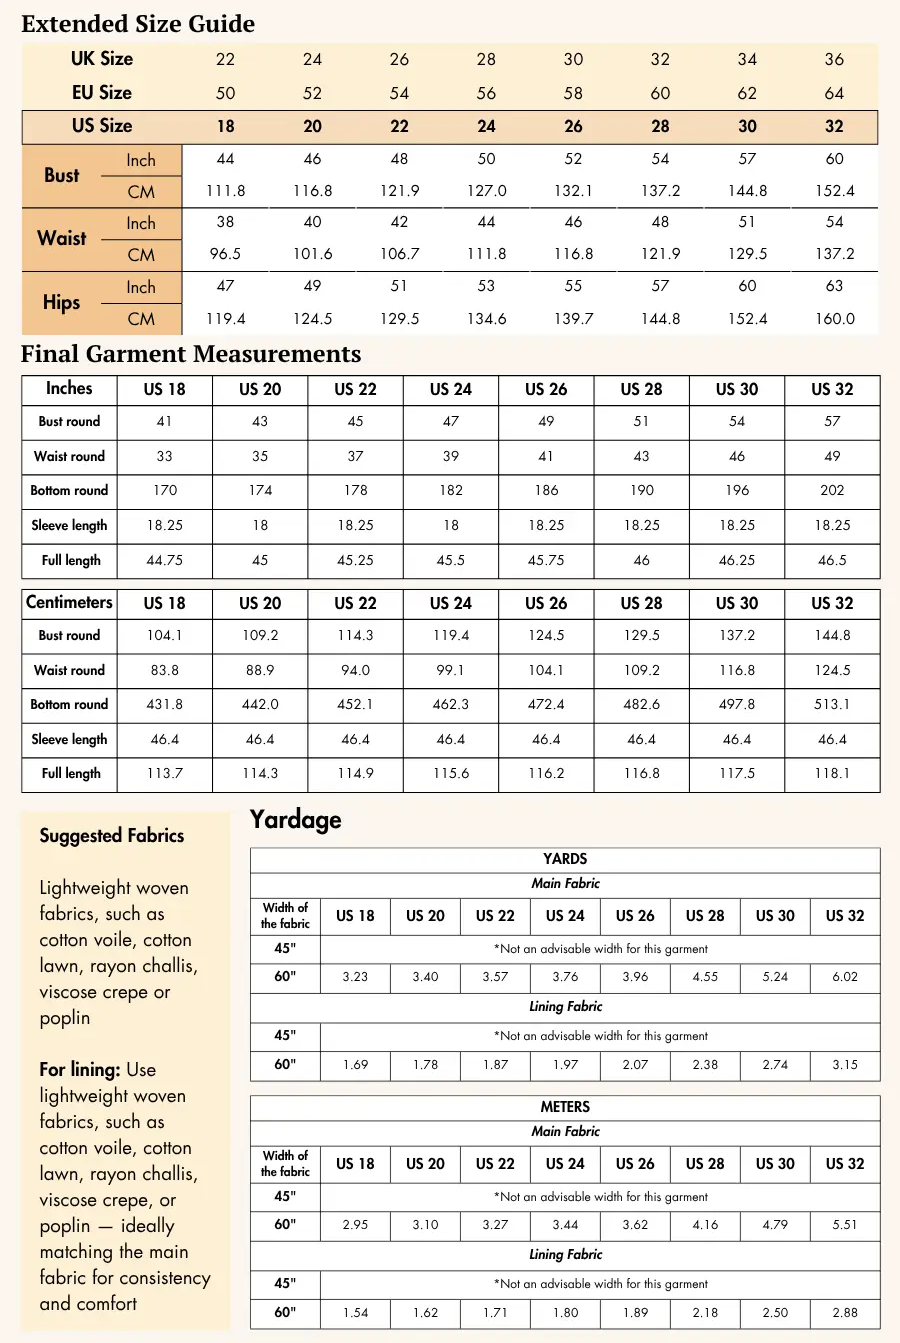
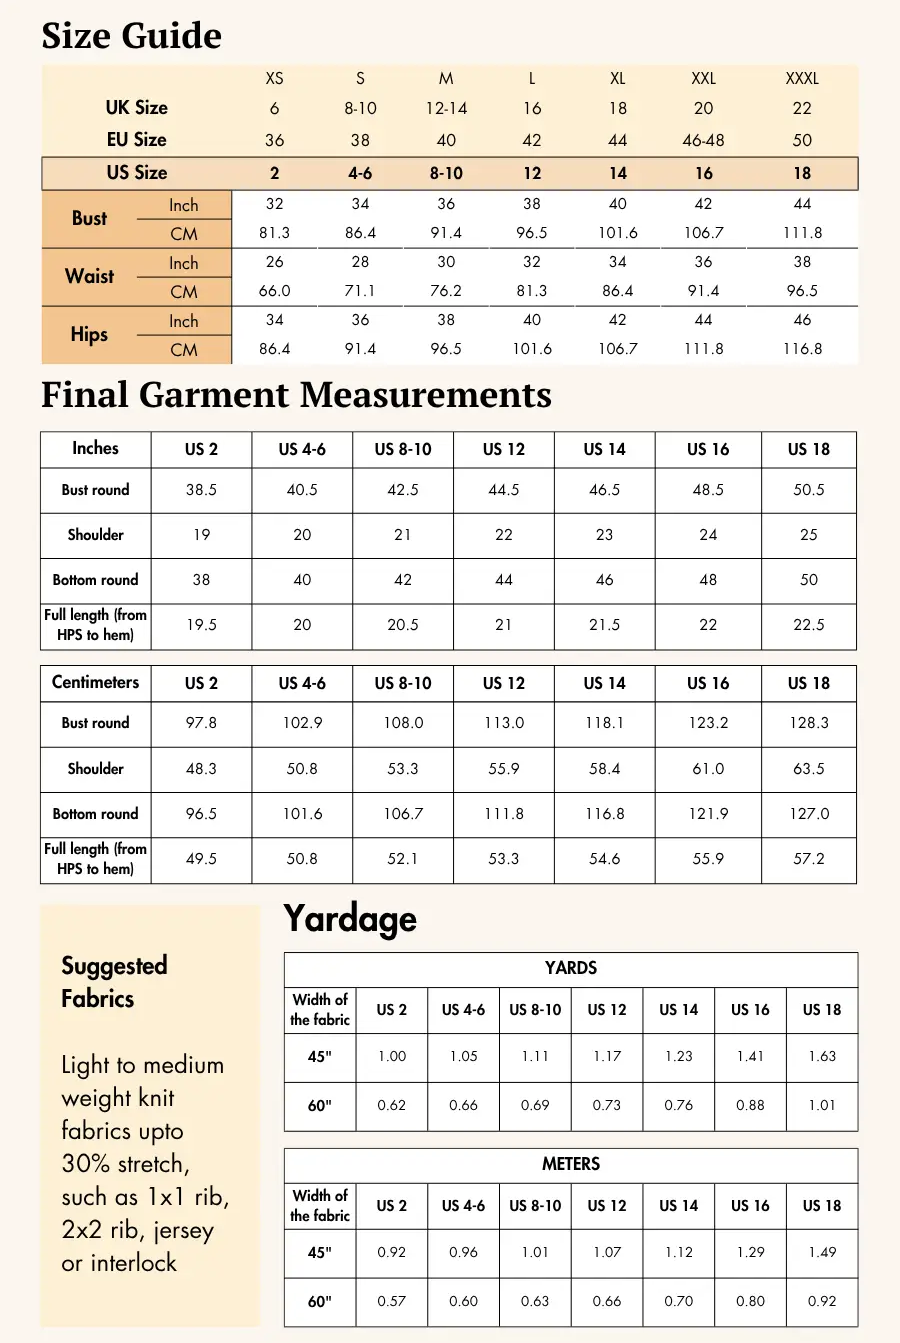
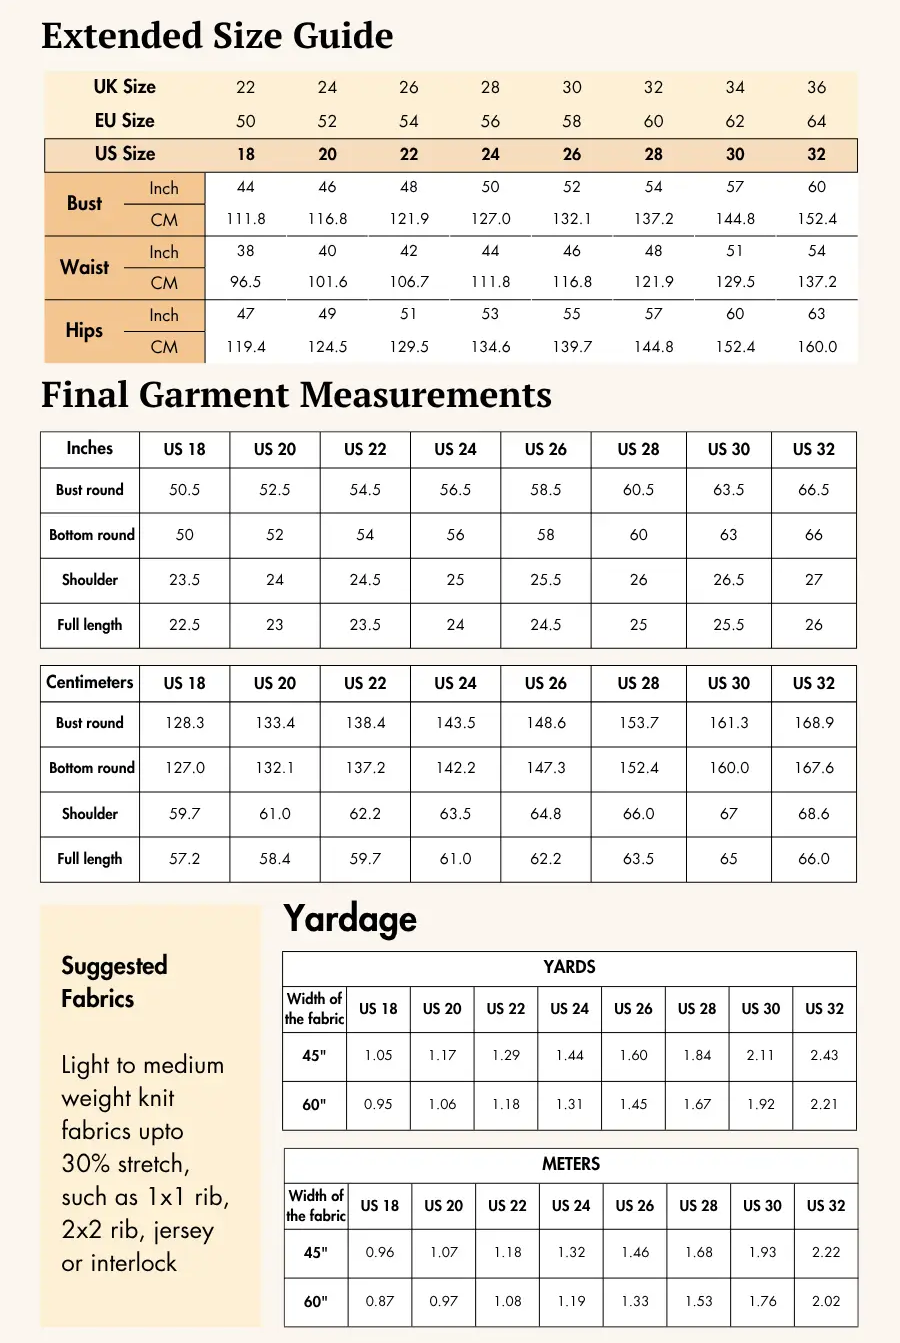
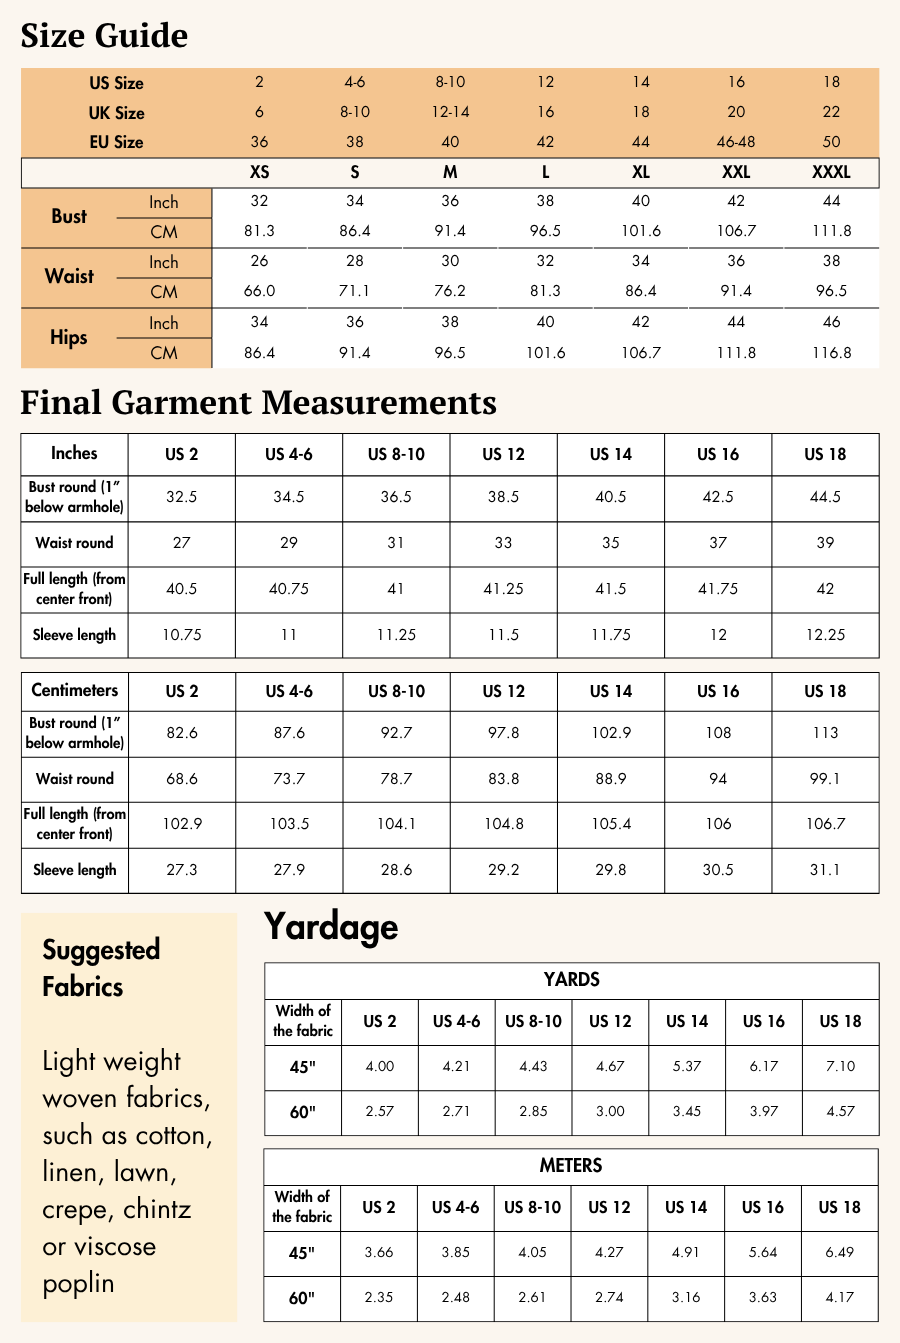
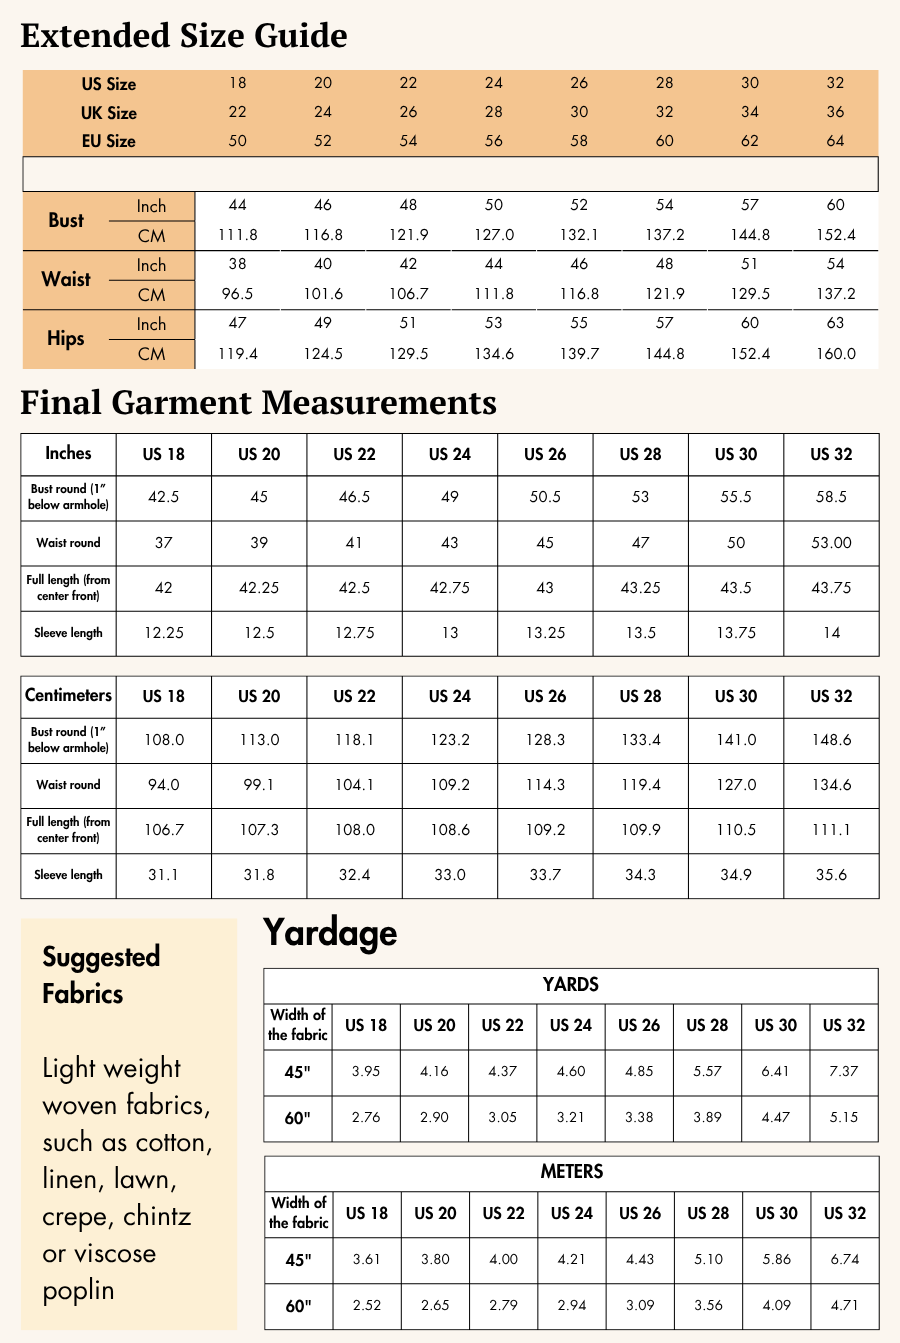
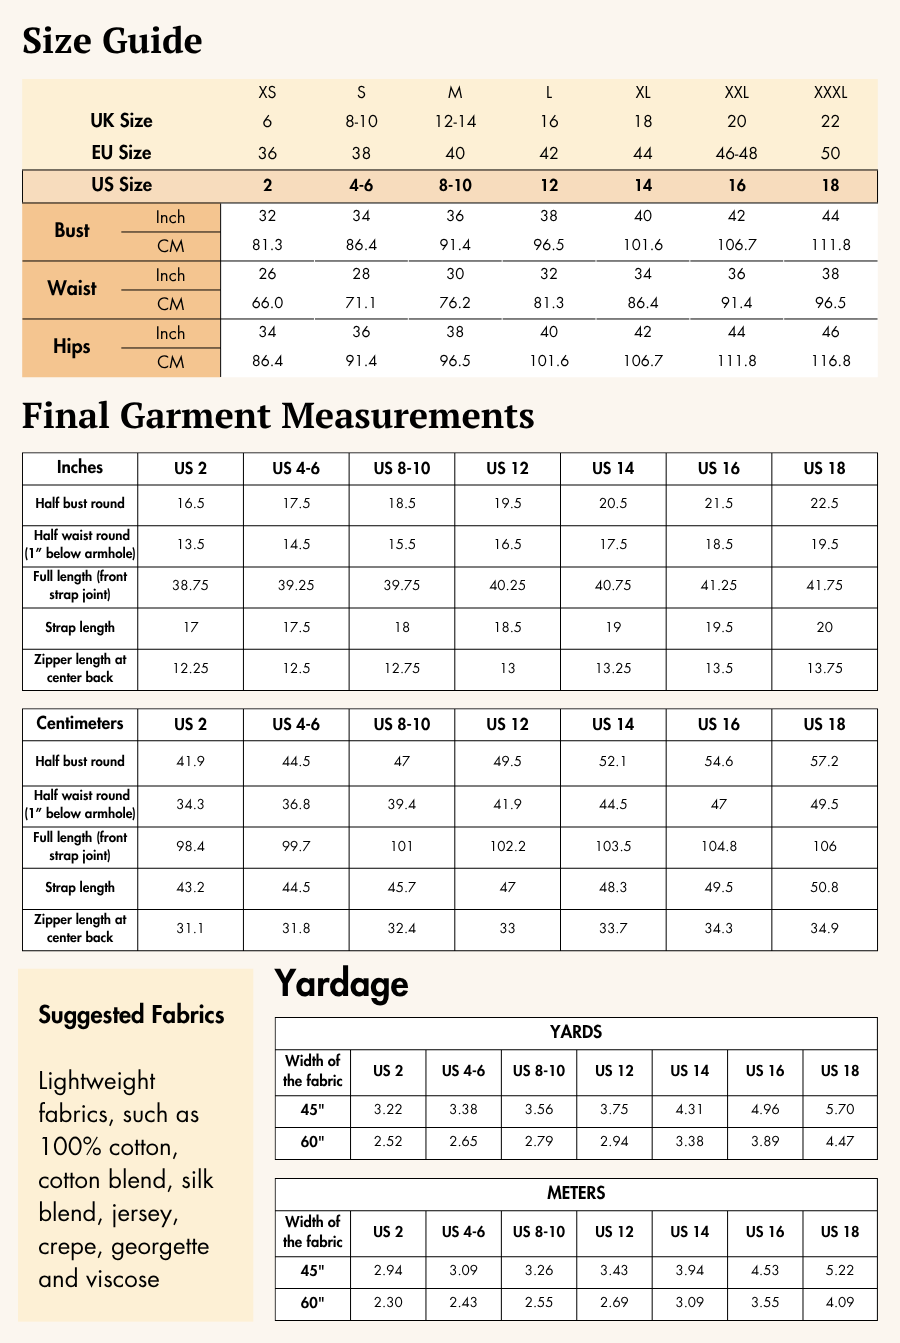
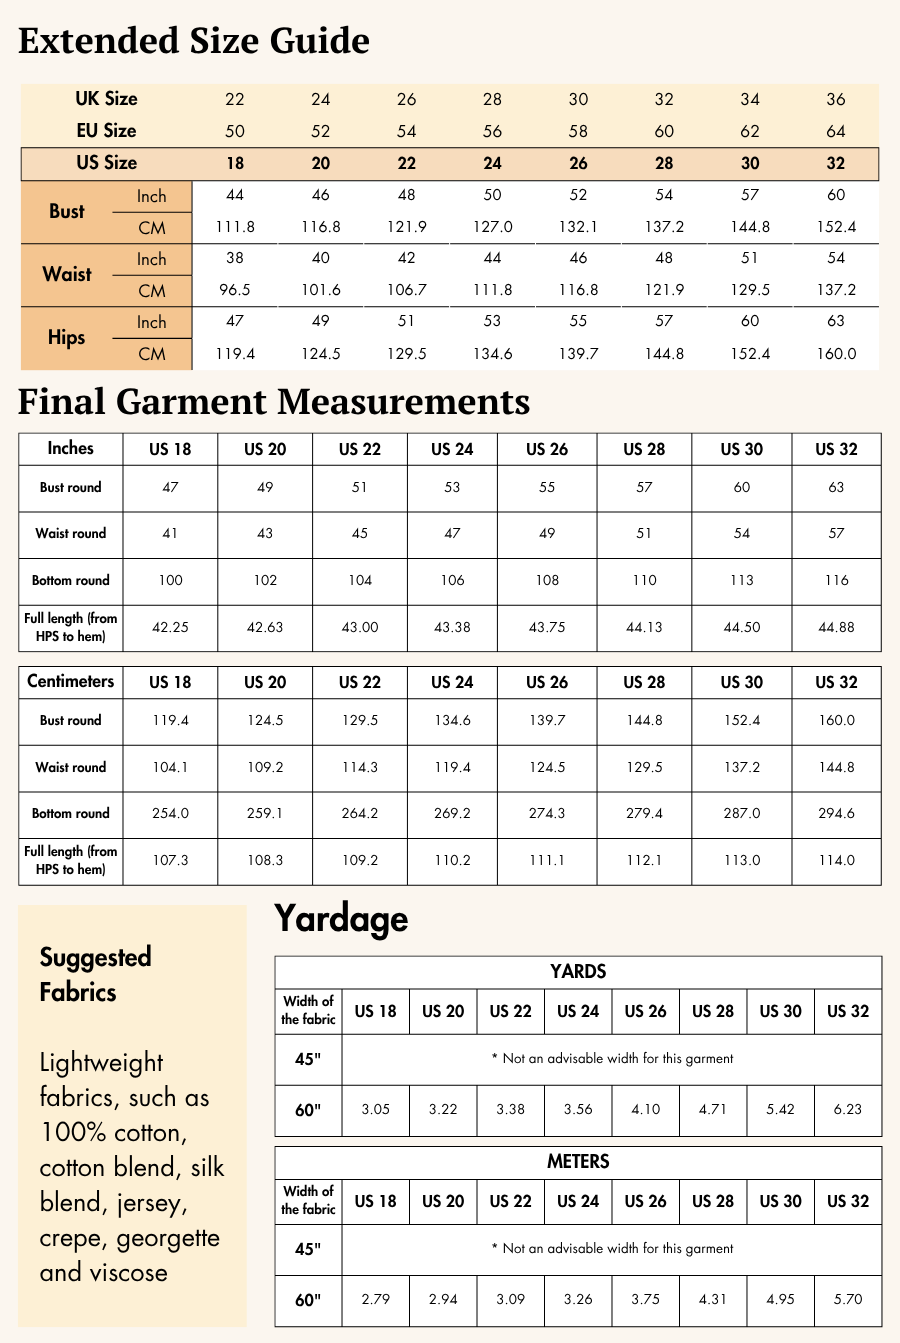
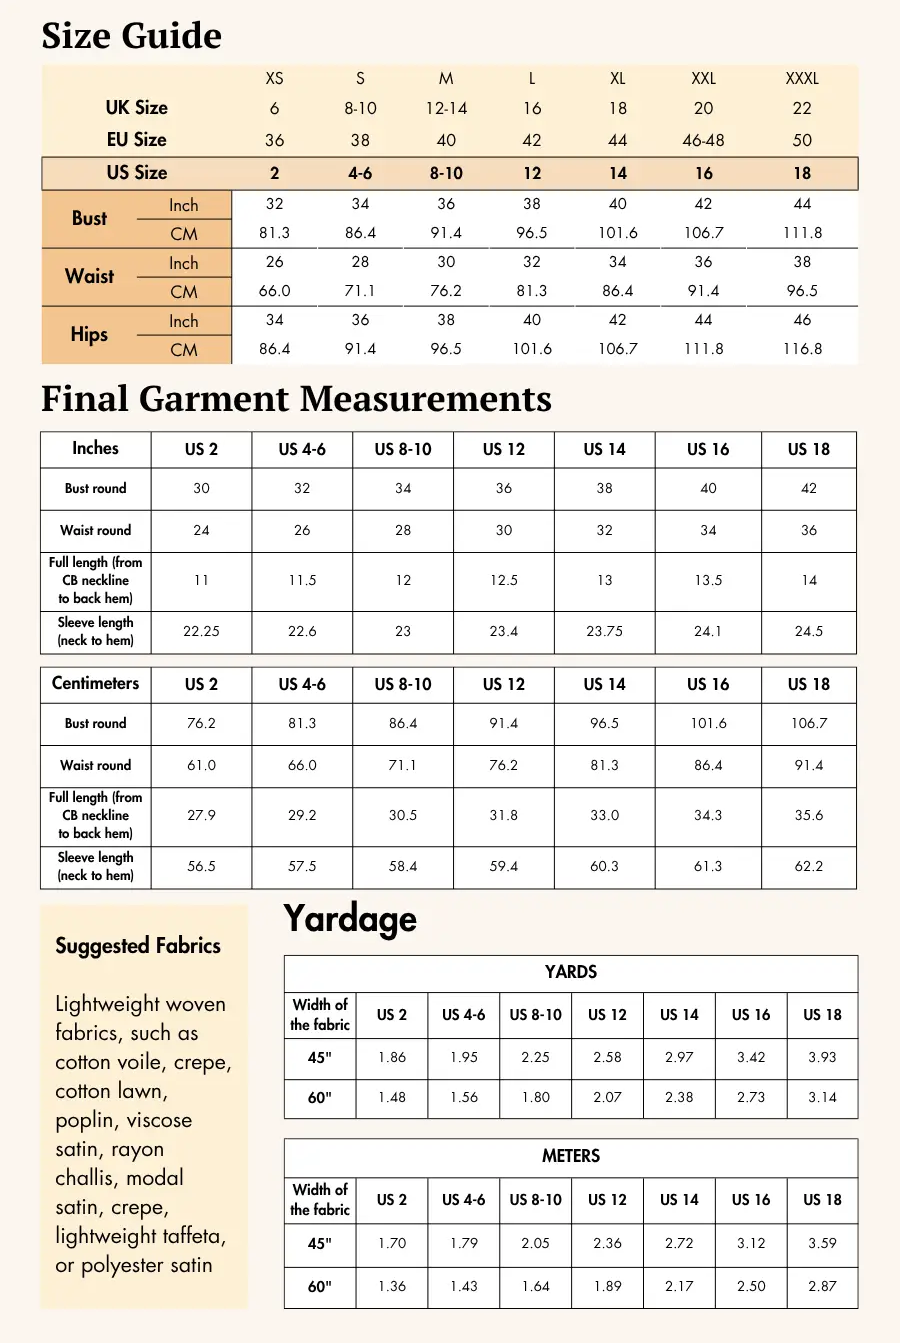
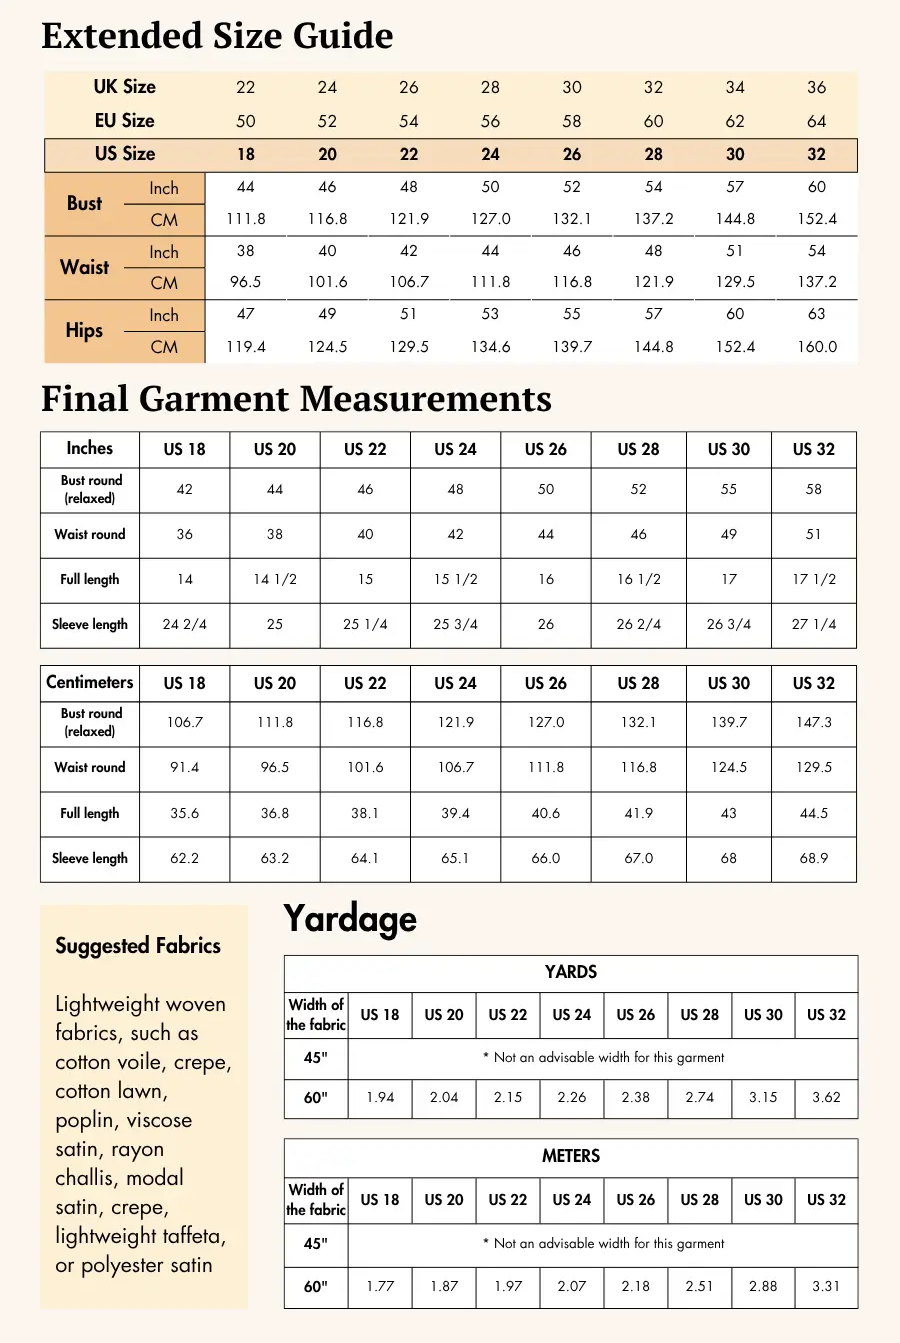
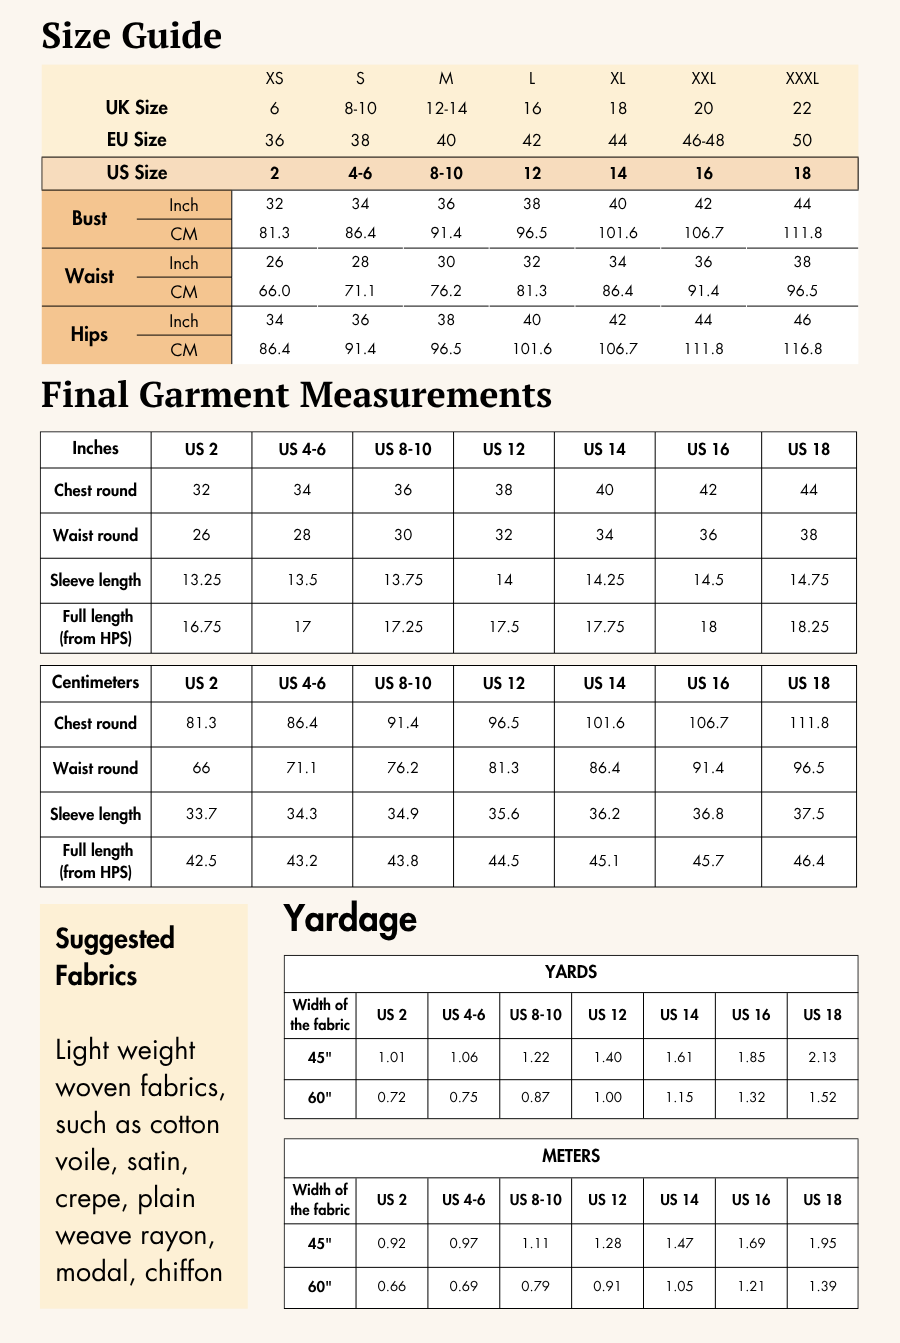
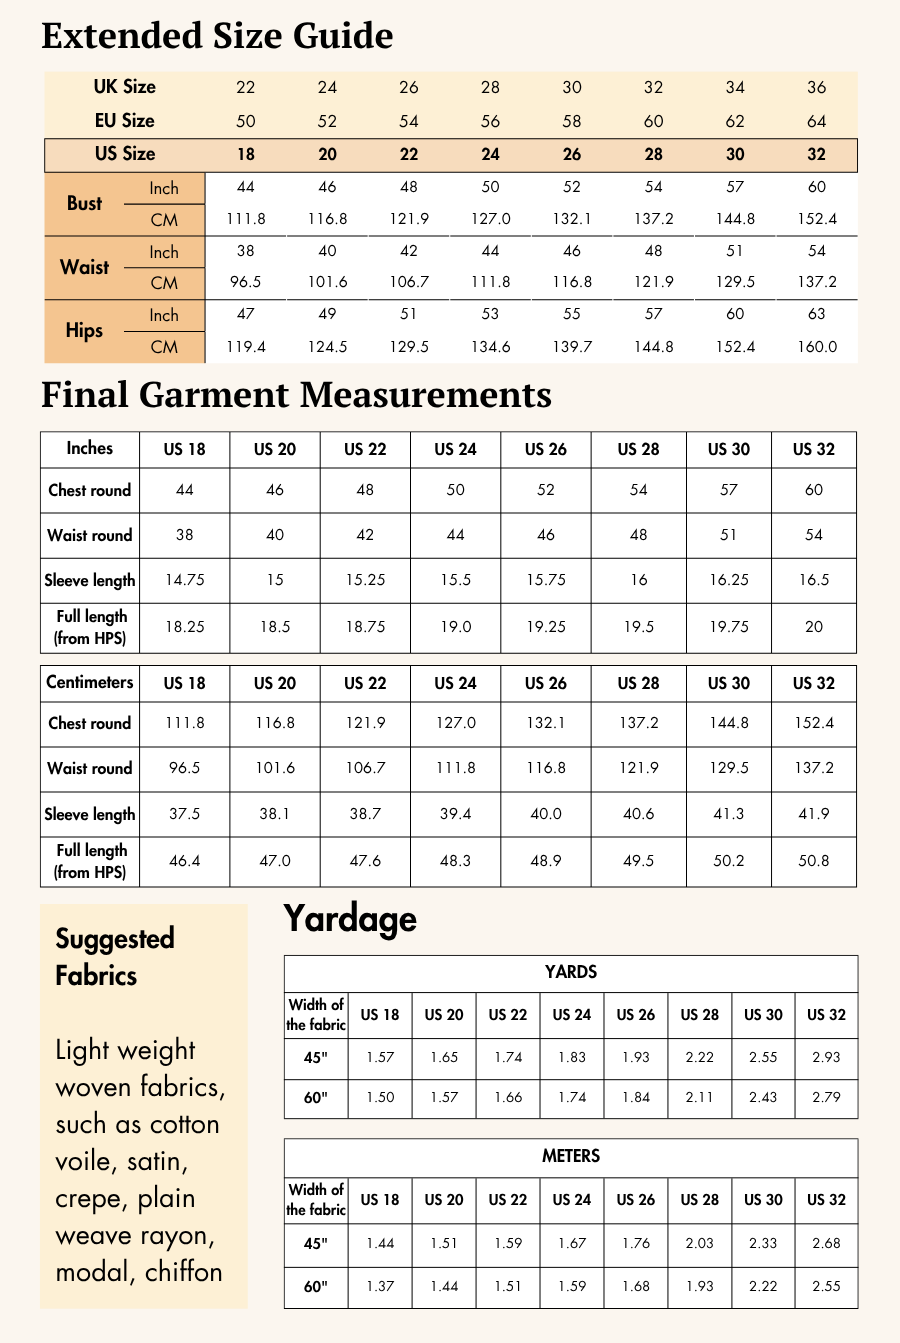
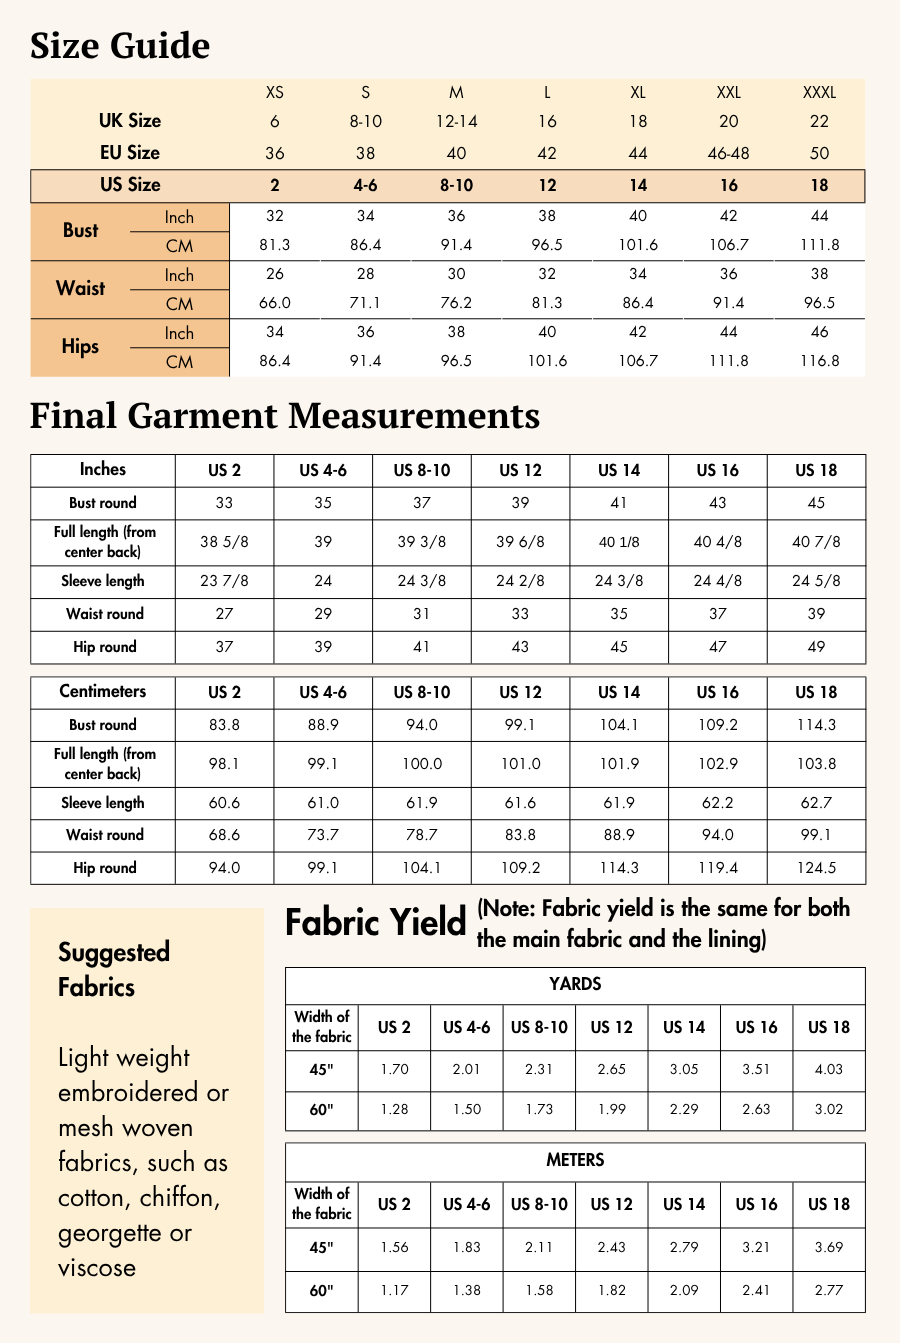
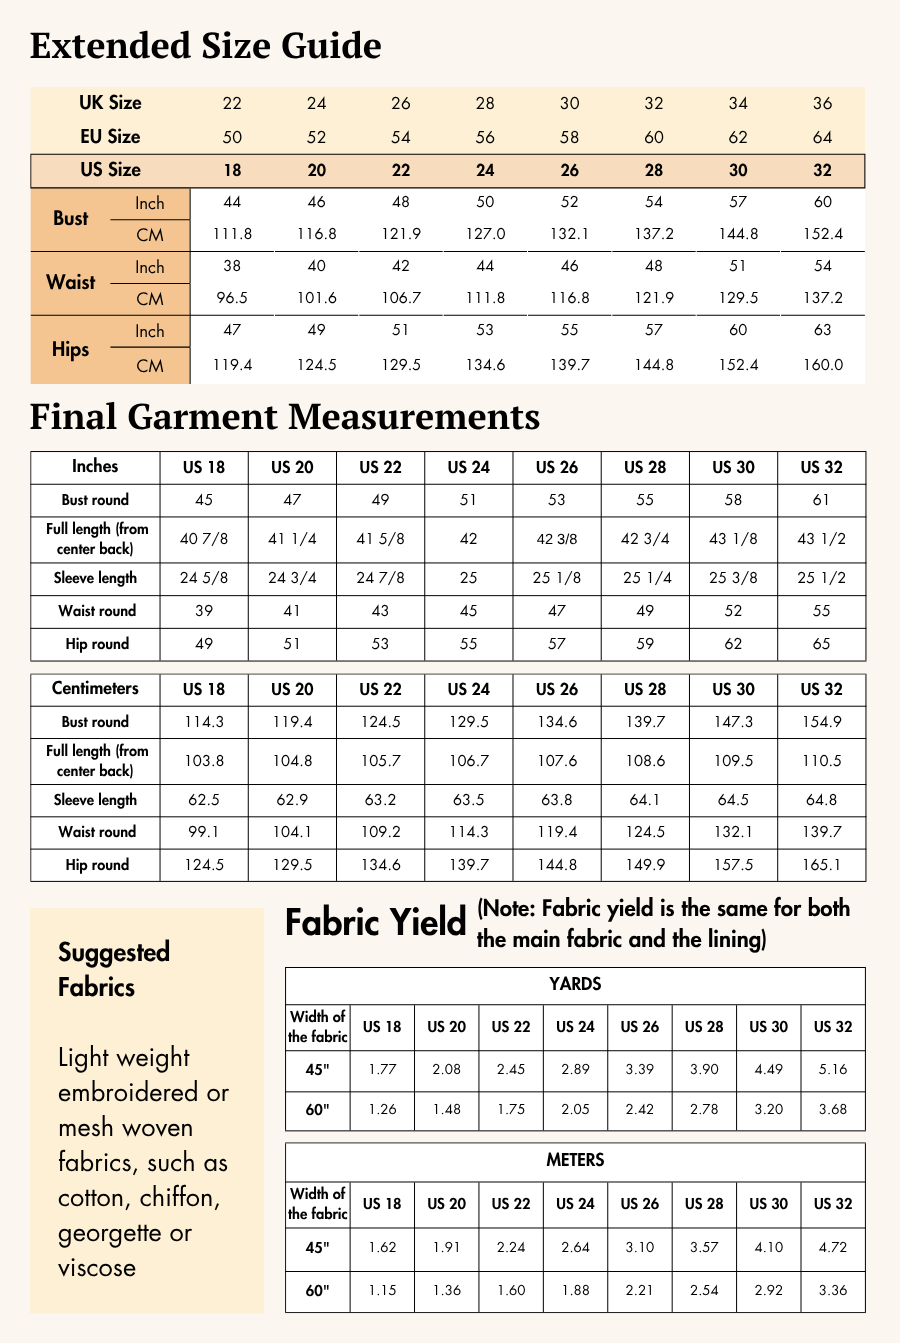
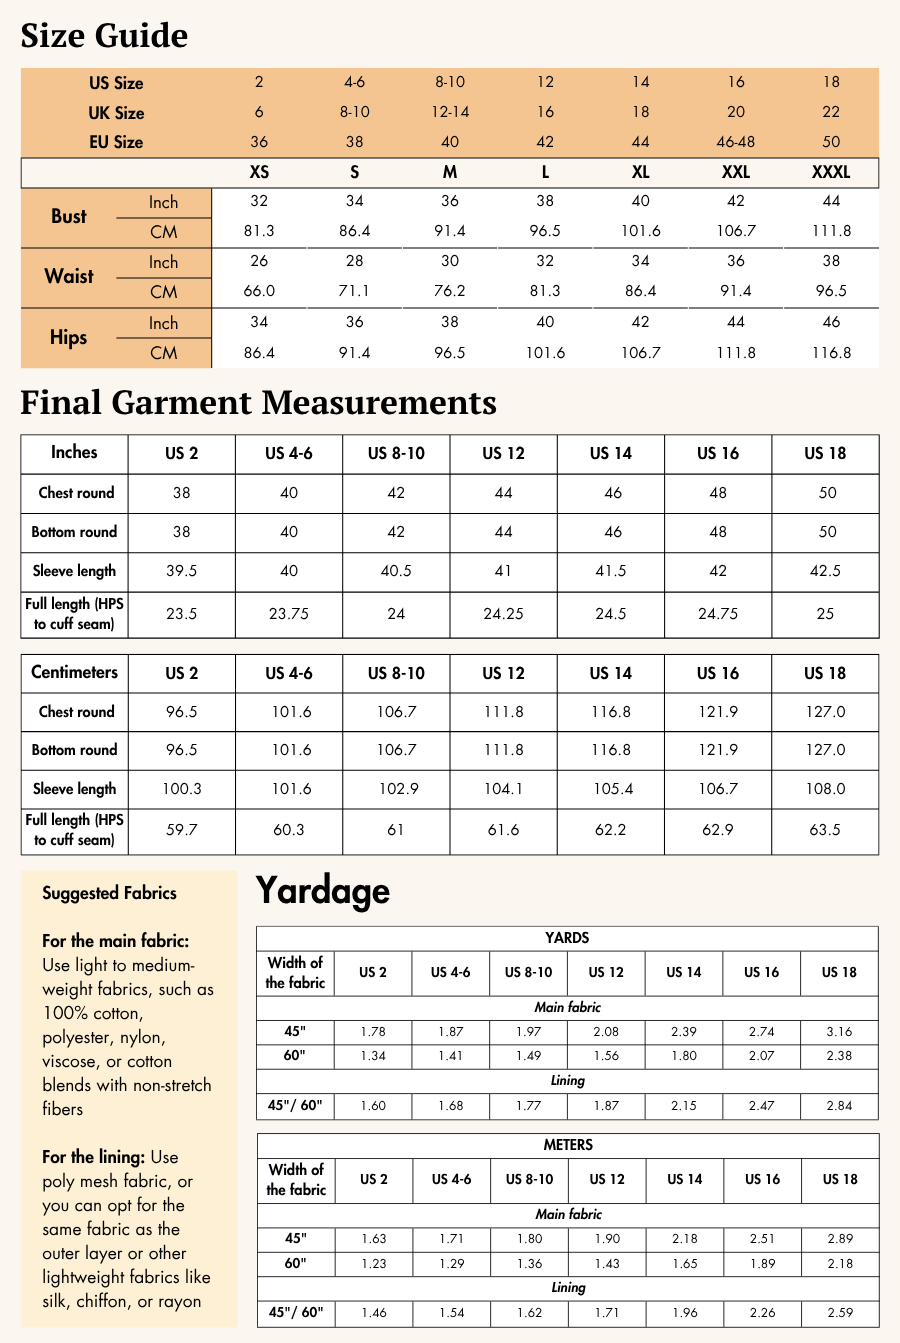
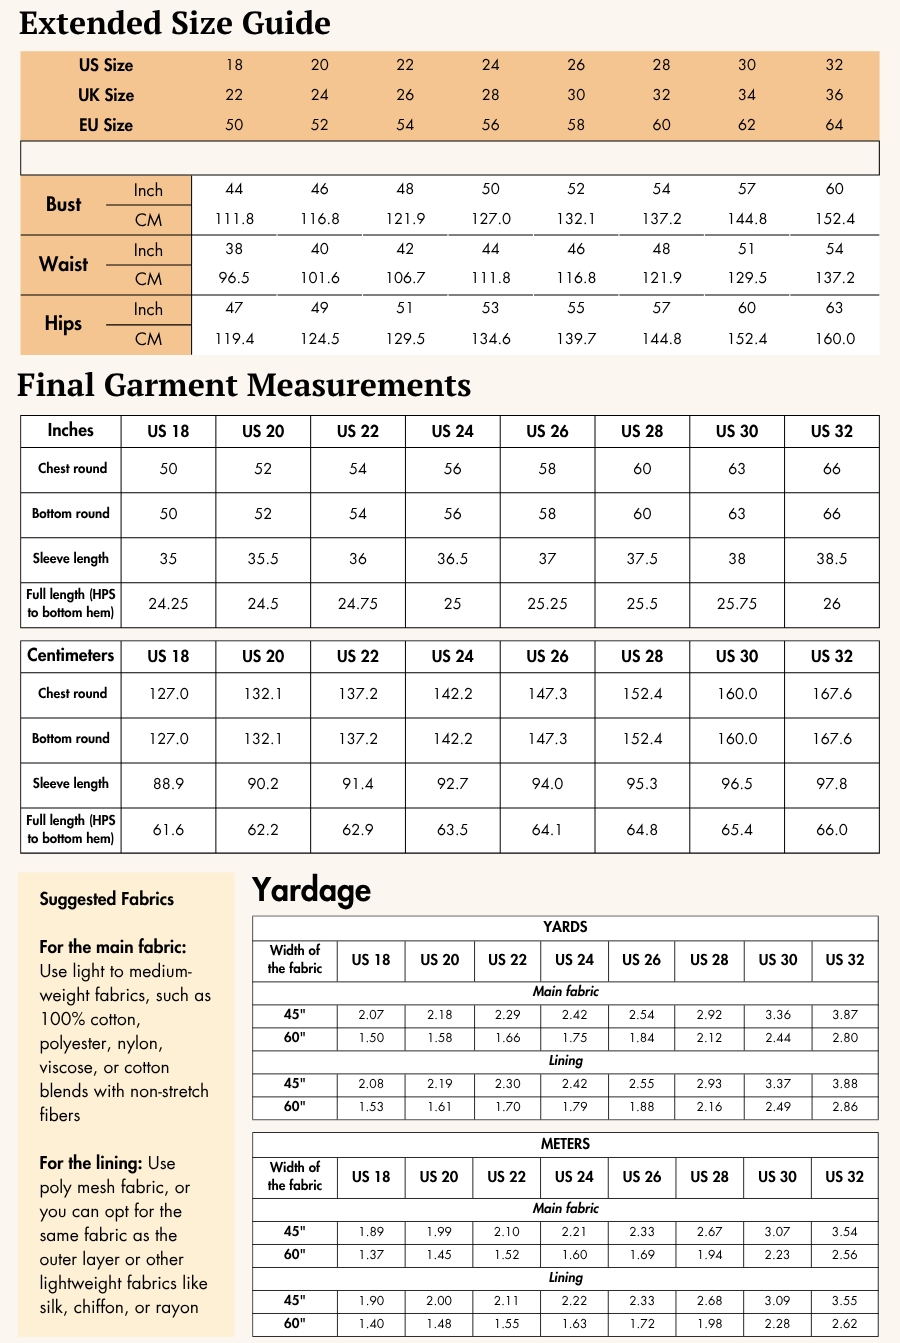
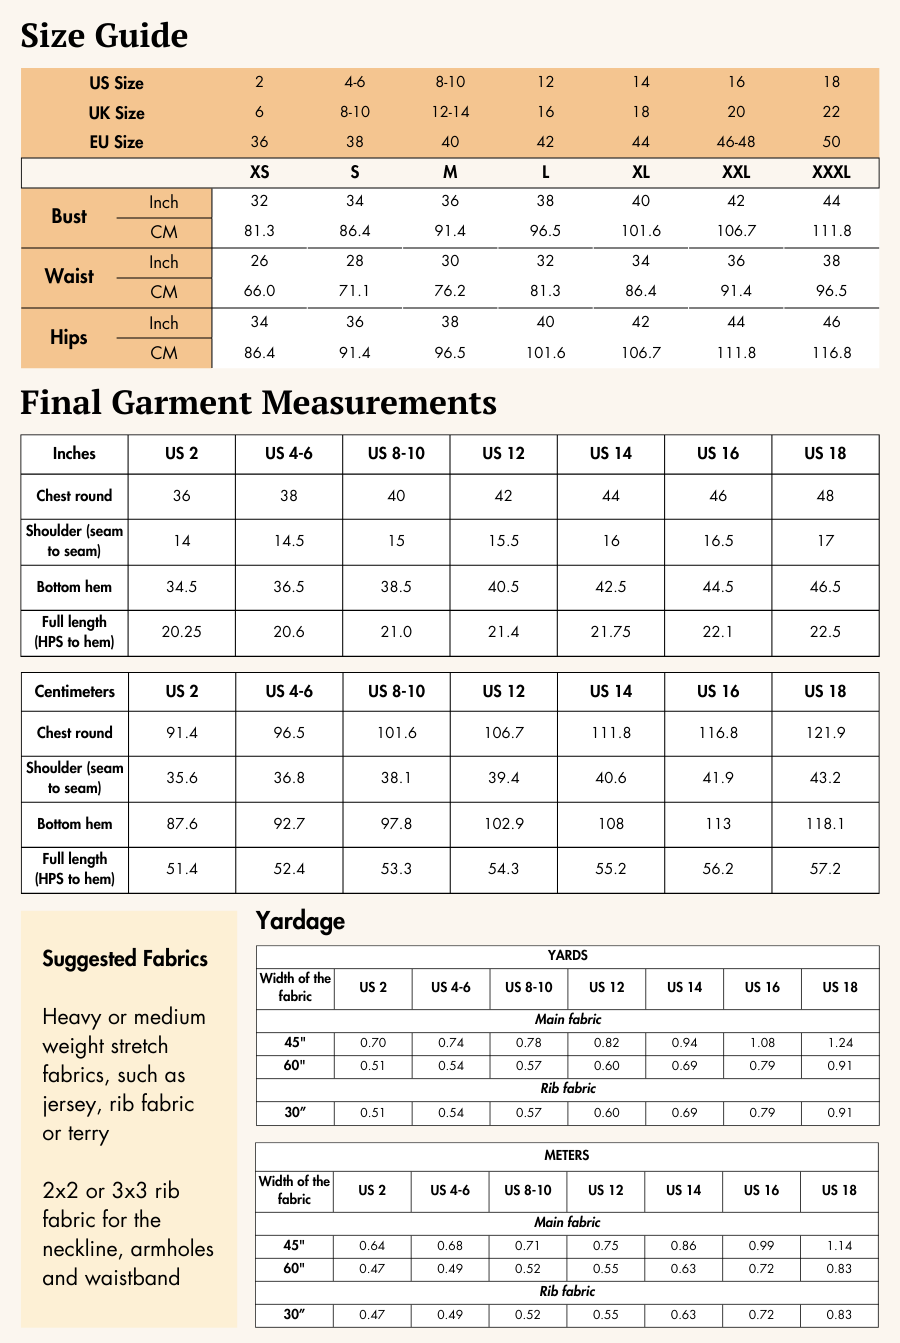
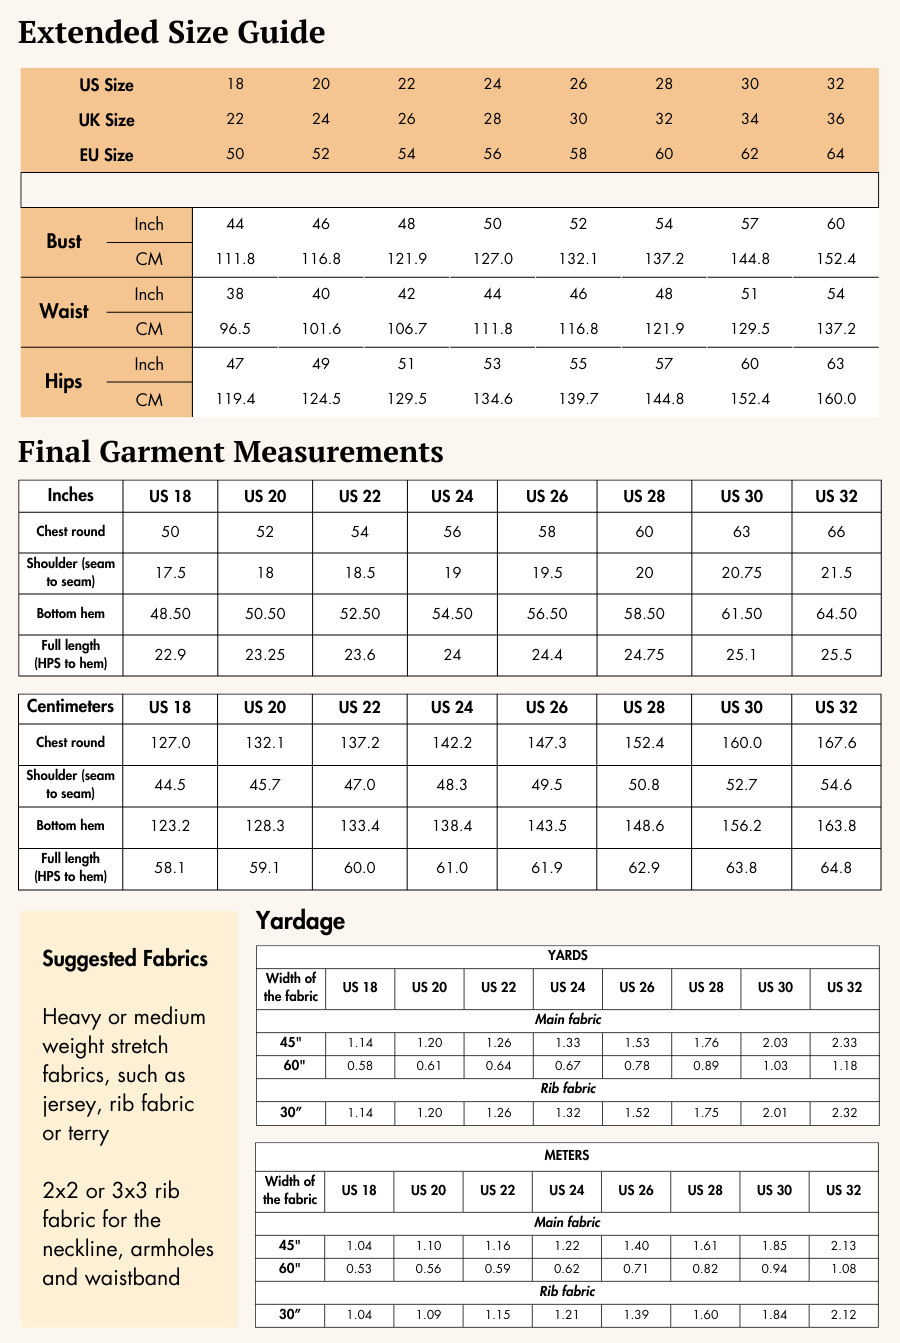
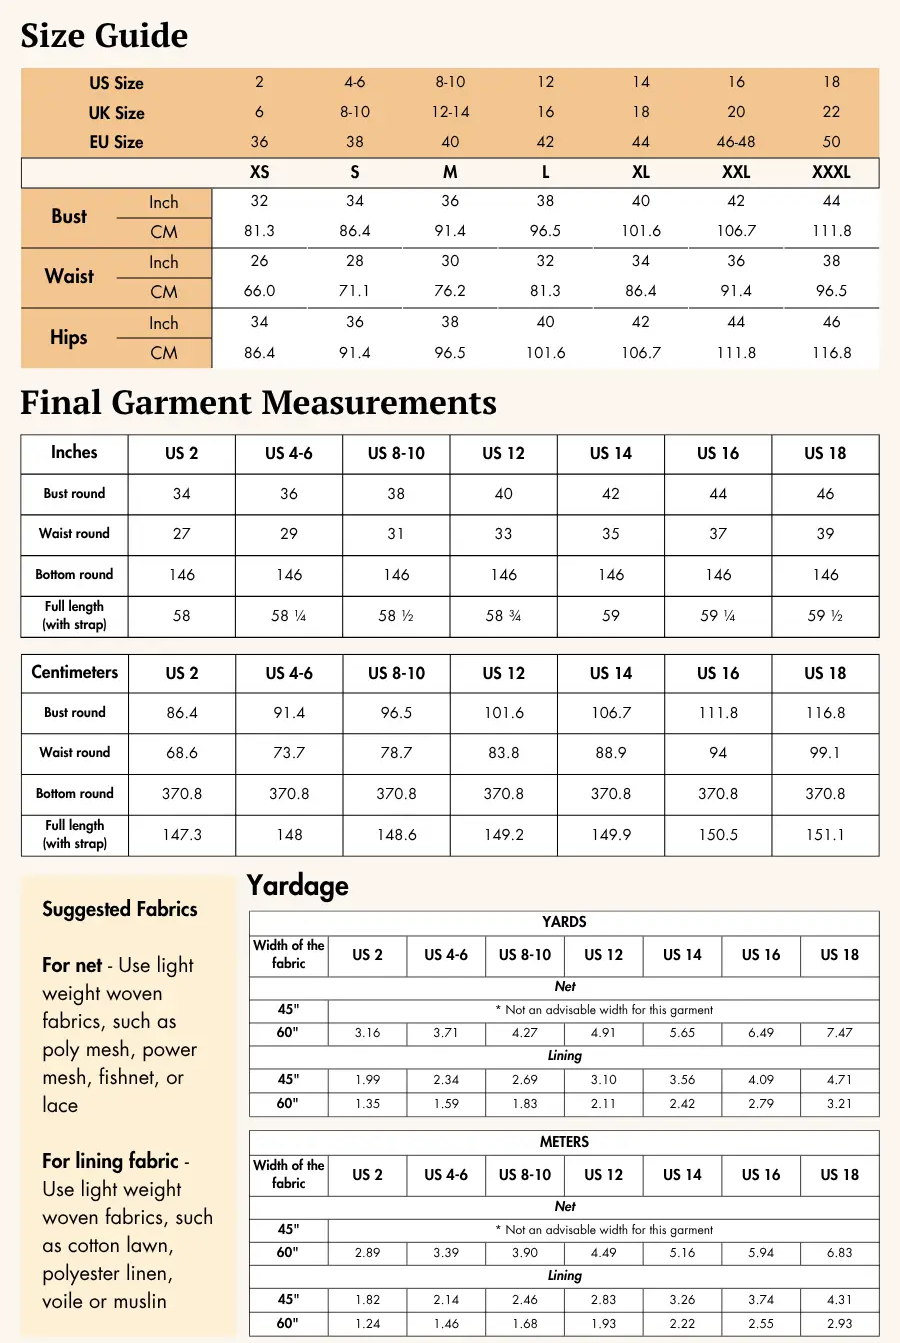
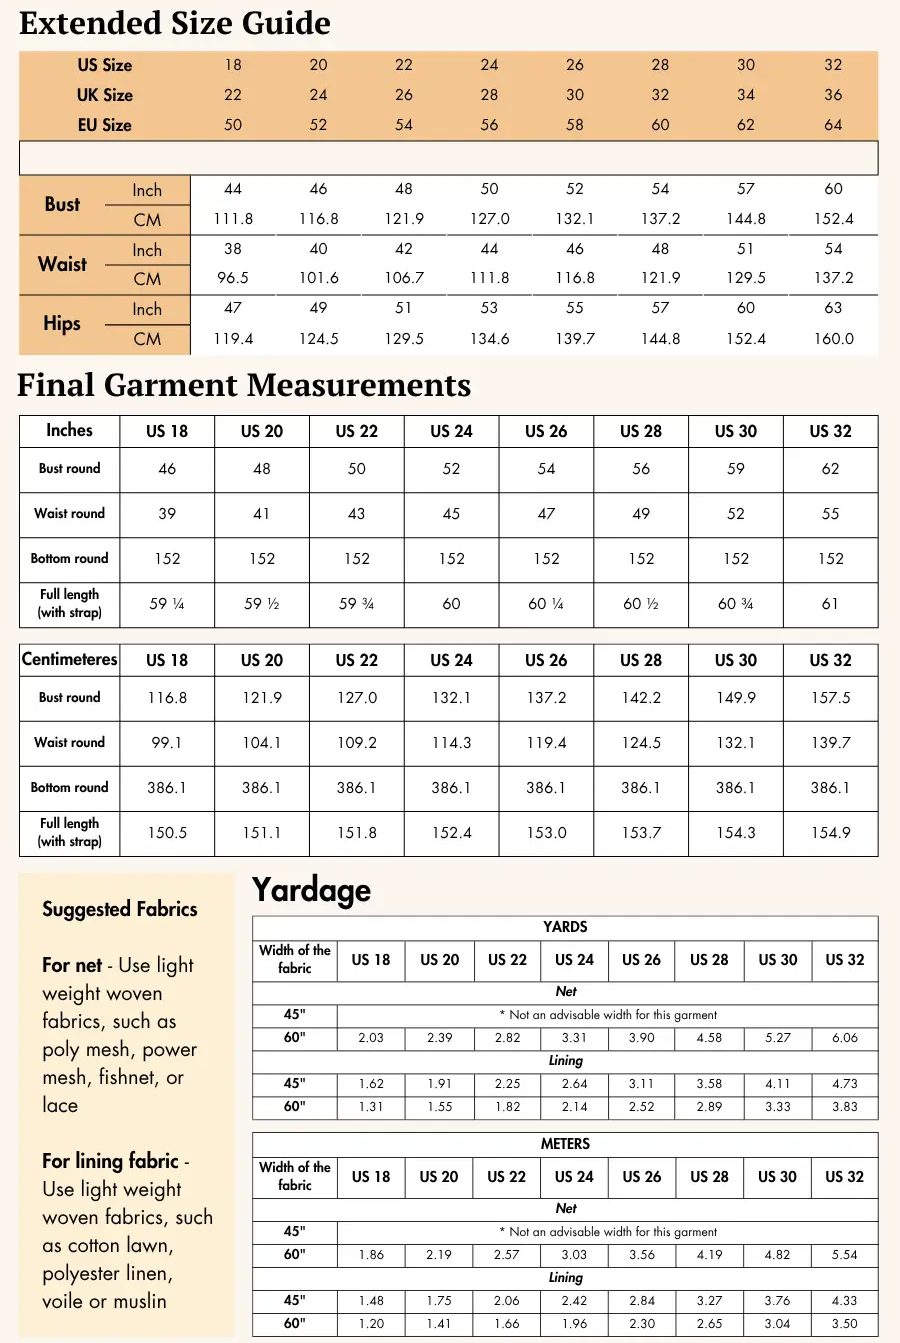
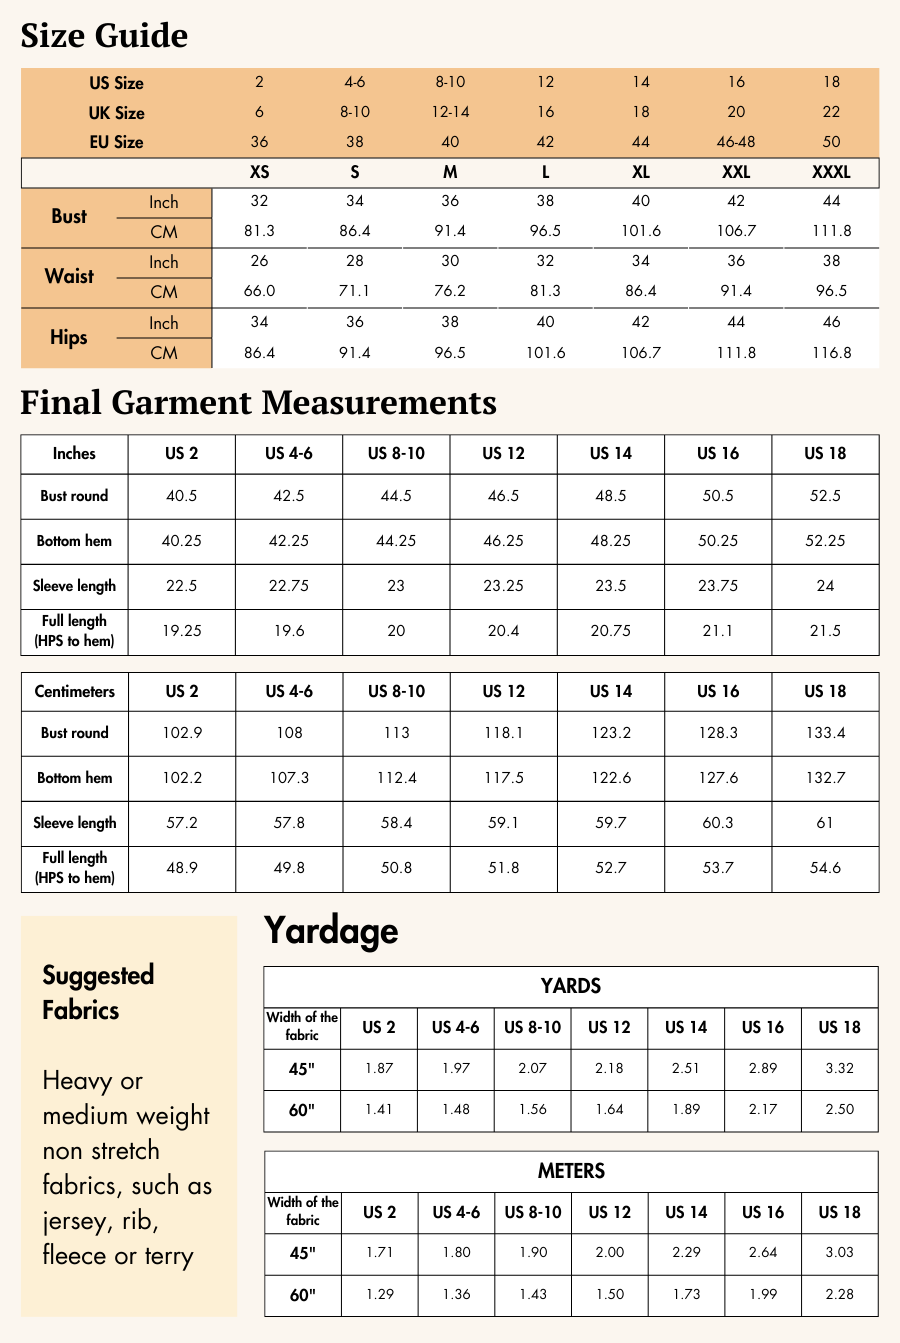
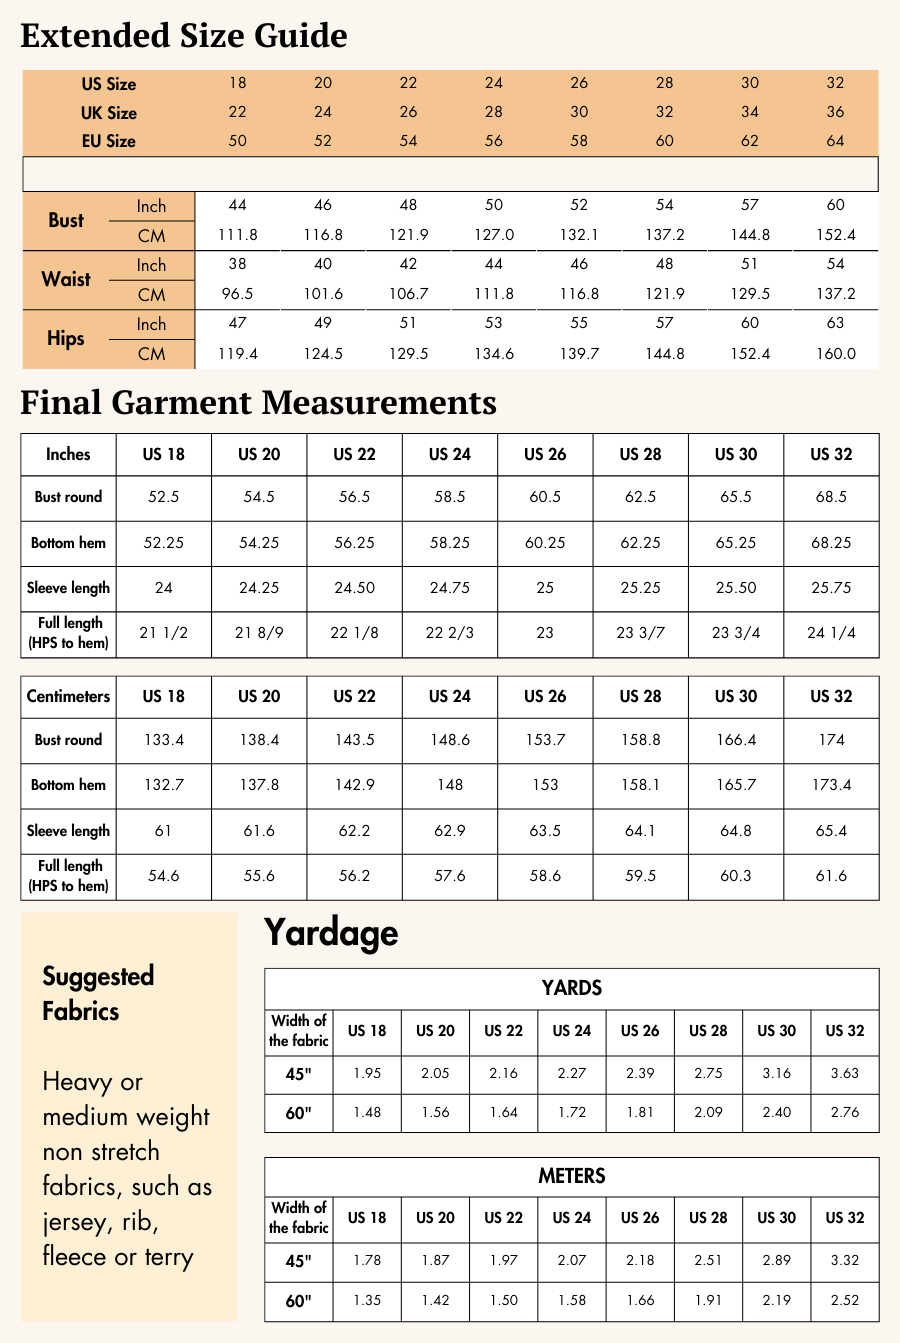
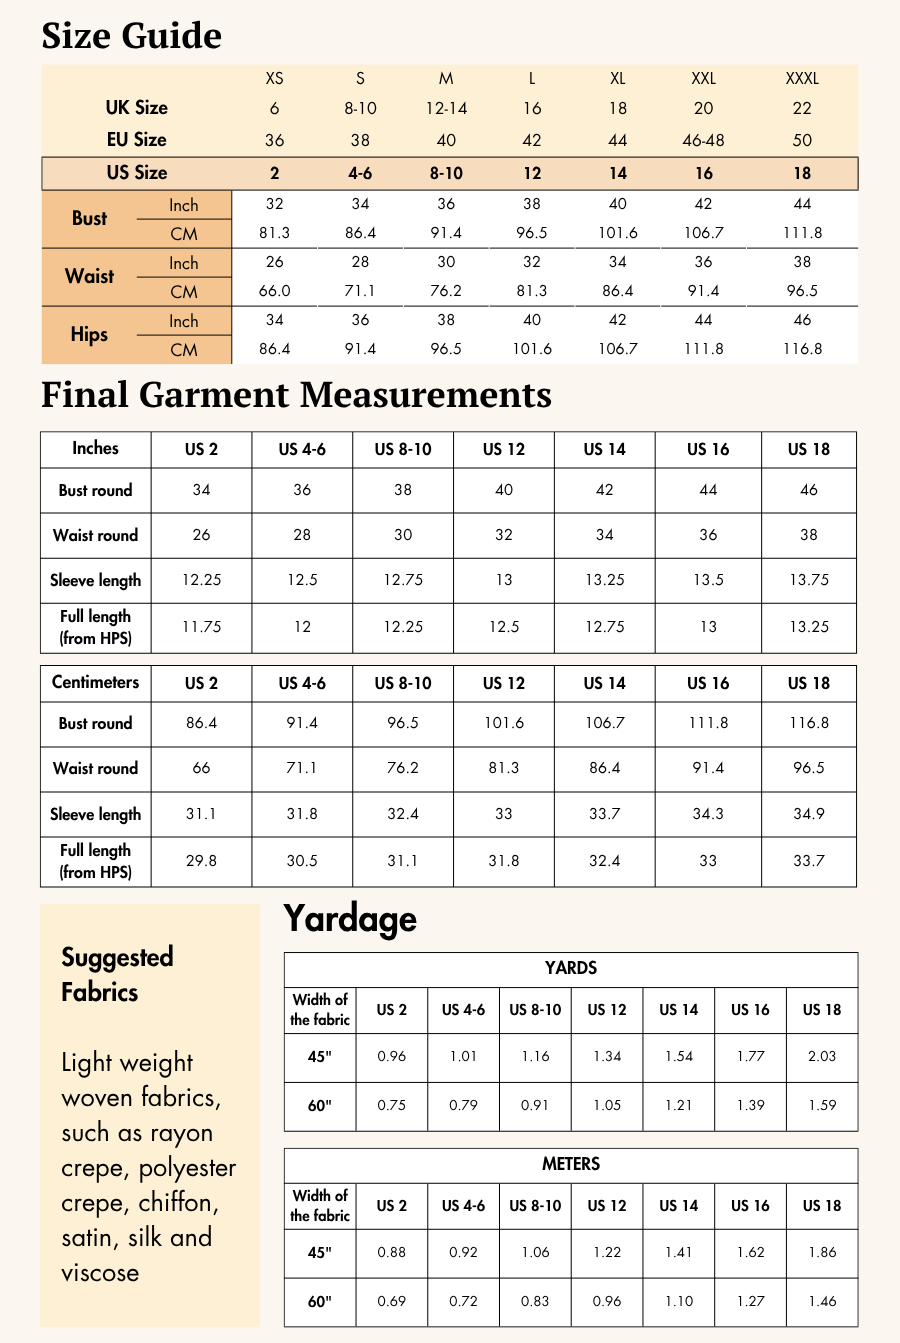
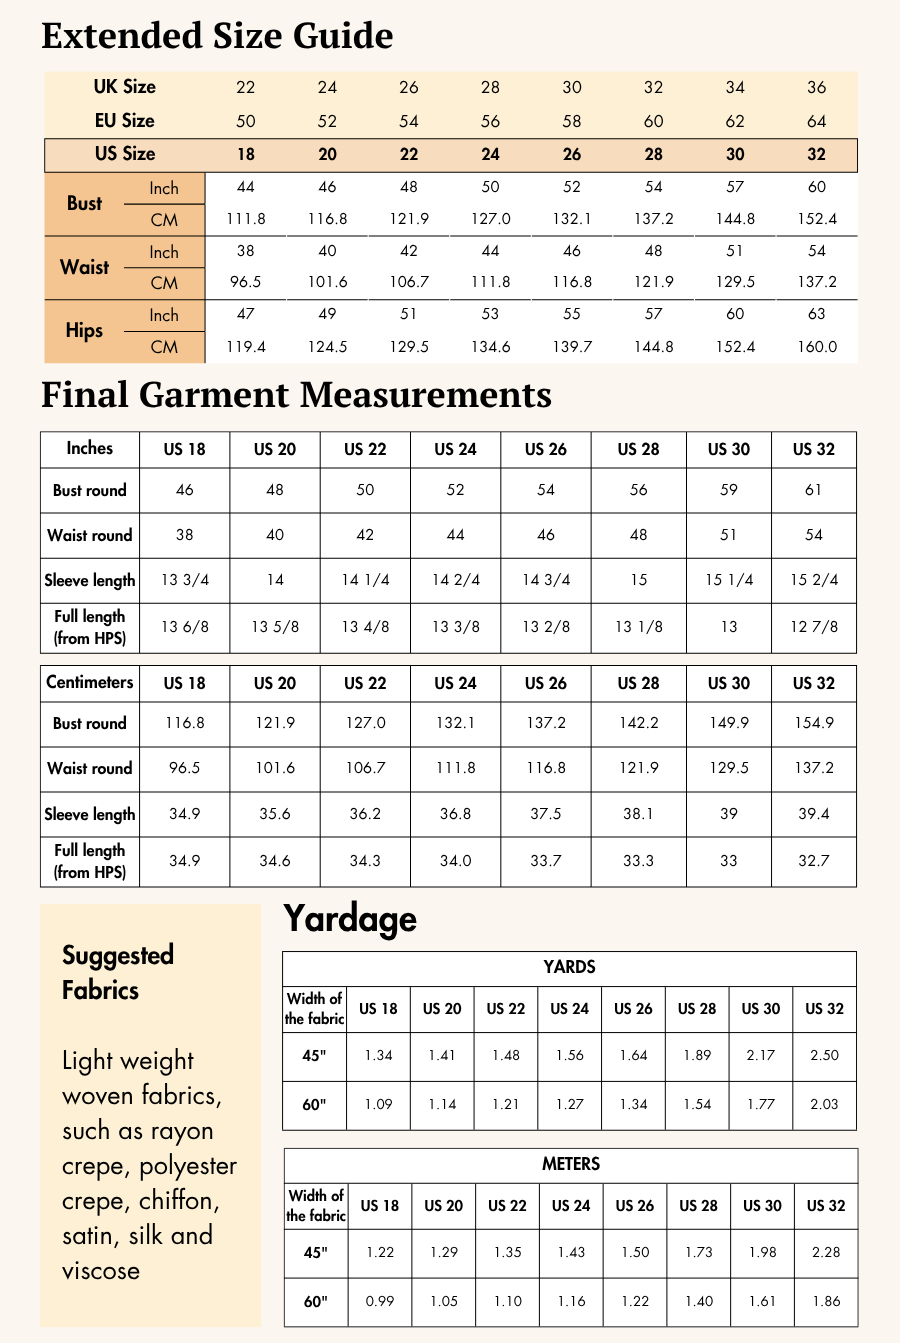
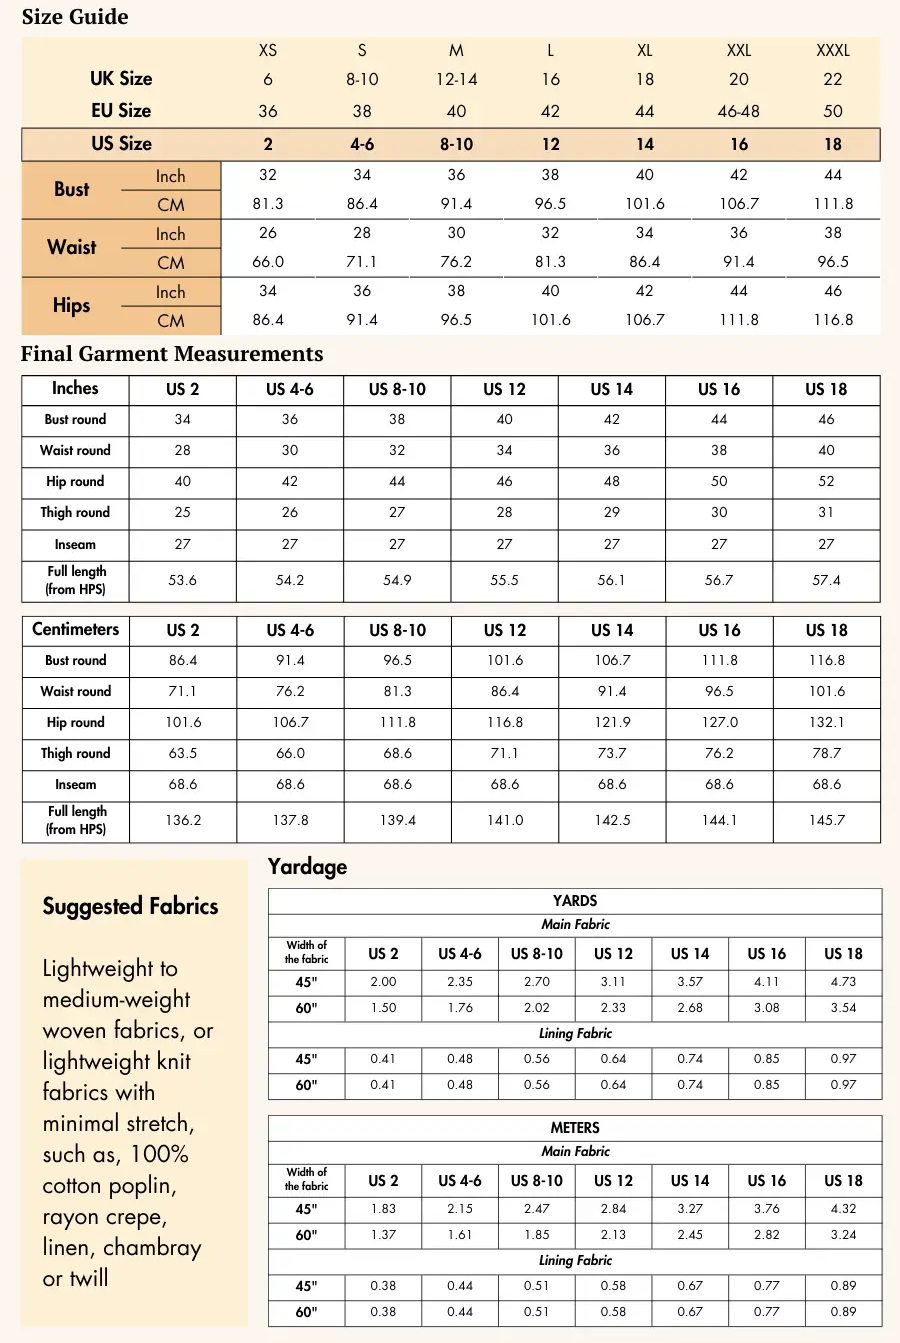
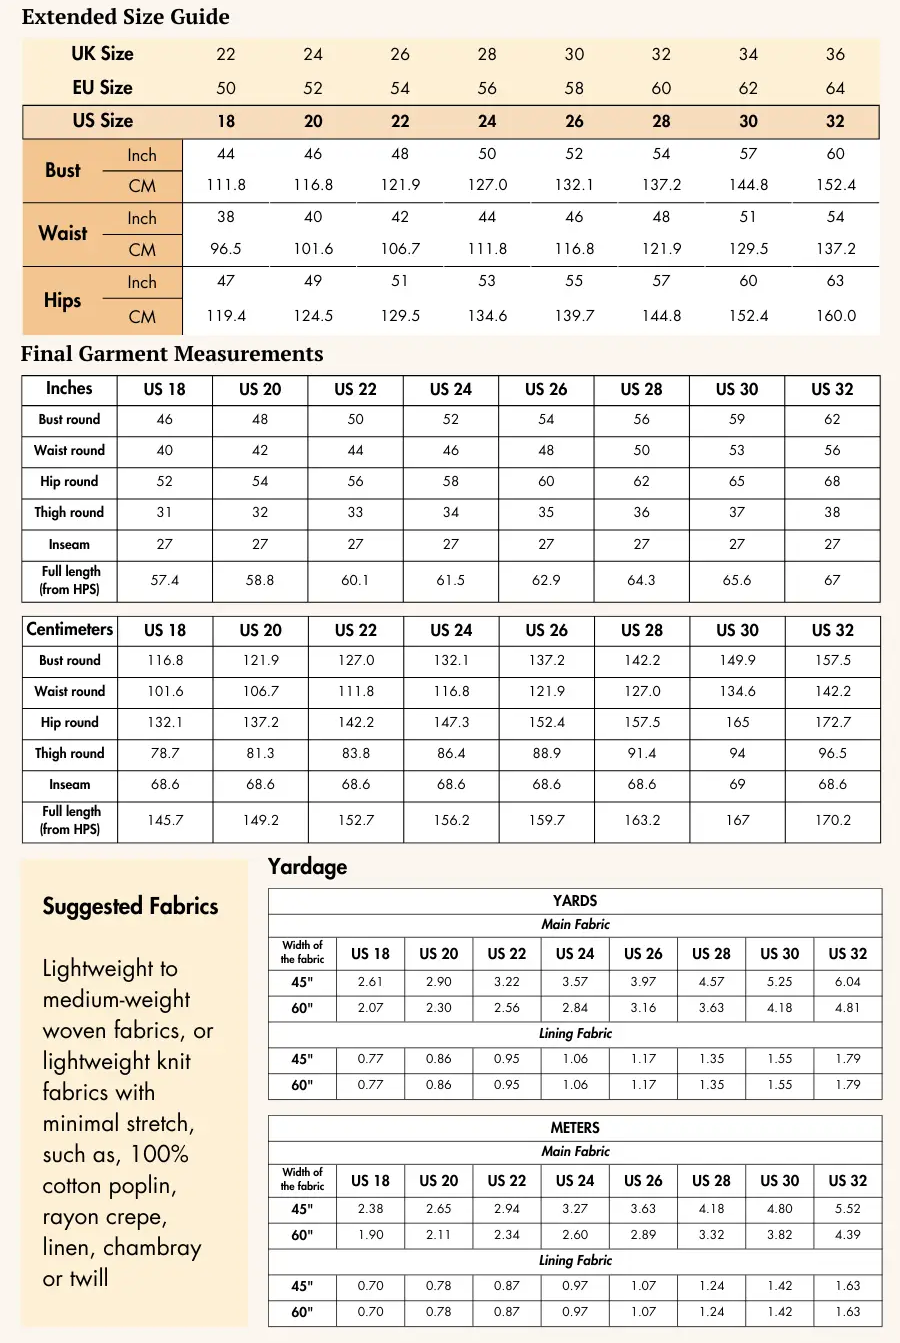
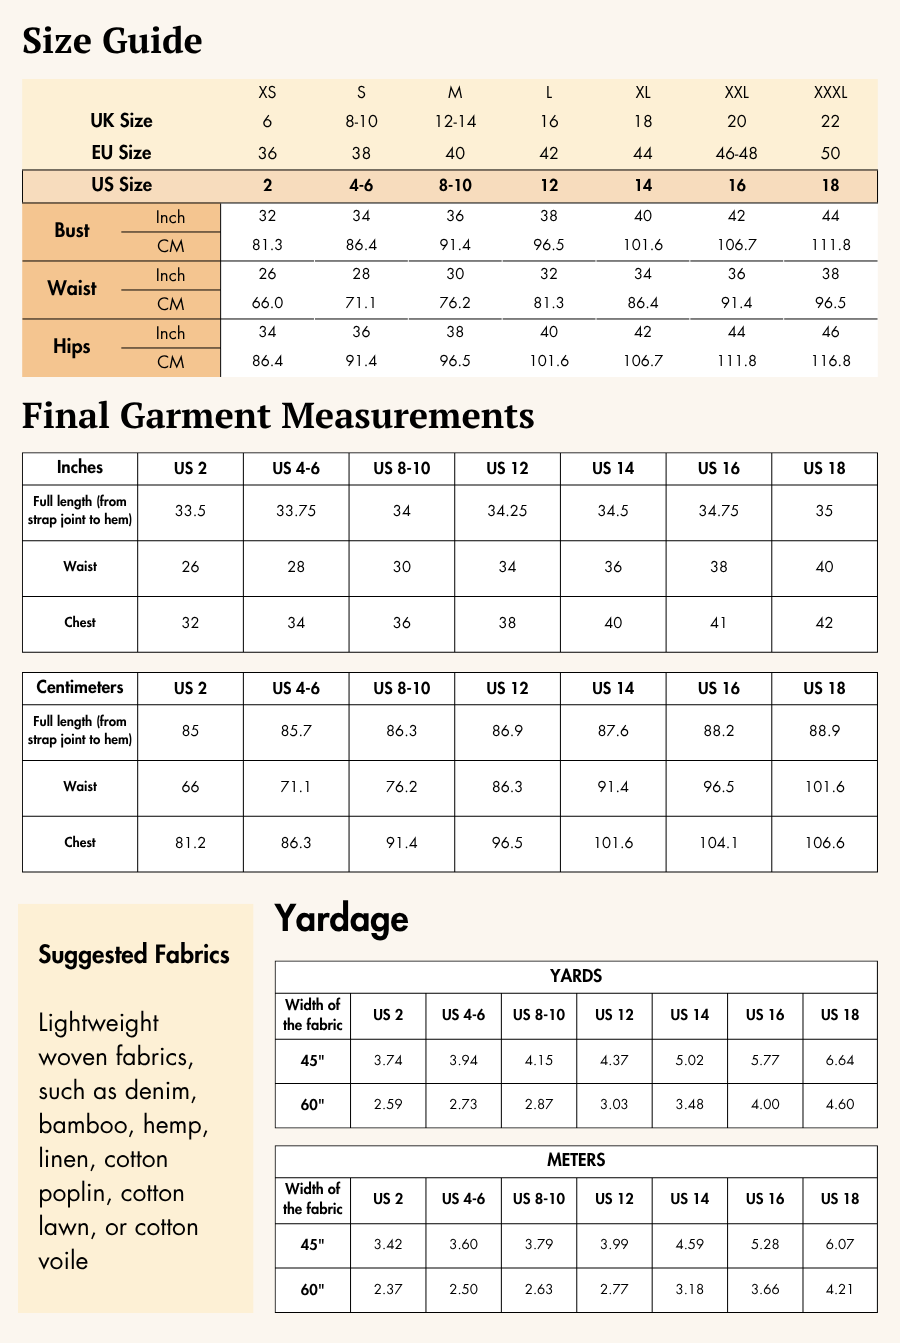
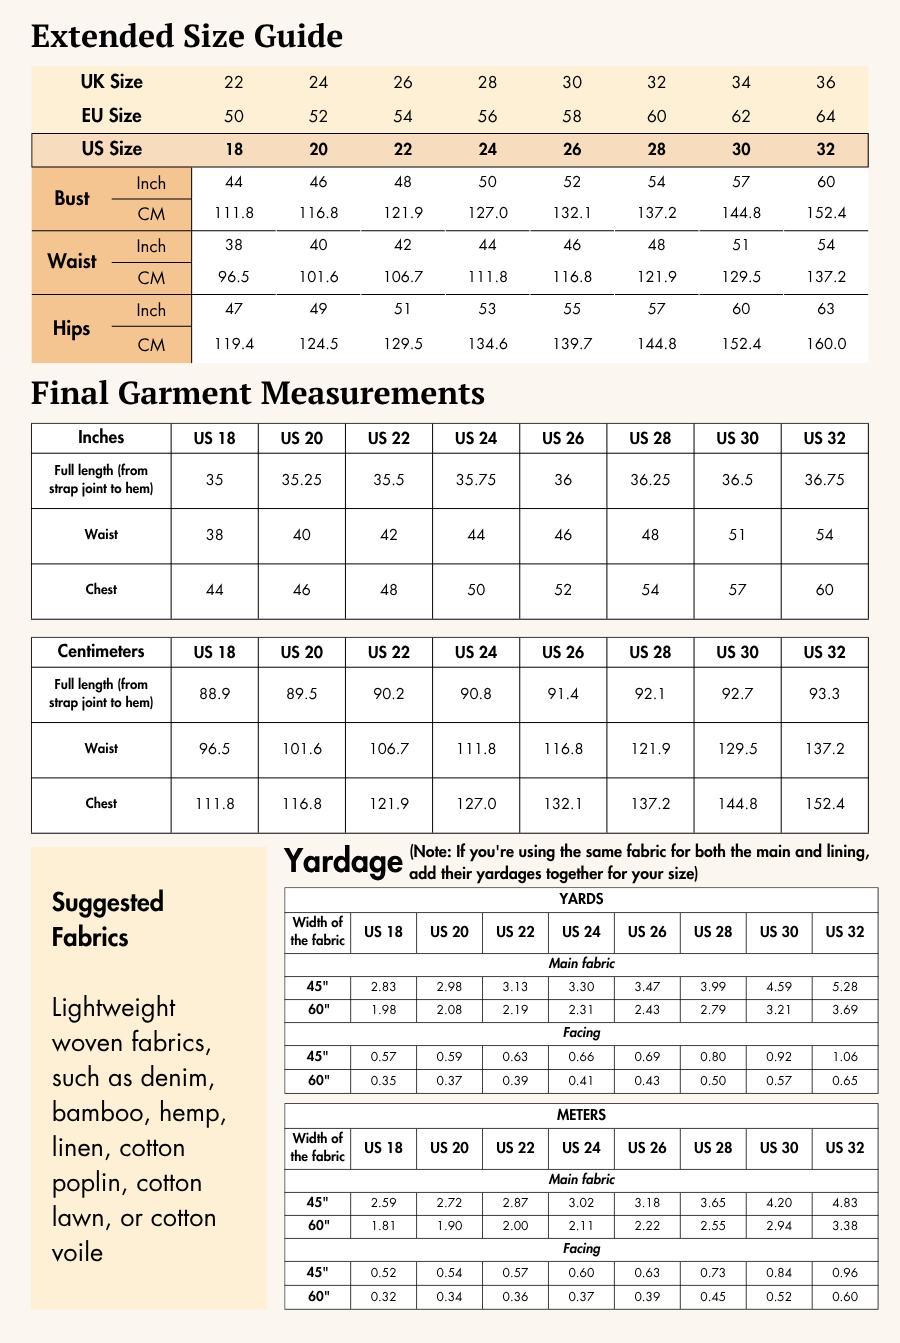
The Rosaline Dress pattern is available for sizes US 02 - US 32 | UK 06 - UK 36 | EU 36 - EU 64. Check the Rosaline Dress Size Chart and measure yourself to select the correct size (see the garment and body measurement tables).
Verify how much fabric you need by referencing the fabric yield table.
Step 3: Printing Your Digital Sewing Pattern
Before cutting your fabric, print your digital pattern at 100% scale on the correct paper size (usually A0 or A4/US Letter). Once printed, trim and tape the pages together following the pattern guide. Now your pattern is ready to use!
If you want to learn more about how to Print Digital Sewing Patterns, click here.
Step 4: Pattern Inventory: What Pieces to Prepare
For sewing the Rosaline Dress, cut all of these pieces:
A. Front - cut x2 fabric
B. Side back top- cut x2 fabric
C. Center front top - cut x1 fabric
D. Center back smocking block - cut x0 fabric
E. Front and back bottom - cut x4 fabric
F. Sleeve - cut x2 fabric
G. Bottom facing - cut x4 fabric
H. Center back smocking ready - Use to measure correct smocking panel size after the sewed smocking block fabric piece.

Step 5: Pattern Marking


-
Lay out all pattern pieces according to the cutting diagrams. Ensure the grainline arrow for each piece runs parallel to the selvage for best drape.
-
Transfer all markings: Notches, grainlines, center fronts/backs, fold lines, circles, buttonholes, and strap/zipper placements, using chalk, pen, or tailor’s tacks onto the wrong side of your fabric.
-
Cut notches anywhere they appear on the pattern edge—these are crucial for proper alignment and assembly.
-
Mark the center front on all pieces cut on the fold.
Step 6: Cutting Layout
- Reference the correct layout diagram in the Rosaline Sewing Guide for your chosen size and fabric width (45” or 60”).

-
If using fabric with nap or a directional print, buy extra yardage and align pattern pieces accordingly.
-
Pin or use pattern weights to secure each piece for accurate cutting.
-
Trace the shapes and cut along the outlines, carefully removing any marking lines after cutting.
Step 7: Fabric Cutting and Preparation
-
Cut out every required piece per your size from your main fabric. For pieces needing two cuts, fold fabric as shown in cutting diagram.
-
Cut all notches as shown on the pattern.
-
Double-check that you have all pieces before you start sewing.
Seam allowance: Follow the seam allowances as indicated on the pattern file layers. These are provided specifically for each piece to ensure accurate construction. This pattern uses a 1.3 cm (or 1/2” inch) seam allowance all around, 1.6 cm (or 5/8” inch) at the sleeve armhole and 2.5 cm (or 1” inch) at the sleeve hem and at the top of center back smocking block.
Step 8: Step by Step Instructions to Sew a Milkmaid Dress

1. For creating front top panel:
1a. Place the front and center front top piece facing right sides together. Align the pieces
along the panel seamline, matching the panel notch. Pin them together.
1b. Sew on the panel seamline.
1c. Spread open the seamline and iron it.
1d. Repeat the same process from step 1a to 1c for the other front piece.

2. For creating the elastic casing of the center back smocking panel:
Fold the neckline seam allowance twice such that first fold is about 1cm from the edge and the second fold is at the seamline (fig.2a). Sew on the edge of the fold to close the casing
to achieve figure 2.

3. For creating smocking on the center back smocking panel:
To achieve smocking, you’ll need elastic thread. Elastic thread is used as the looper thread for lock stitching. Decrease the thread tension on your sewing machine. Always check the spool to ensure there’s enough elastic thread, as it’s crucial not to miss a seam in between, as it can affect the smocking effect. It’s always recommended to try it out first on a sample piece of fabric before proceeding with the final patterns.
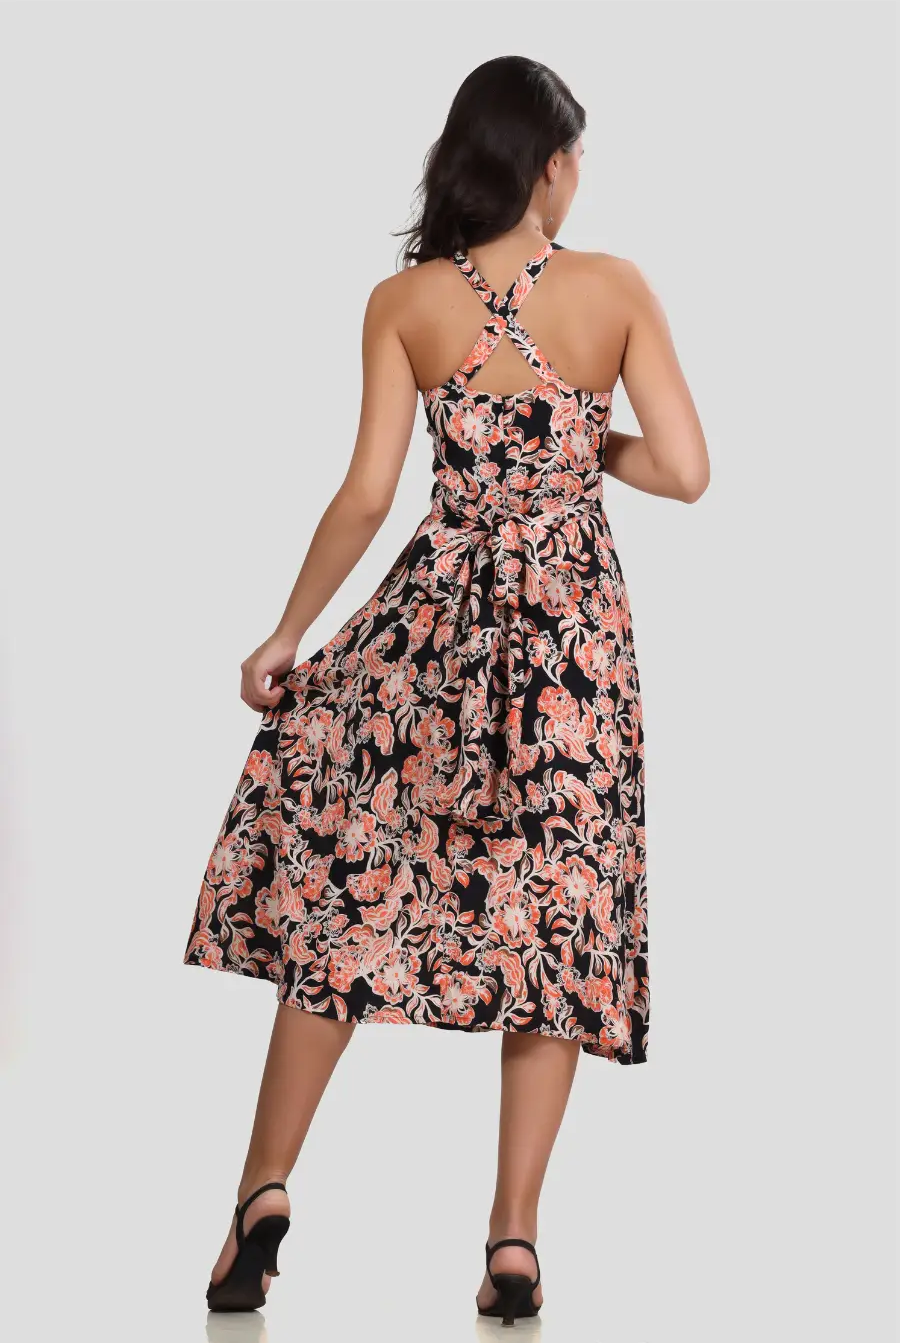
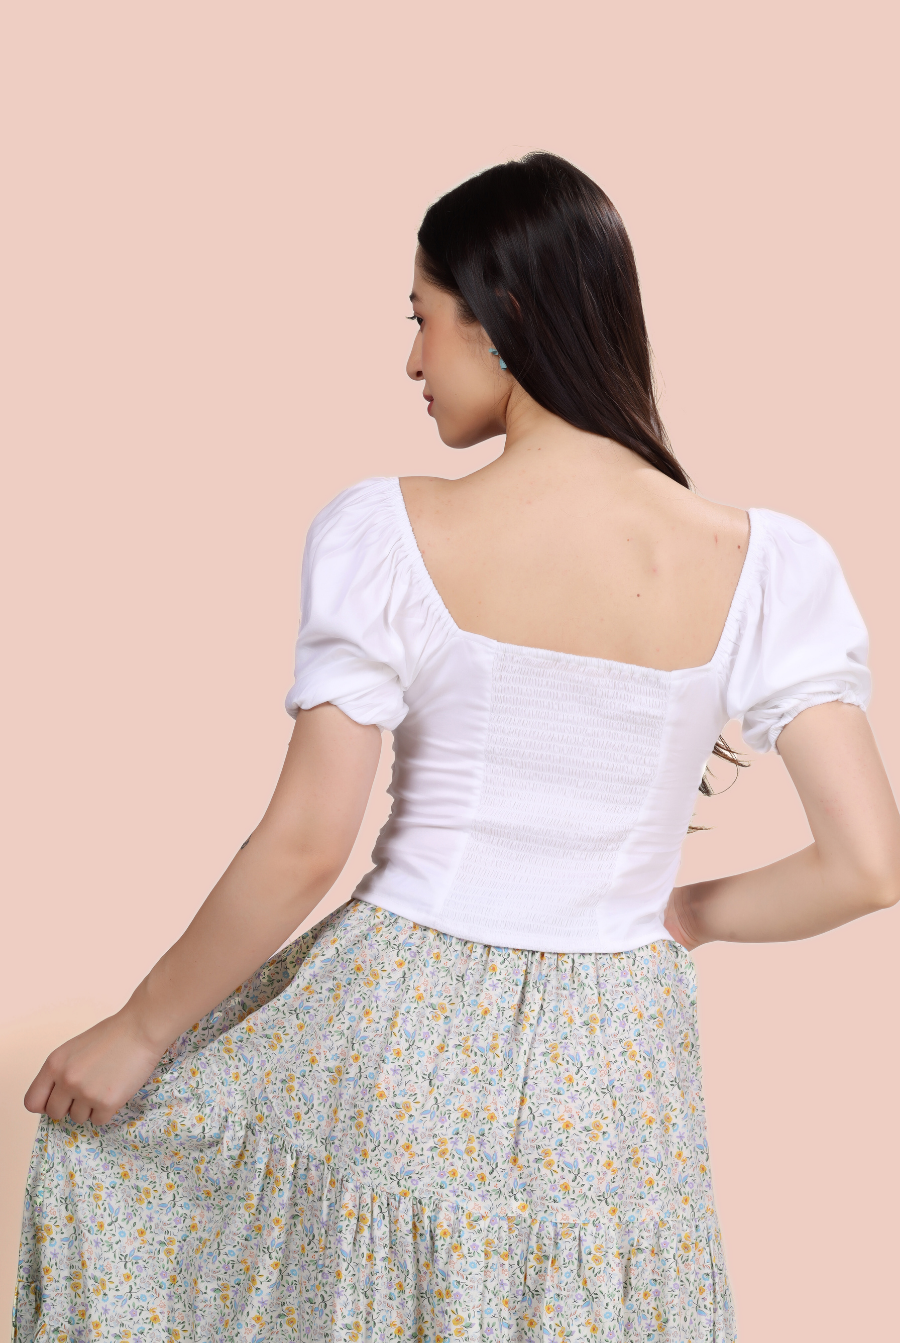
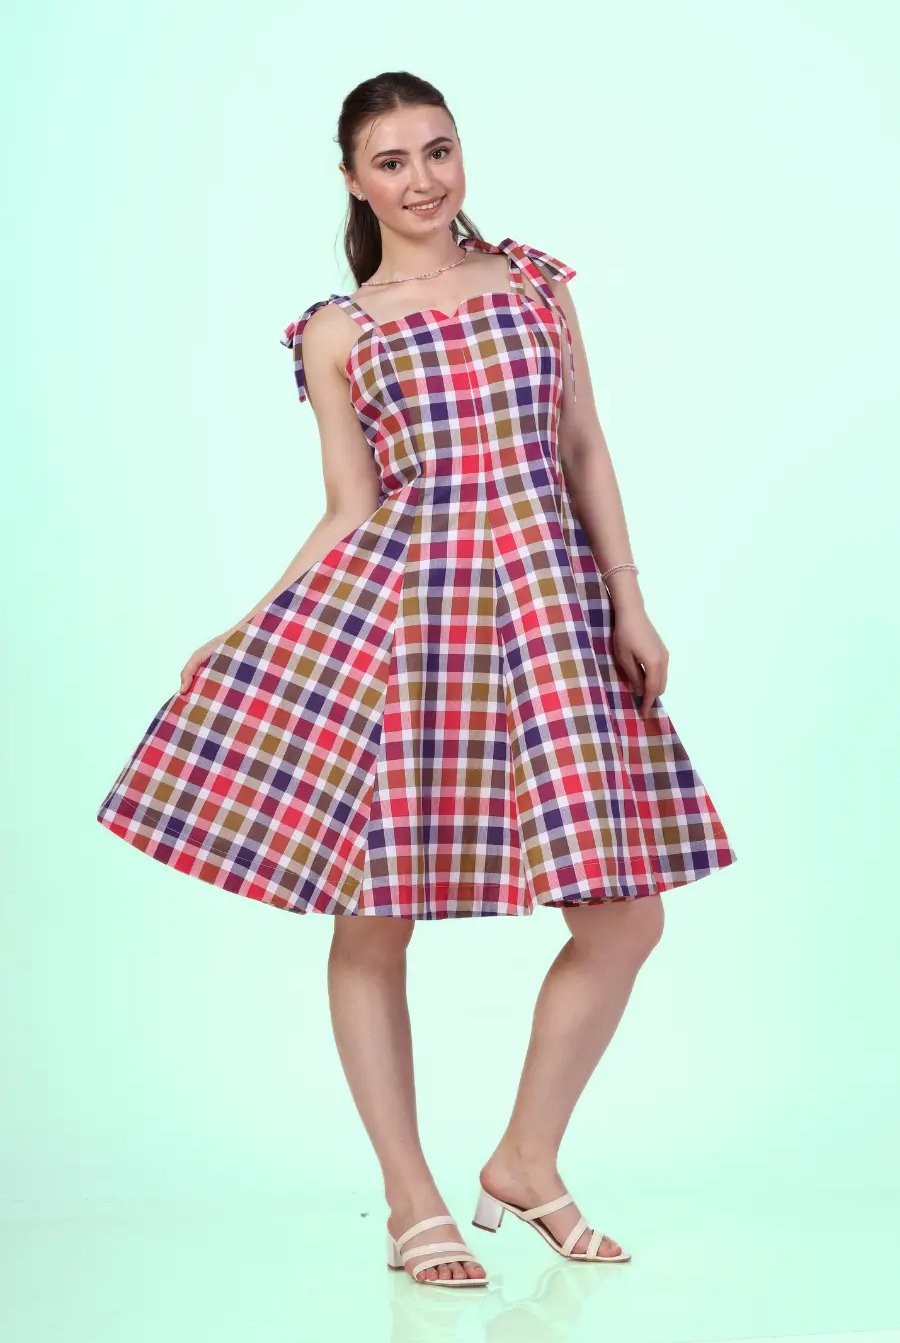
For center back smocking, you are free to use as many lines as you please. On the front page, the model has 22 lines of smocking at the back. Mark 22 equal distance seams on the back smocking fabric. Now, create 22 stitching lines on the block (fig.3a). Secure both ends of the stitch line with a few back stitches. It will get shrinked after the stitches.
Use the center back smocking ready pattern as a measurement guide to cut the center back smocking block in its relaxed form, meaning don’t stretch the fabric while cutting. Also, transfer the seam allowance from the ready pattern onto the smocking
block to achieve figure 3.

4. Use an 8mm elastic strip, cut to the length of the back neckline of the smocked panel. To make tighter, you can reduce the length by 0.25 - 0.5 inch (fig.4a). Insert the elastic into the prepared casing of the center back smocking. Pin the elastic at the both end to hold the elastic strip at it’s place to achieve the figure 4.

5. For creating back top panel:
5a. Place the side back piece on the smocking panel. Sew along the back panel seam.
5b. Spread open the smocking panel and iron it.
5c. Repeat the same process from step 5a to 5c for the other side back piece.

6. For creating elastic casing of the sleeve panel:
Clip the armhole notch until armhole seamline at both side of the sleeve. Fold the armhole twice such that first fold is of 1cm on seam allowance and second fold is from armhole seamline. Iron and pin the armhole. Sew on the edge of the fold to close the casing to achieve 6a. Repeat the same process to create the casing for the sleeve hem (fig.6b).
The elastic strip for the armhole casing should be 1 inch shorter than the armhole
length and the other strip for the sleeve hem casing should be 1 to 2 inches shorter
than the sleeve hem length.
Insert the elastic to the casings and pin them at the ends to hold them at their places
(fig.6).

7. For creating front and back bottom skirt panels with finished hem:
7a. Place the bottom facing on the hem of the front and back bottom piece facing right sides together. Sew on the hemline.
7b. Turn over the bottom facing to the wrong side and iron the seamline.
7c. Fold the seamline twice such that first fold is about 1cm and the second fold is from the seamline. Iron it. Sew on the edge to finish the raw edge of the hem.

7d. Place the two front and back bottom piece facing right sides together.
7e. Sew on the center seamline. Repeat the same process for the other two front and back bottom pieces.

8. For creating gathers on the skirt panel:
Keep the sewing machine setting on a 5-7mm stitch length. Sew between the waist seam allowance of the bottom skirt panel where gather notches are marked.
Tie the threads of the basting stitch at one end. Pull the thread from the other end to create gathers.
Repeat the same process for the other bottom skirt panel.

9. For creating front dress and back dress panels:
9a. Place the prepared gathered bottom skirt panel on the prepared back top panel facing right sides at the waistline. Match the length of the gather to the stretched smocking then spread and pin the gathers evenly.

9b. Sew on the waist seamline. Iron the seamline of the back waistline.
9c. Repeat the same process for the prepared front top panel and other gathered bottom skirt panel.
Optional: You can add an elastic strip on the bottom of the smocking panel for a better fit while attaching a skirt panel.

10. For attaching the prepared sleeve to the dress:
10a. Align the sleeve with the armhole, matching the armhole notch on the sleeve to the corresponding notch on the front dress panel. Pin in place and sew along the seamline.

10b. Take the other side of the same sleeve and match it with the back dress panel. Pin in place. The semi transparent effect in the illustration highlights the aligning.
10c. Sew along the seamline to fully attach the sleeve.
10d. Repeat the same steps (10a and 10b) for the other prepared sleeve panel on the other side of front and back armhole of prepared dress panels.

11. For attaching the zipper to the dress:
11a. Place the right side of the 14-inch zipper (preferred) on the side seam of the dress starting 1 inch below from the top. Pin them or use basting stitches to hold them in place. Sew on the dent between zipper teeth and zipper tape. Repeat the same process for the other zipper tape, placing it on the prepared back dress.

11b. Turn the dress wrong side out and close the zipper. Sew along the side seam, starting 1-2 cm above the zipper end and continuing down to the zipper end. Pivot your fabric so that you can sew horizontally across the bottom of the zipper tape to secure it in place. You’ll want to sew a few stitches back and forth to ensure its firmly anchored. Repeat the same process (11b) for the top of the zipper.

12. Sew the side seam from the sleeve hem to the top of the zipper, then from the zipper end down to the bottom hem. For the other side, sew from the sleeve hem to the bottom hem.

13. Fold the remaining neckline seam allowance of the front and back dress twice and sew on the edge of the fold to finish the raw edge.

Winslet’s sewing guide for Rosaline dress includes clear diagrams that walk you through each step, making it easy to follow and complete your project with confidence.
For an overview of Winslet’s Sewing Guides, click here.
Make the Rosaline Milkmaid Dress Your Next Project
If this tutorial inspired you, you’re going to love sewing with the Rosaline Milkmaid Dress Pattern by Winslet’s. It's beginner-friendly but detailed enough to make you feel like a pro. The illustrations are crystal-clear, and the final result? Absolutely gorgeous.
👉 Grab the Rosaline Milkmaid Dress Pattern here and bring your cottagecore dreams to life.
Show Off Your Milkmaid Dress
Show your creation on Instagram or Facebook with #MadeWithWinslets for a chance to be featured! For any questions or issues, email the Winslet’s support team at support@winslets.com.


