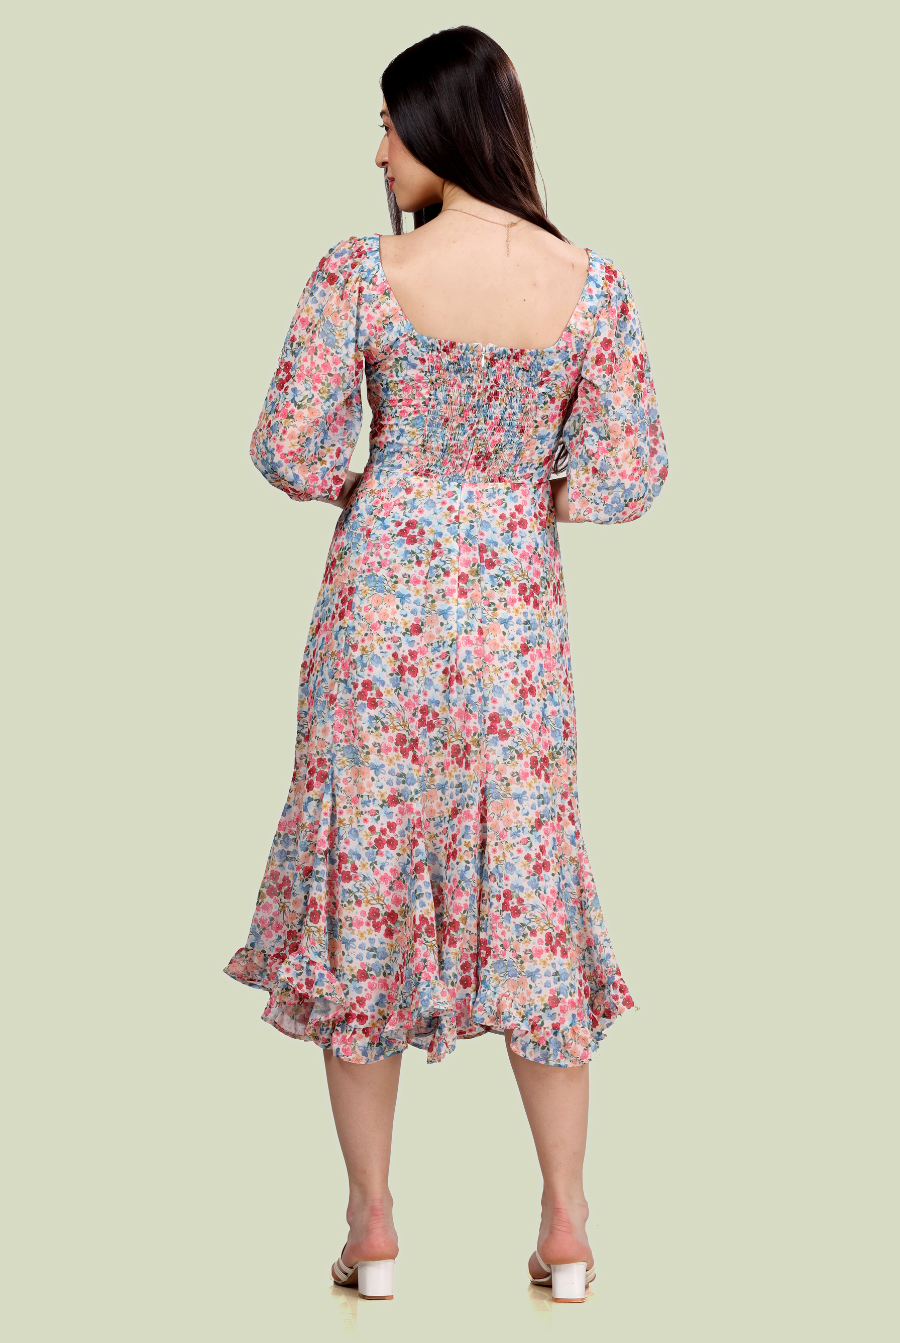
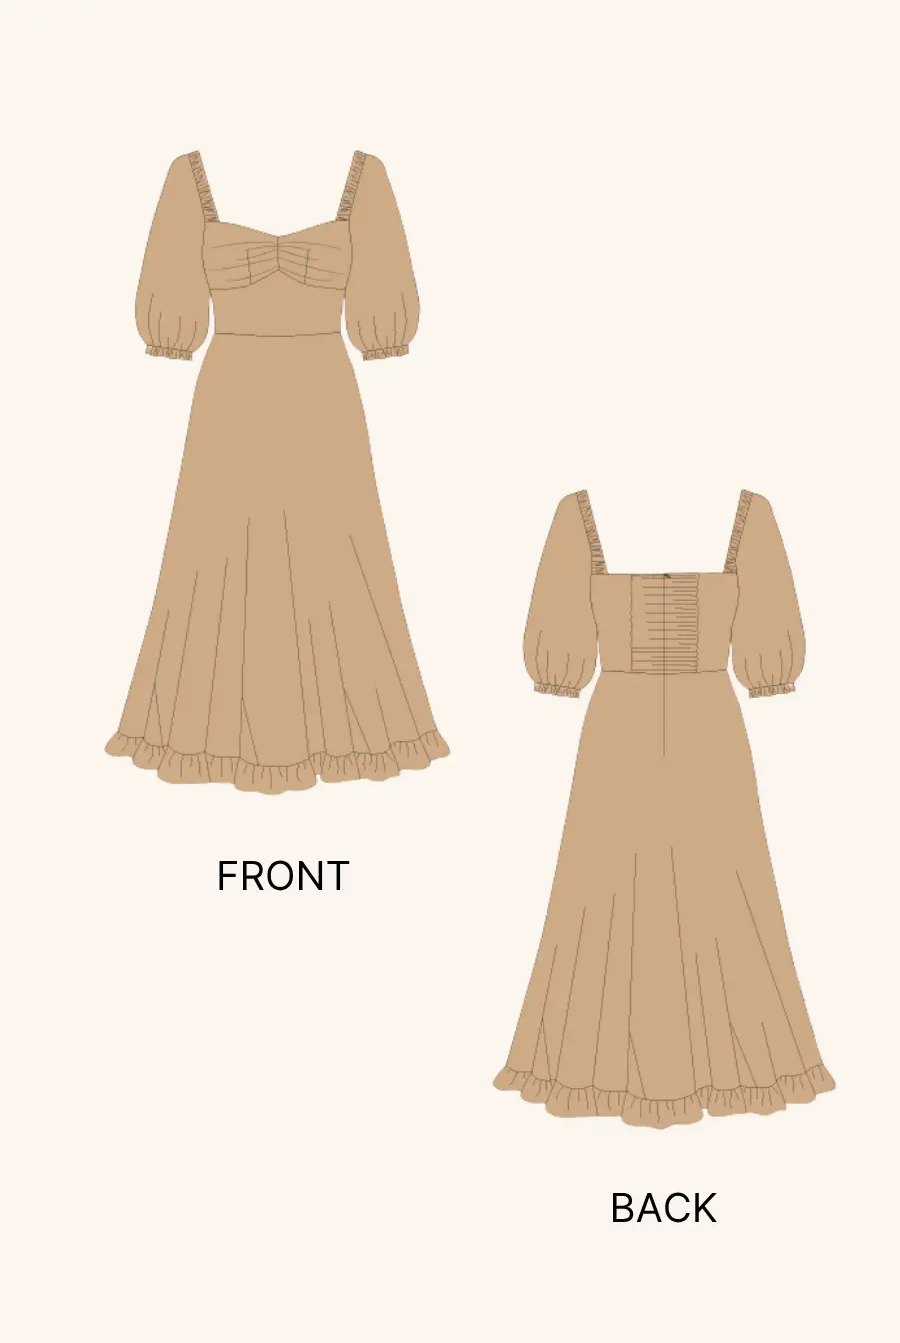
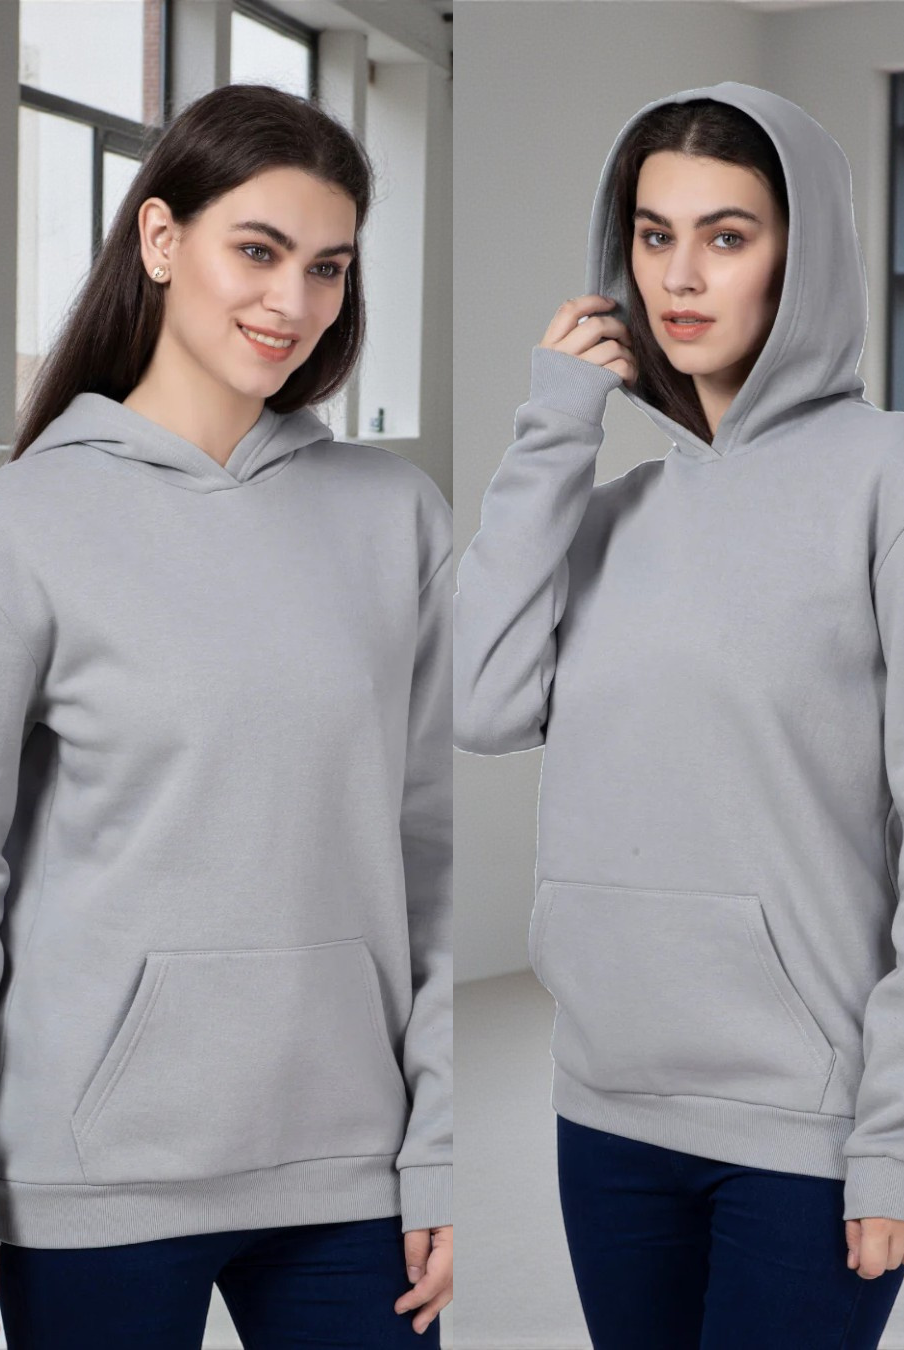
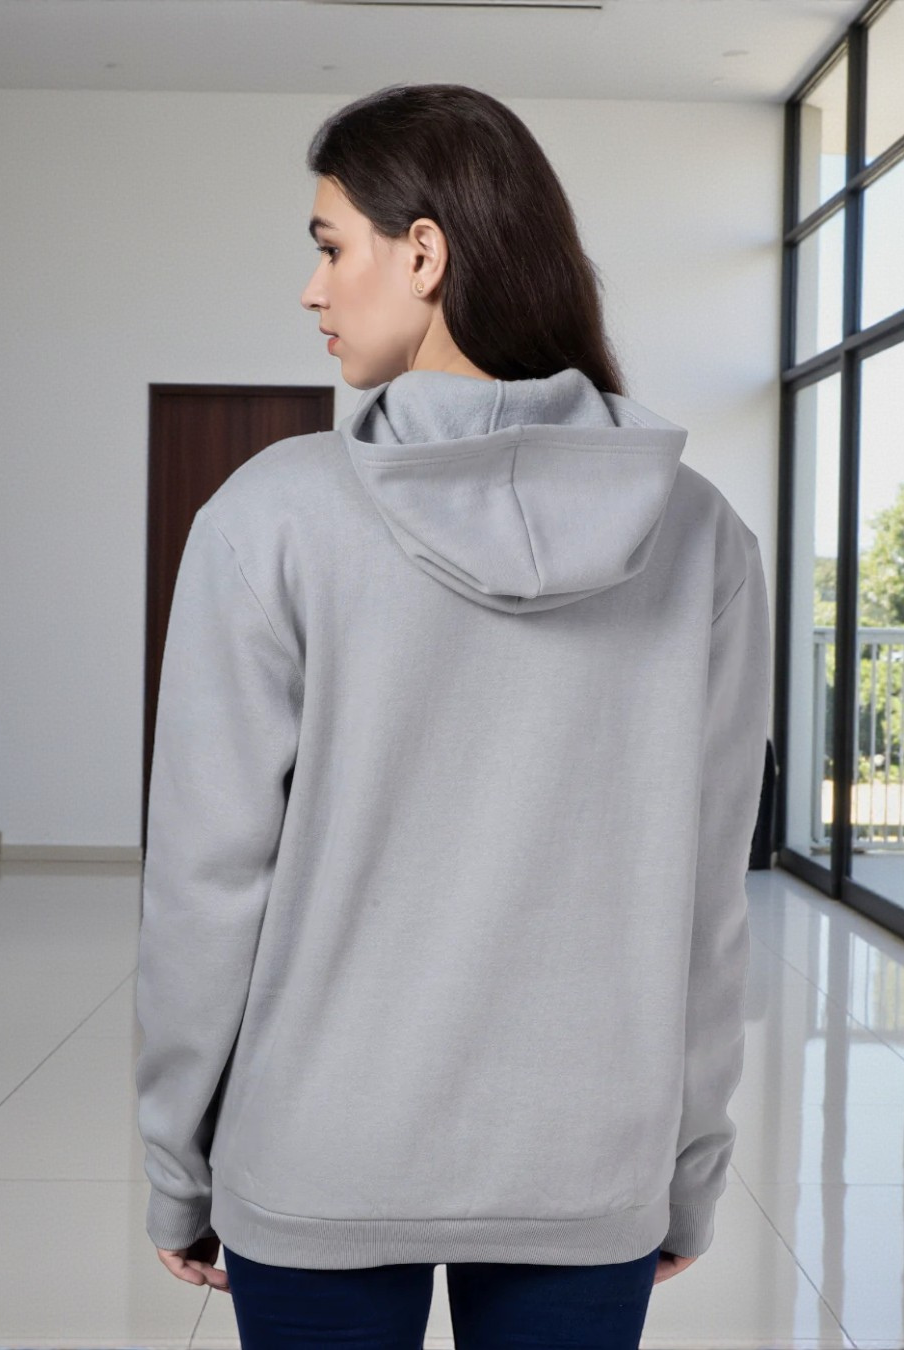
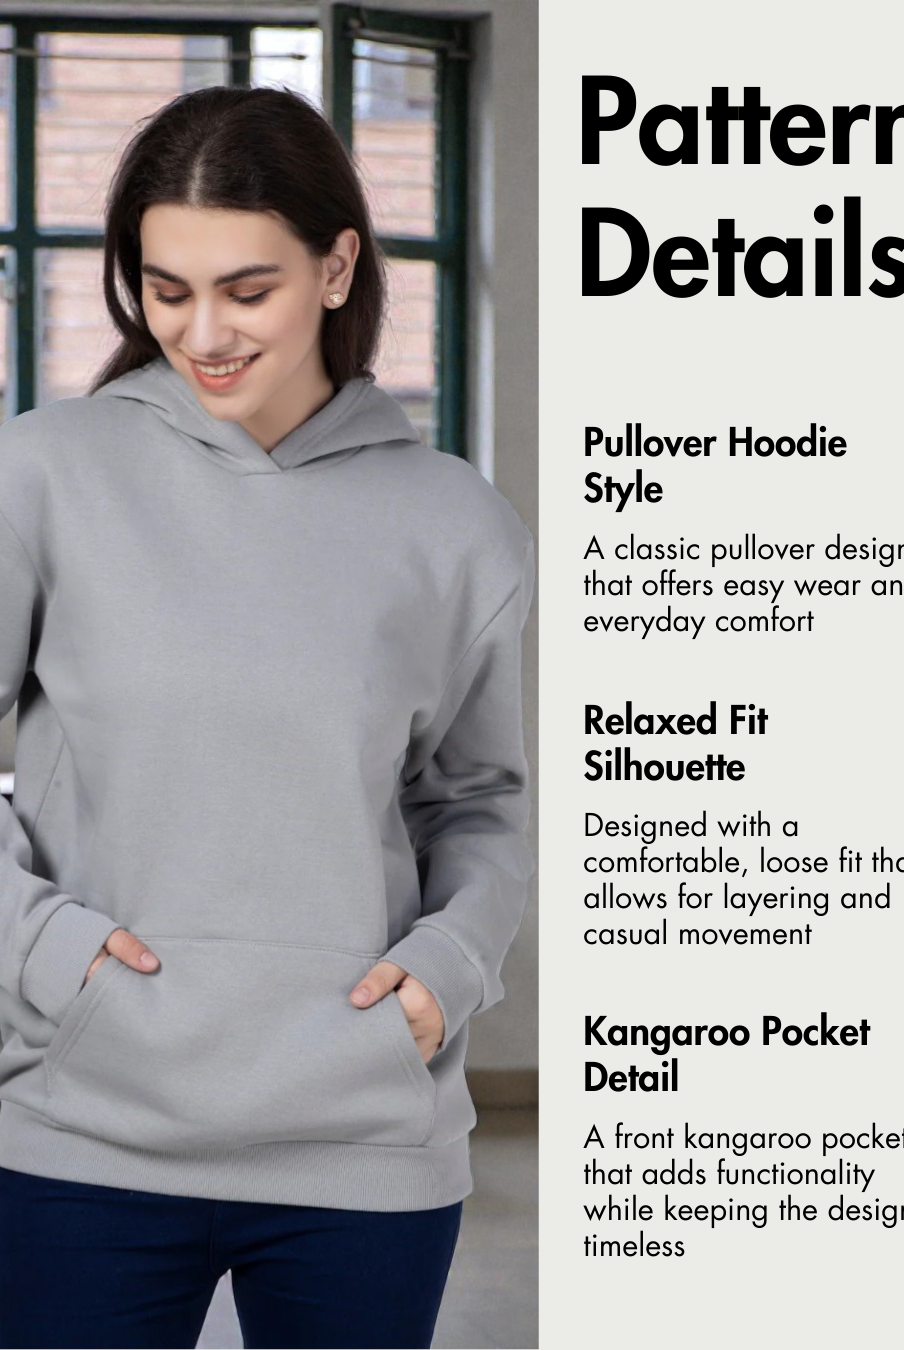
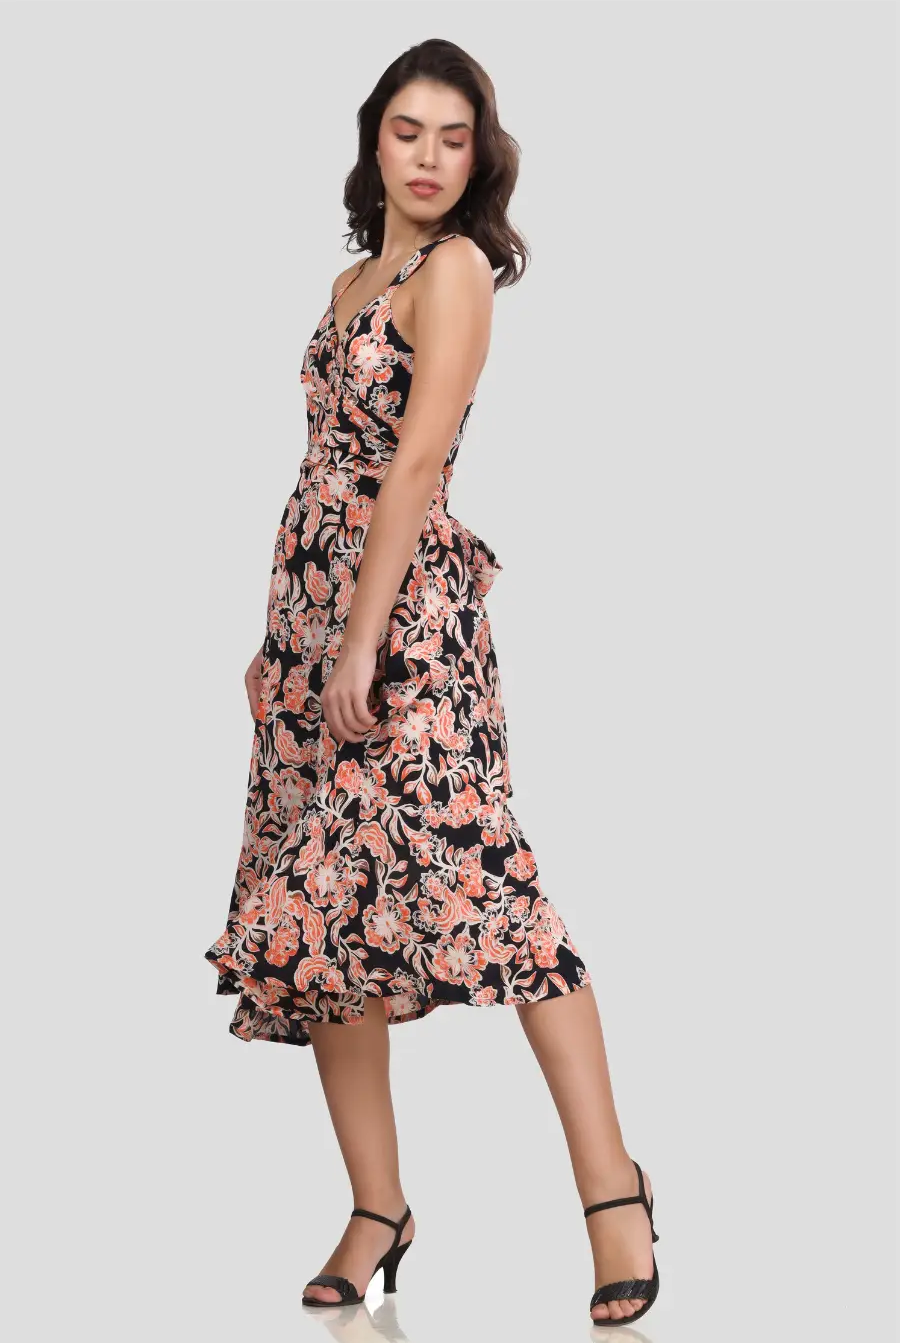
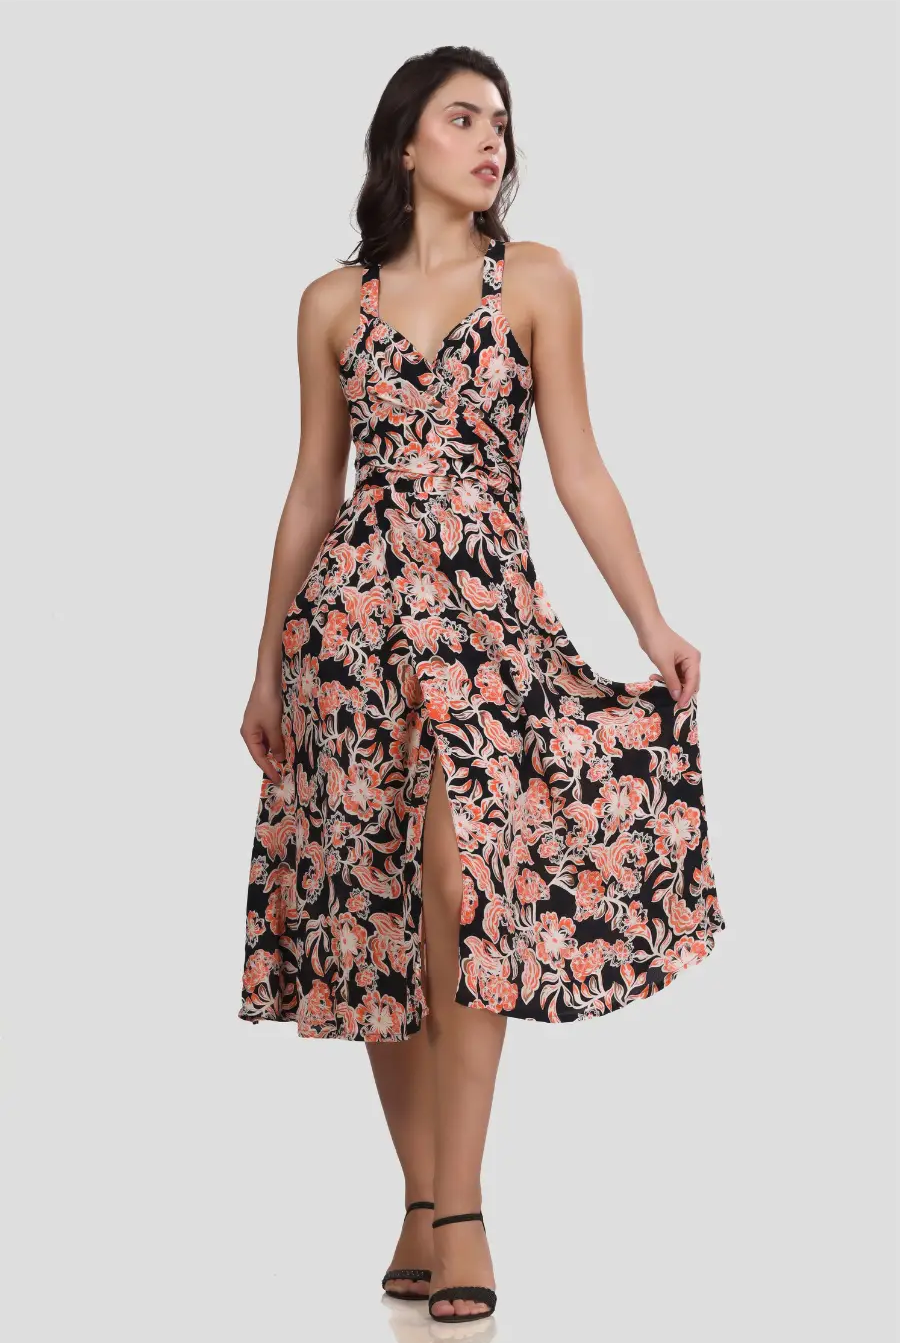
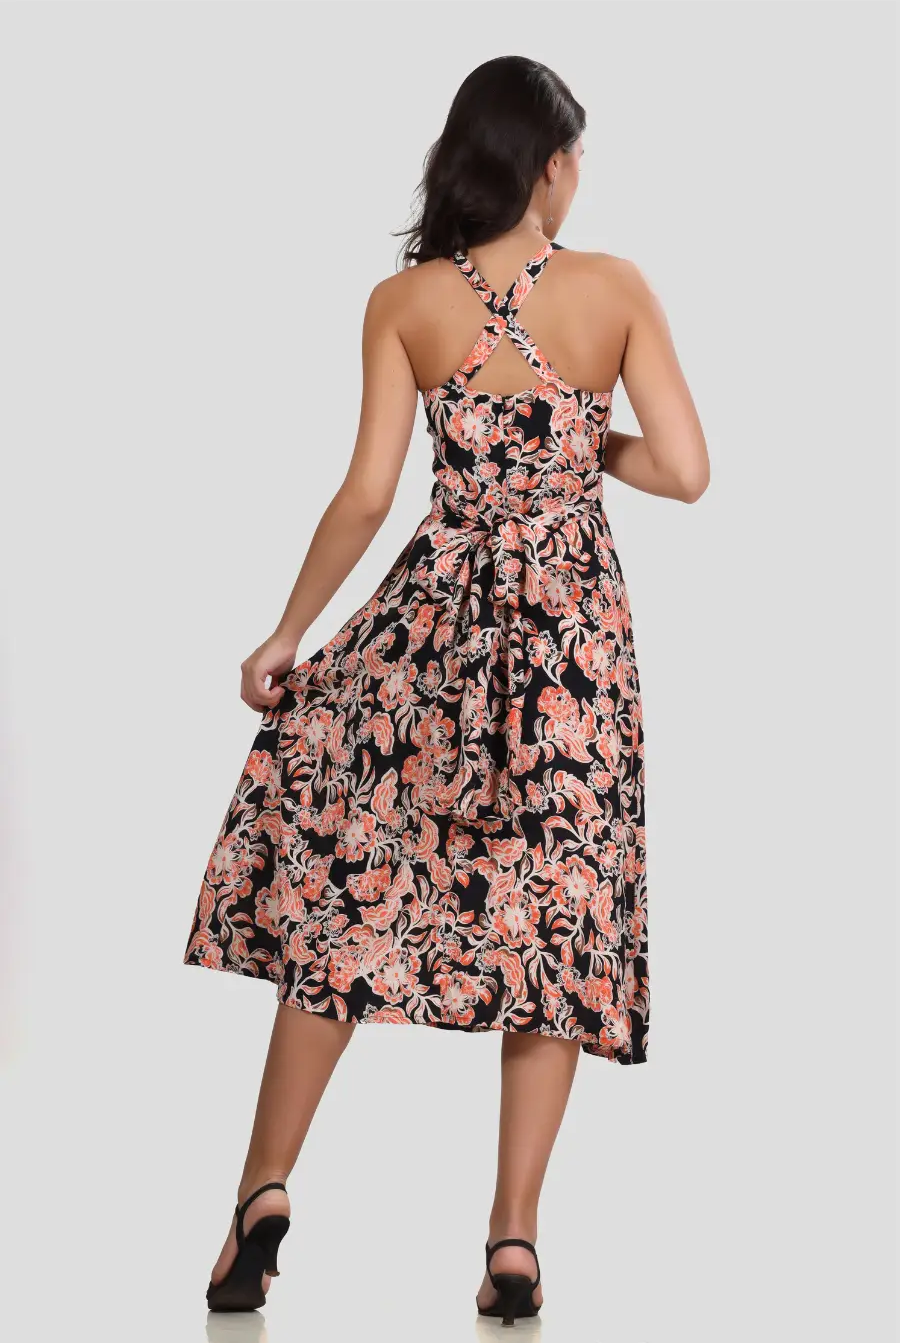
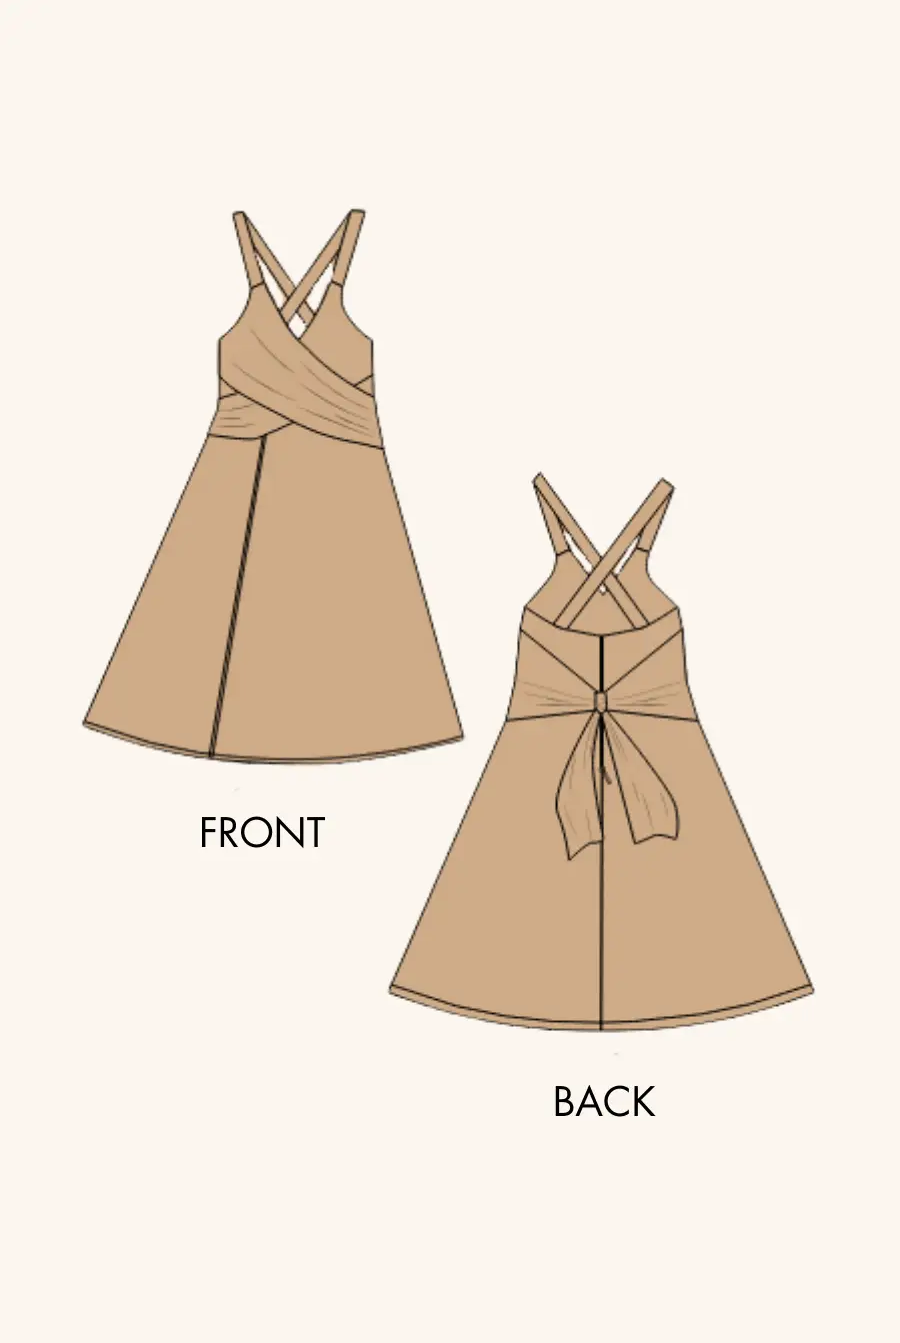
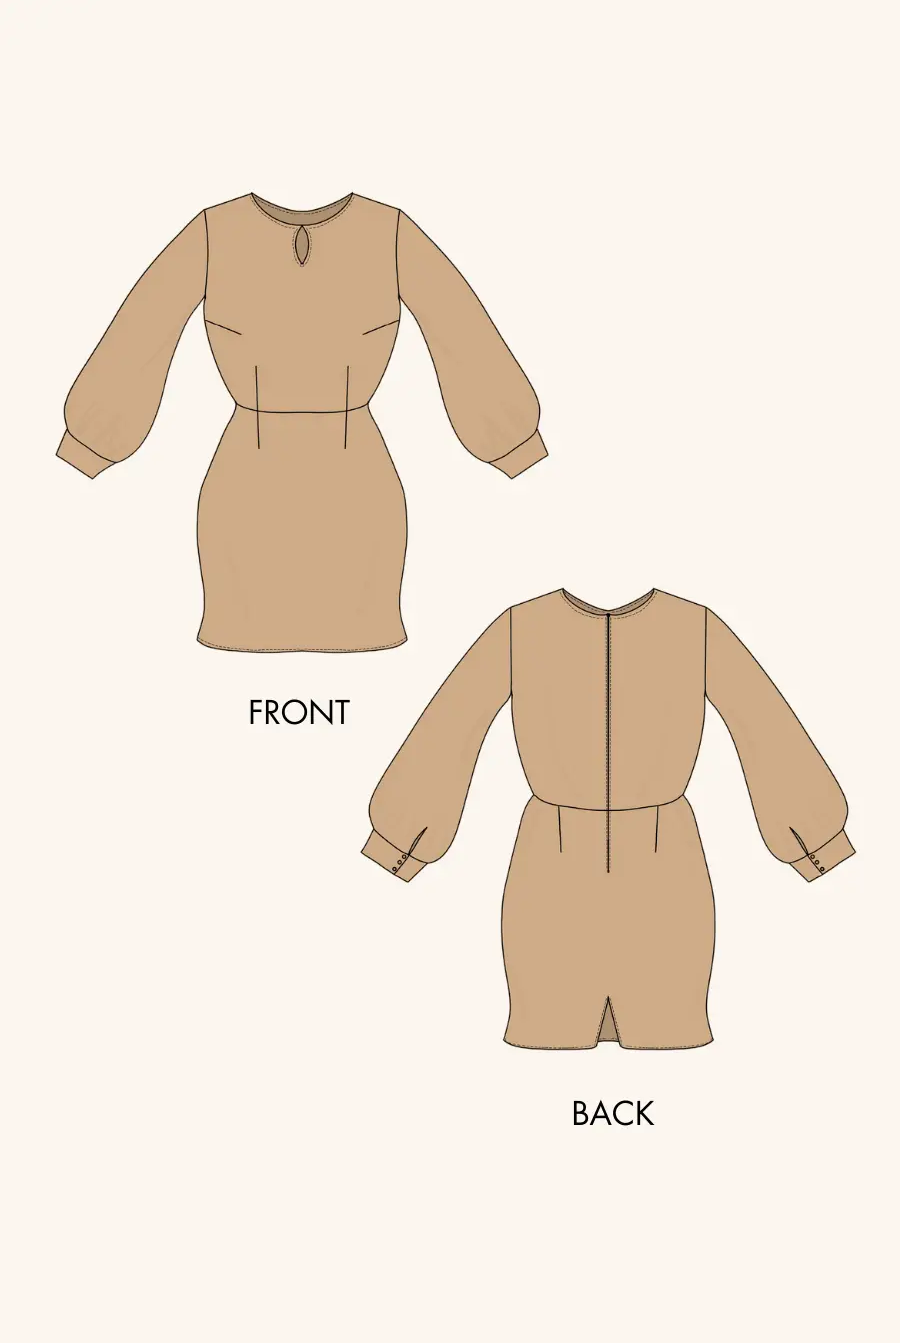
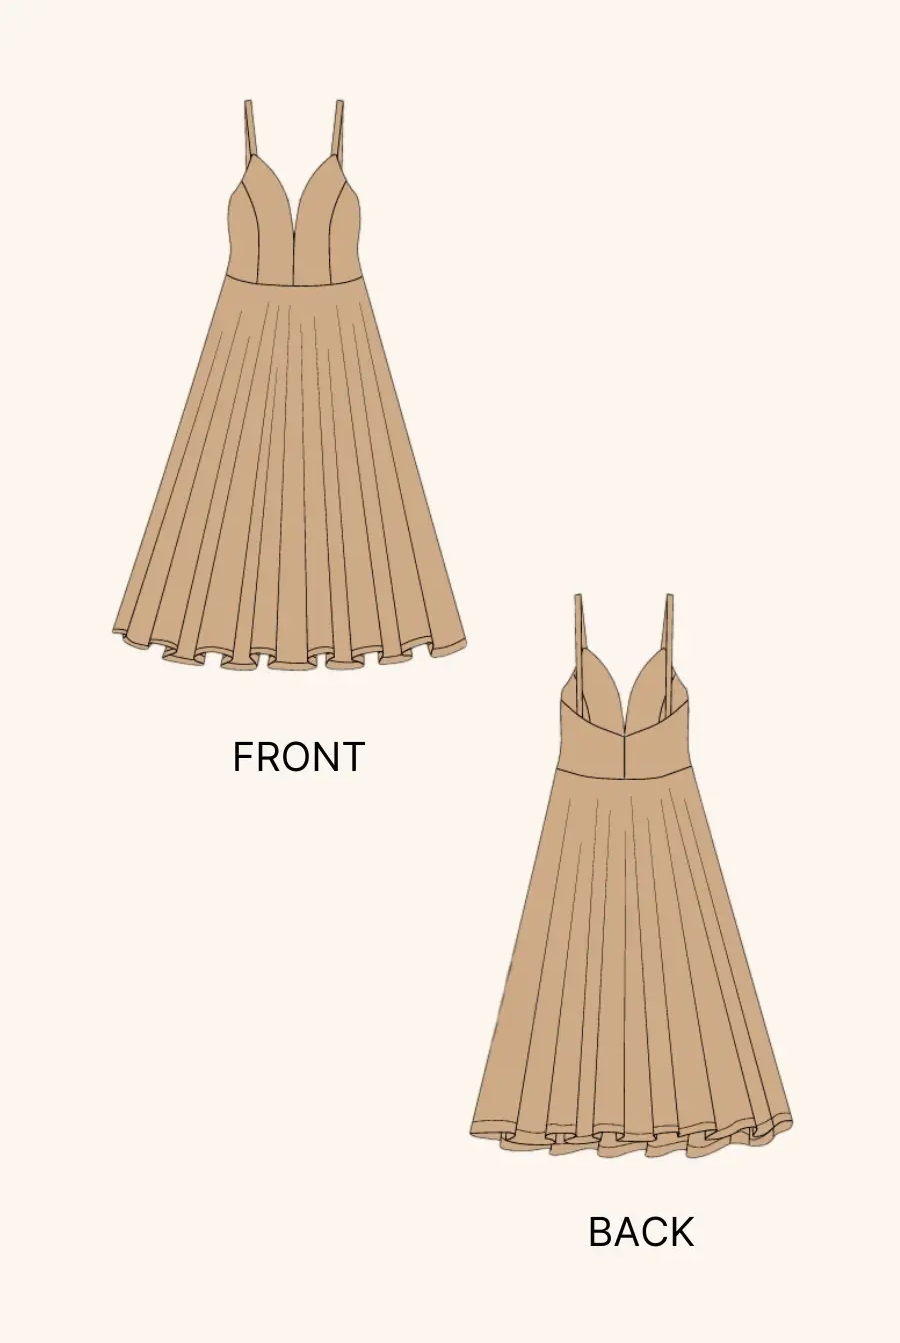
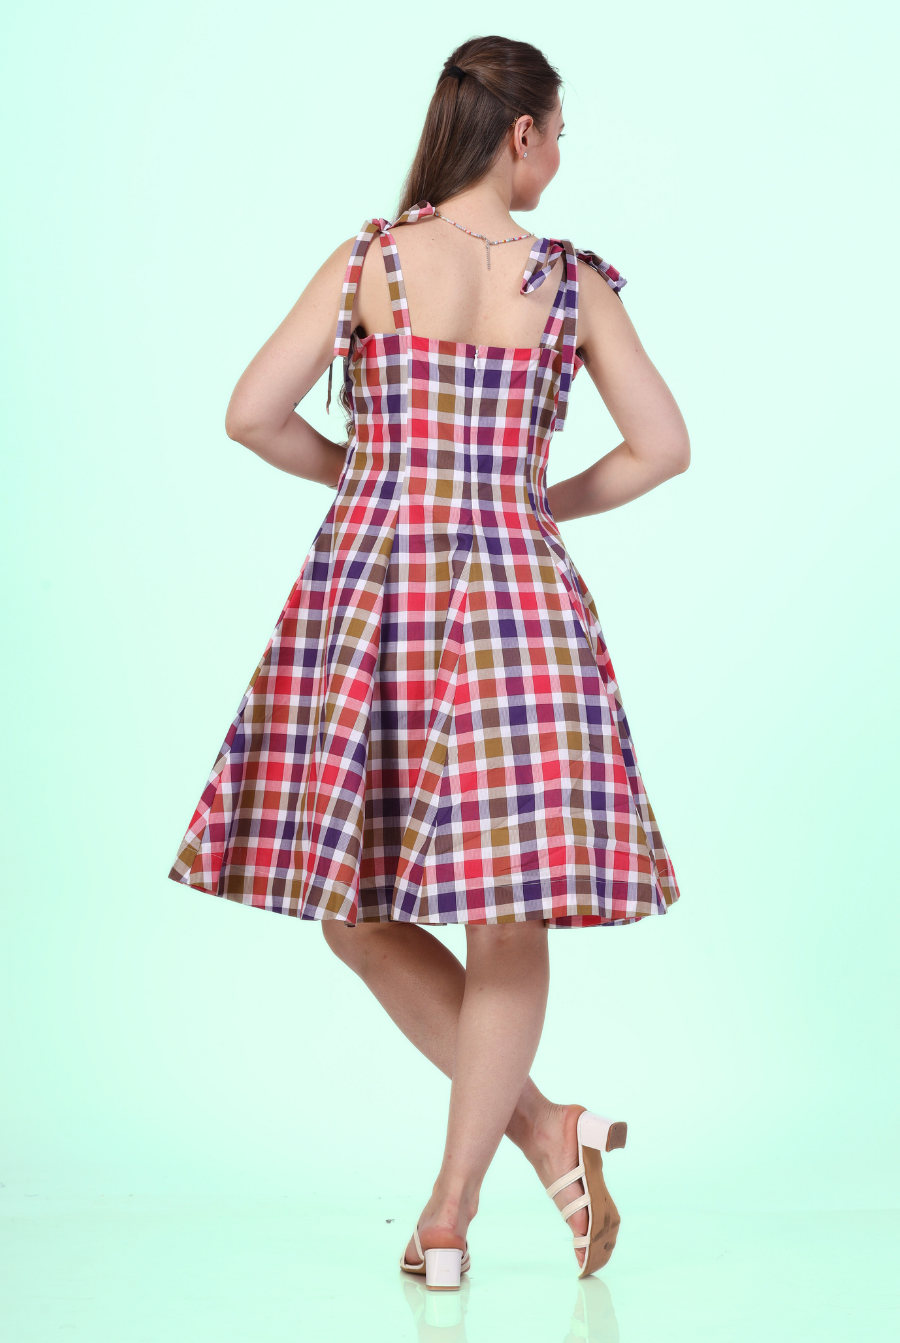
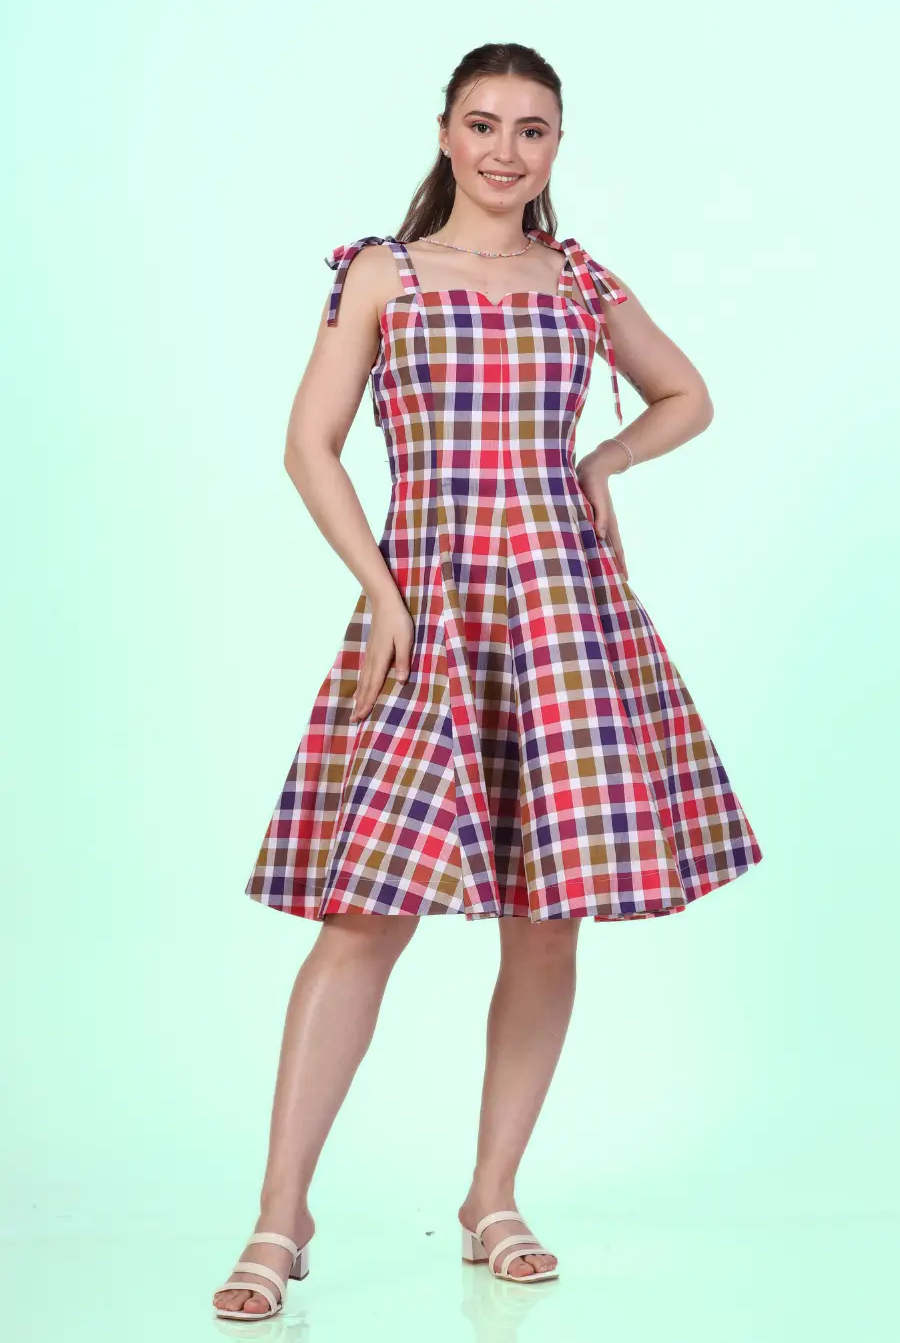
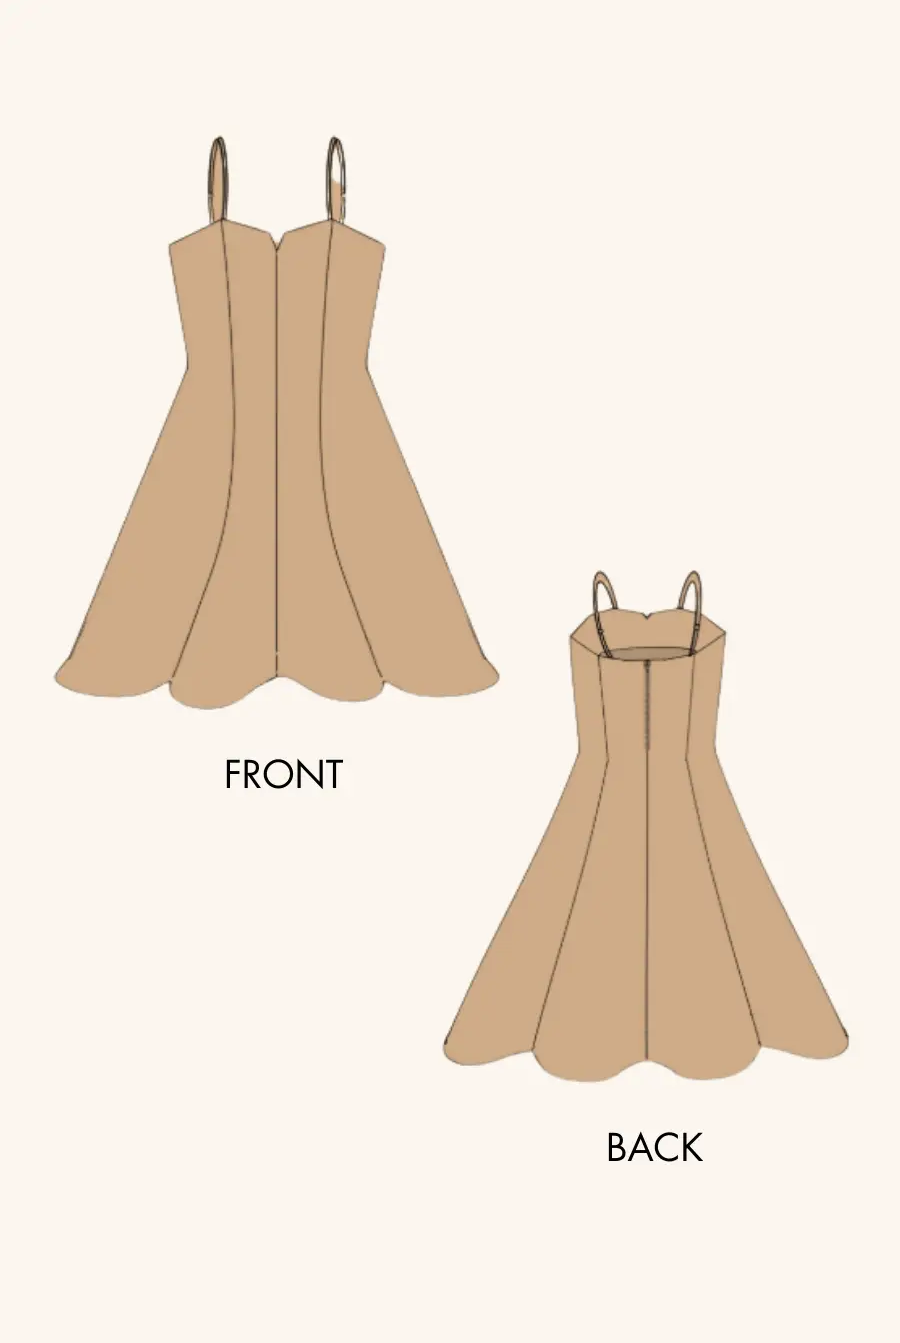
Sewing your own wrap midi dress is a rewarding way to craft a truly personal, elegant staple for your wardrobe. Whether you love layering, crave a flattering silhouette, or want the satisfaction of handmade style, this easy-level project is the perfect launchpad. Follow this detailed guide—drawn directly from the Winslet’s Camellia Wrap Dress sewing guide—for pro-ready results, every step included.
If you want a pattern that makes wrap dress construction straightforward from first cut to final stitch, the Winslet’s Camellia Wrap Dress is a top choice. Its intuitive construction, inclusive sizing, and thoughtful design details ensure beautiful results for sewists of all skill levels.
Why Sew a Wrap Midi Dress?
-
Flattering silhouette: Wrap styling suits every body type, adjustable for comfort.
-
Effortless style: Wear it casually or dress it up for special occasions.
-
Seasonless versatility: Layer with tops, cardigans, boots or sandals.
-
Handmade quality: Choose your ideal fabric and unique finish.
-
Sewing satisfaction: An easy project that builds both skill and wardrobe confidence.
Why Choose the Winslet’s Camellia Wrap Dress Pattern?
-
Confident beginner level: Simple construction, step-by-step color illustrations.
-
Custom fit: Wide straps, adjustable ties, thoughtfully placed notches.
-
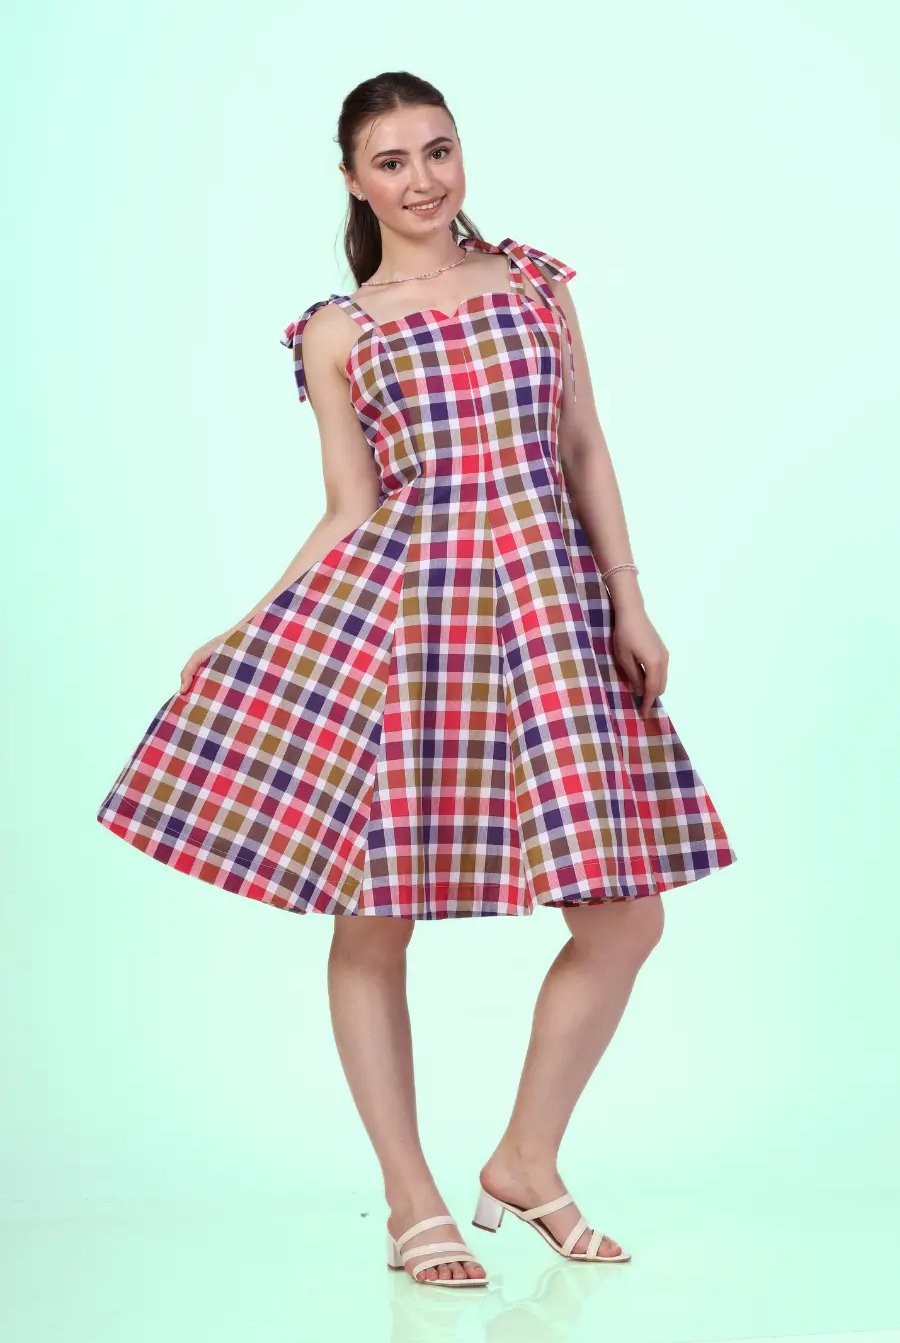
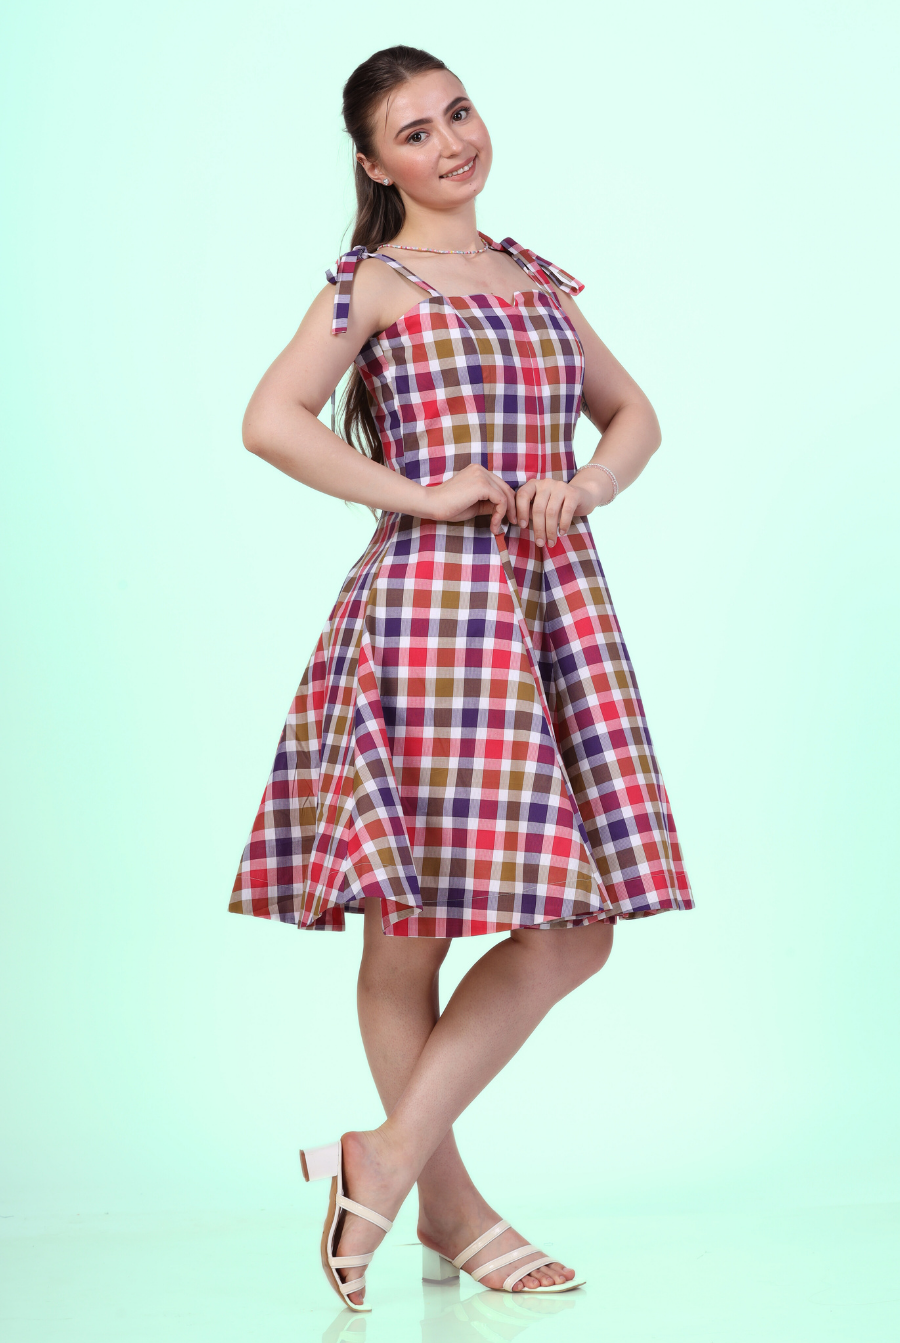
Modern styling: Midi length, defined waist, beautiful drape.
-
Inclusive sizing: All major size charts included (see guide for specifics).
-
Fabric flexibility: Works with cotton, crepe, viscose, silk blend, jersey, georgette, and more.
Supplies & Notions
-
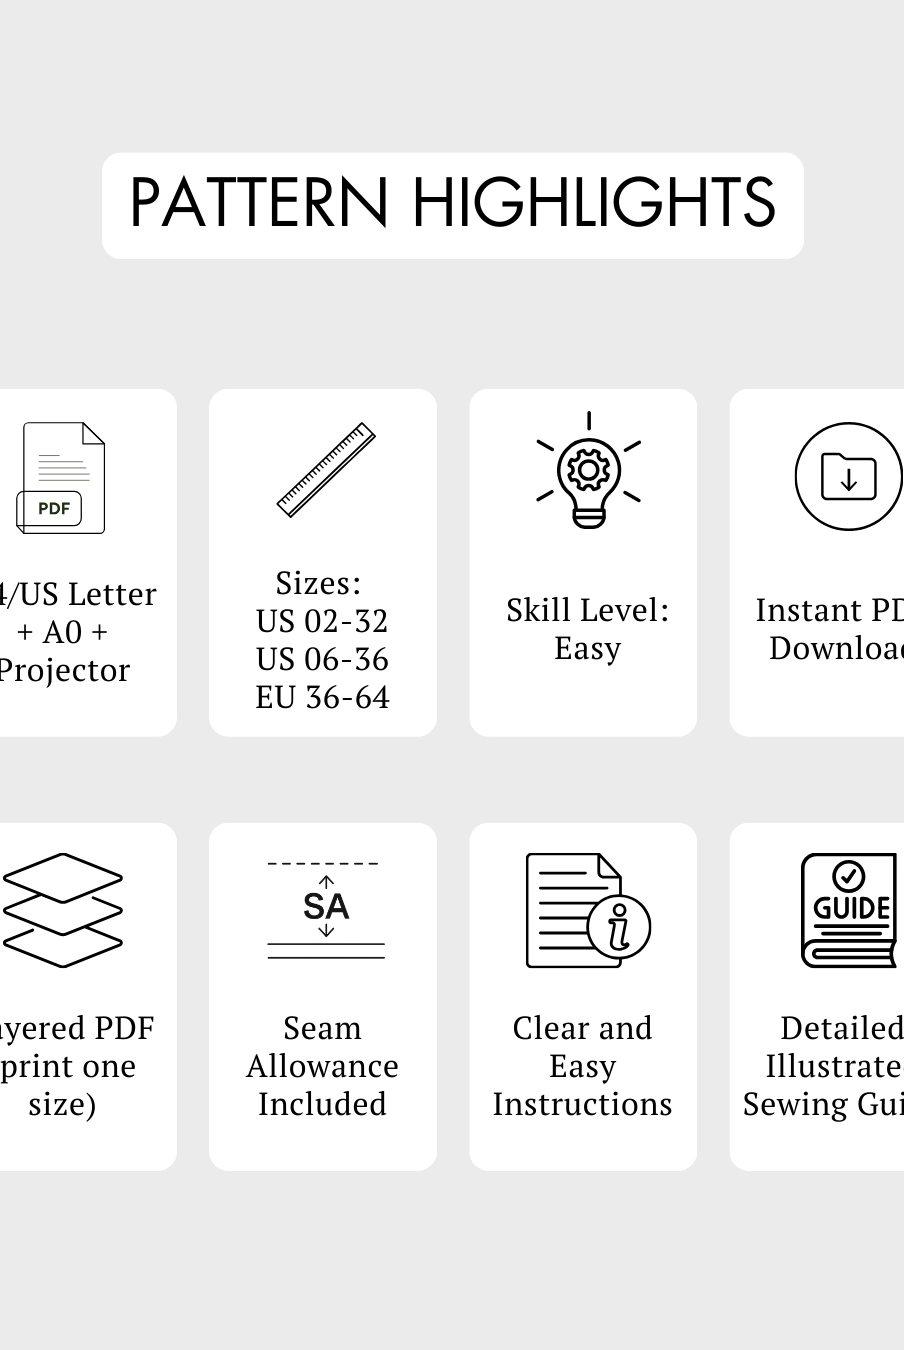
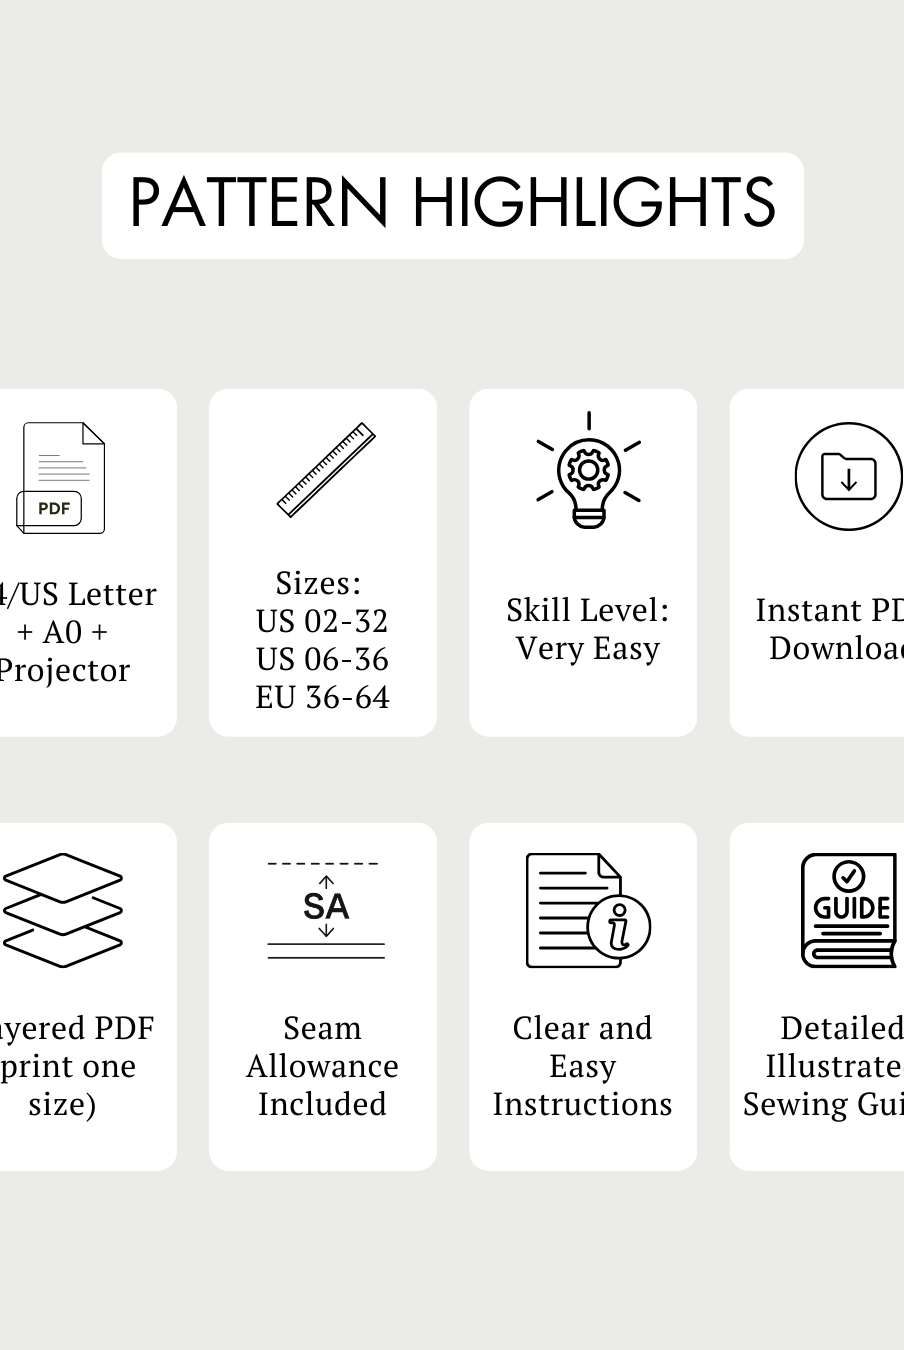
Camellia Wrap Dress sewing pattern (available as PDF: Projector, A4/US Letter or A0 for copy shop)
-
Lightweight fabric: 100% cotton, cotton blend, silk blend, jersey, crepe, georgette, viscose (moss crepe is ideal)
-
3-ply polyester thread (matching)
-
Fabric shears or rotary cutter, thread cutter
-
Iron
-
Tape measure
-
Chalk, marking pen, or pencil
-
Pins, sewing needles
-
Zipper (see size chart for length)
-
Sewing machine
Pro Tip: Pick fabrics with a lovely drape and a little structure for the most flattering result.
Size Charts
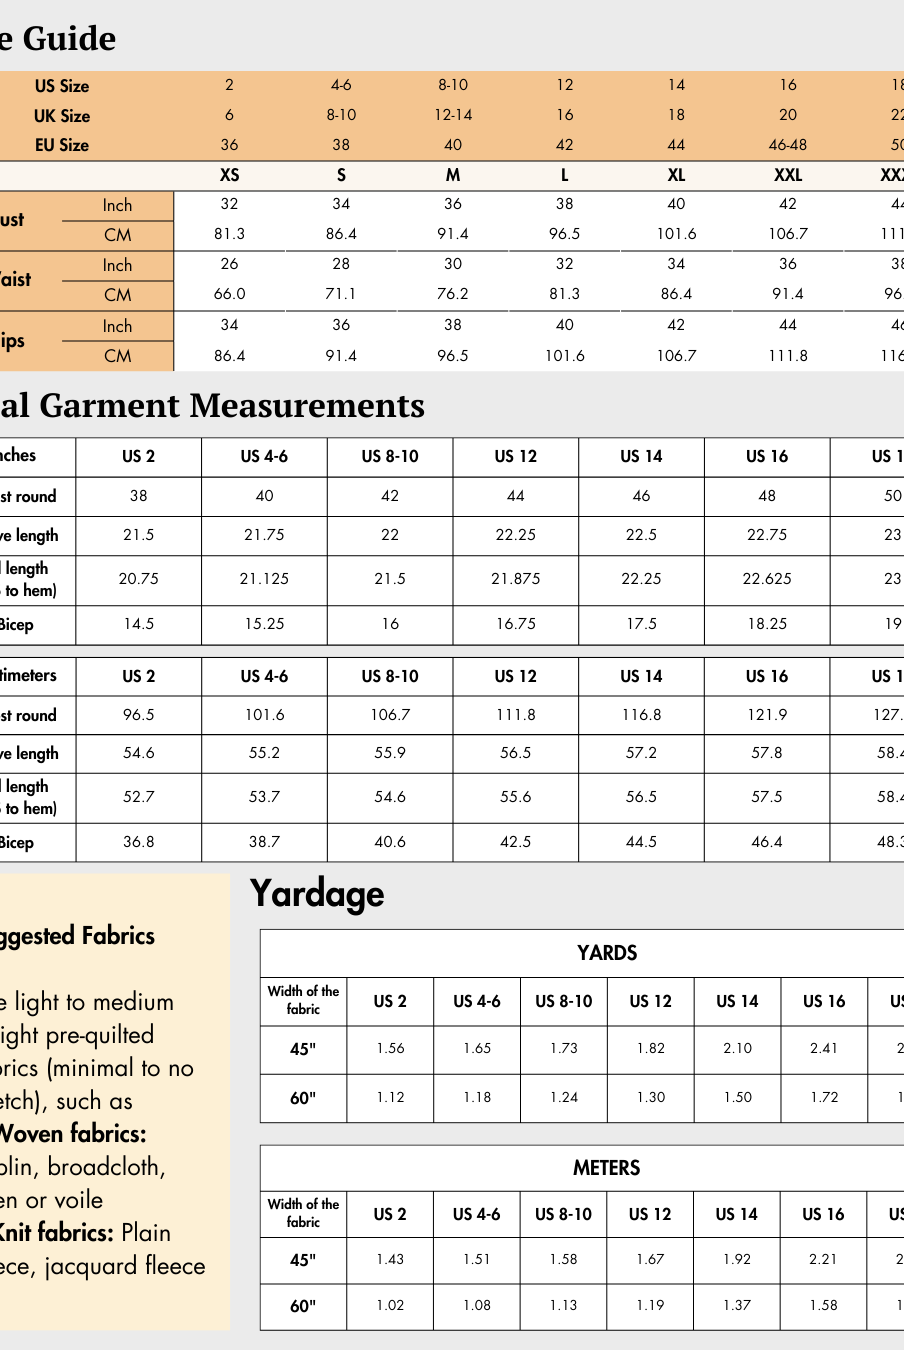
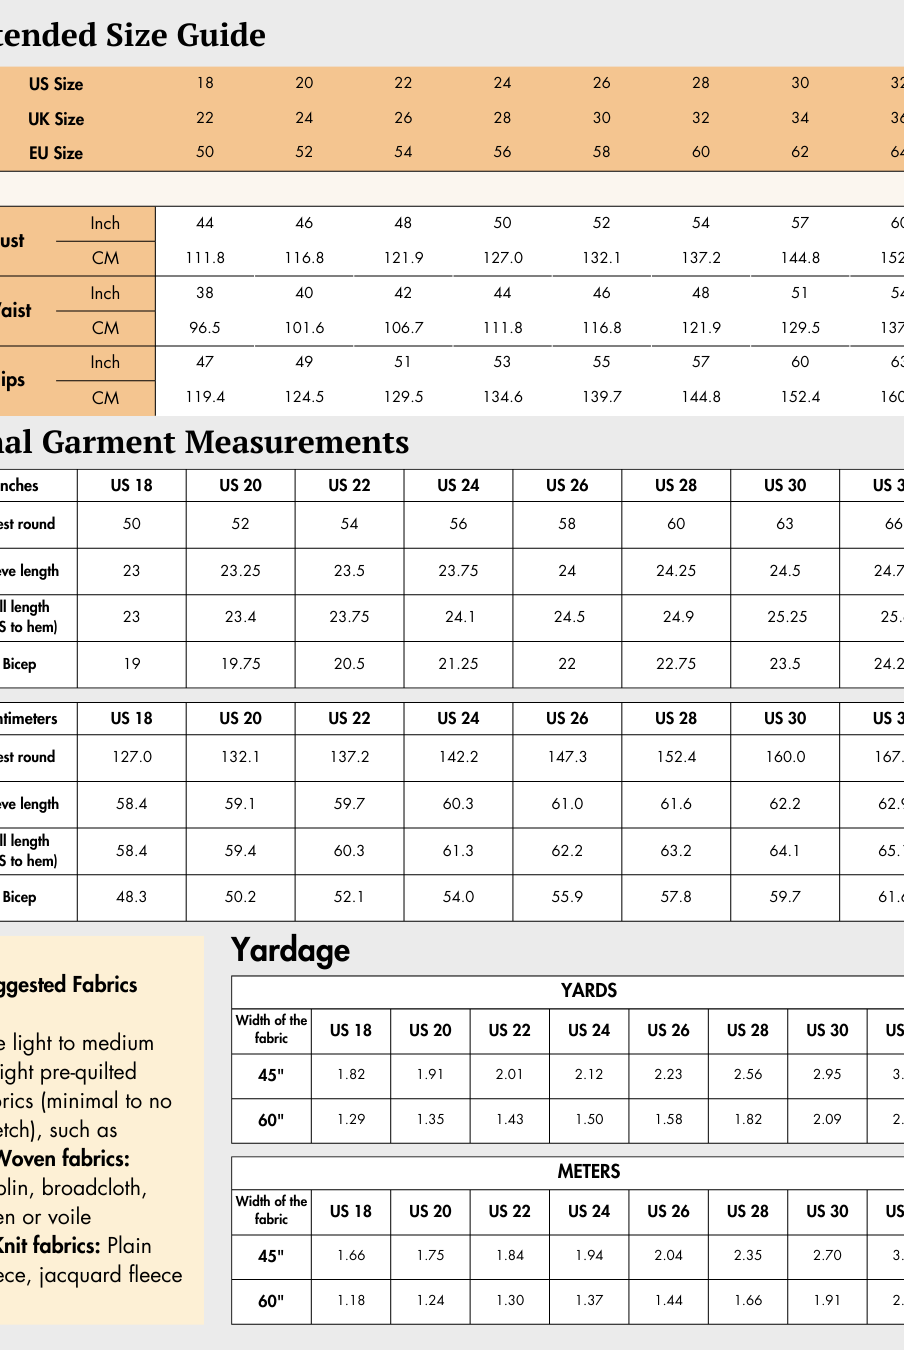
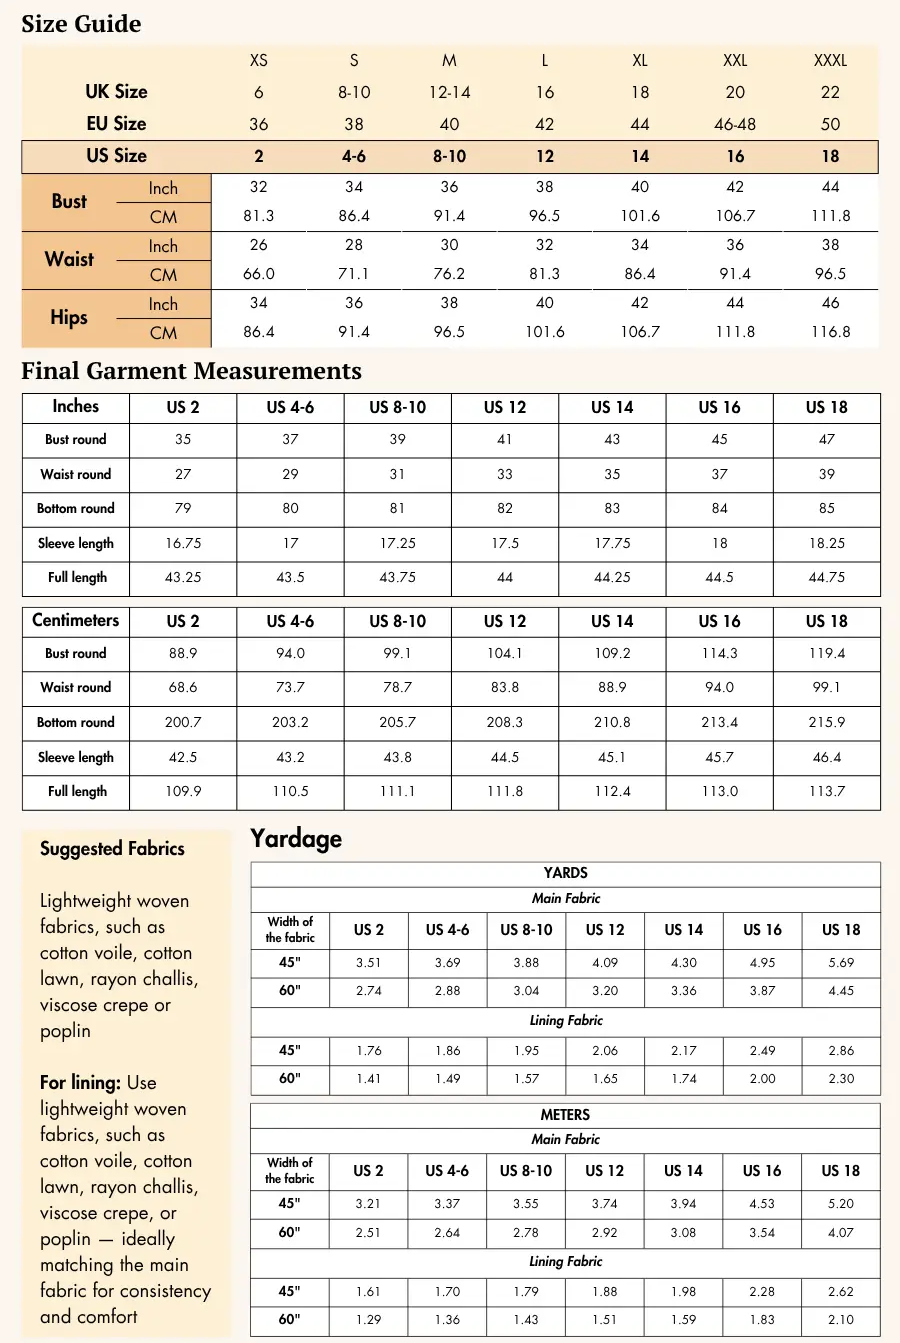
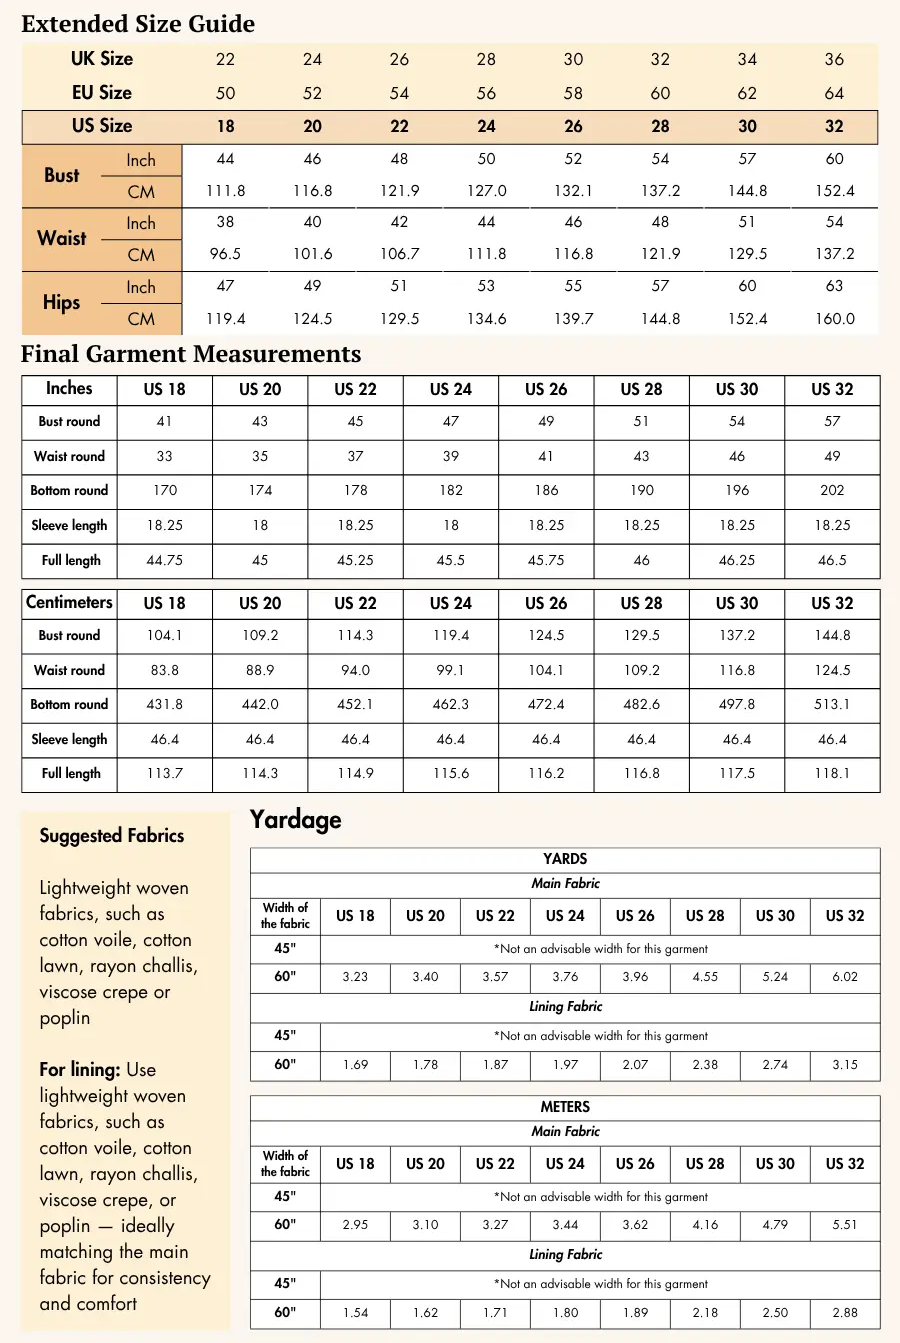
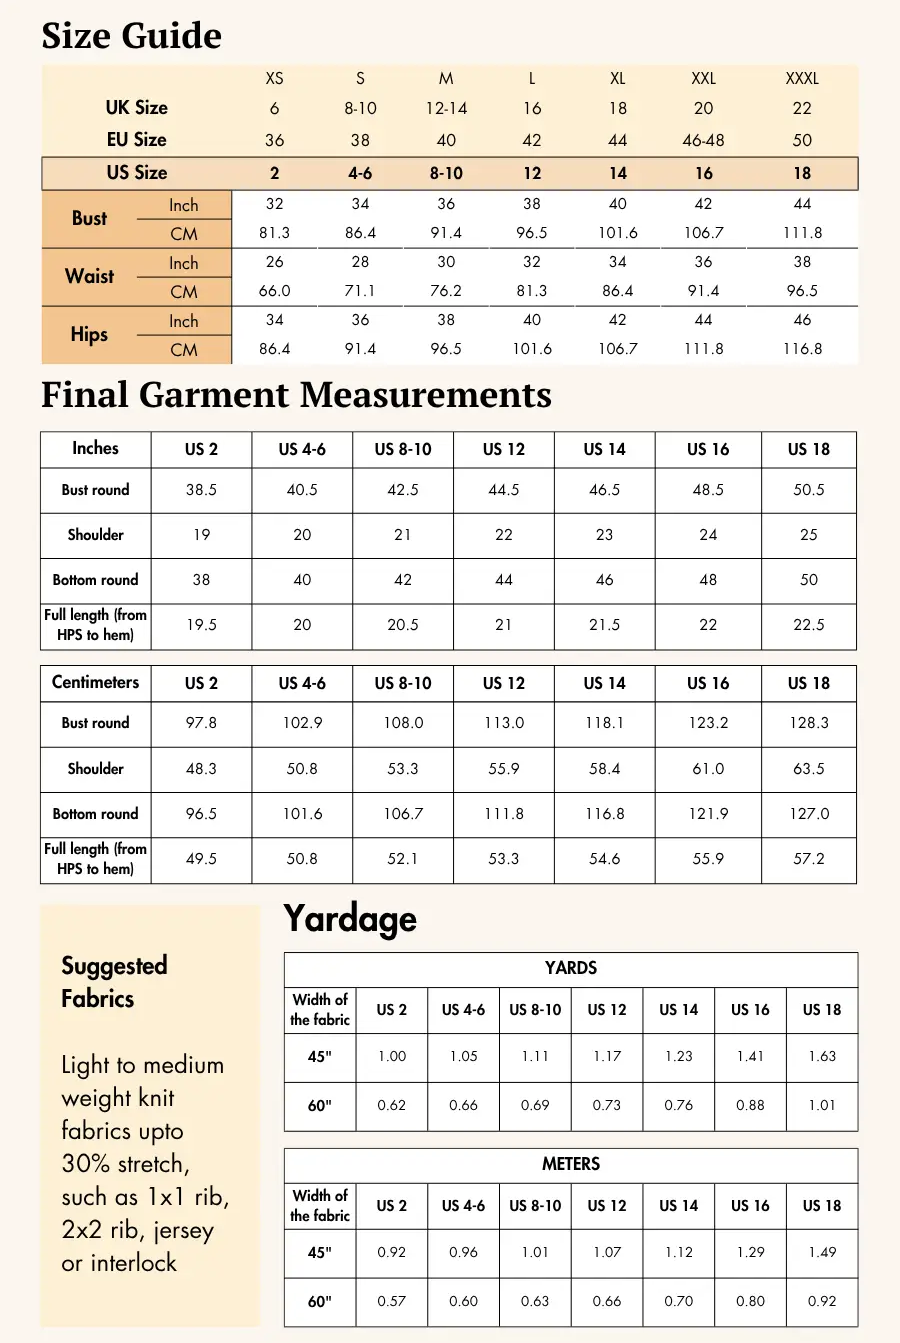
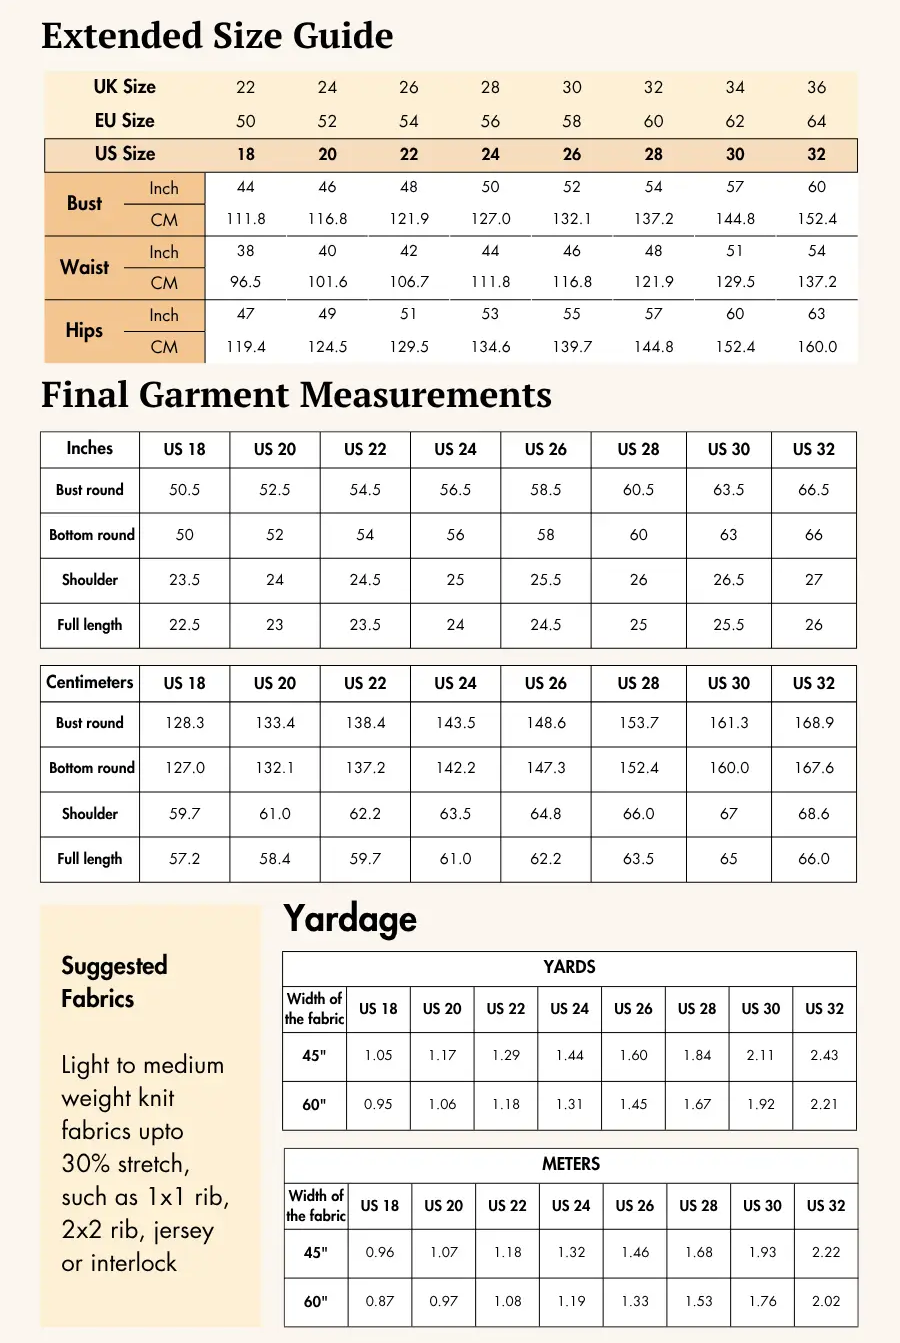
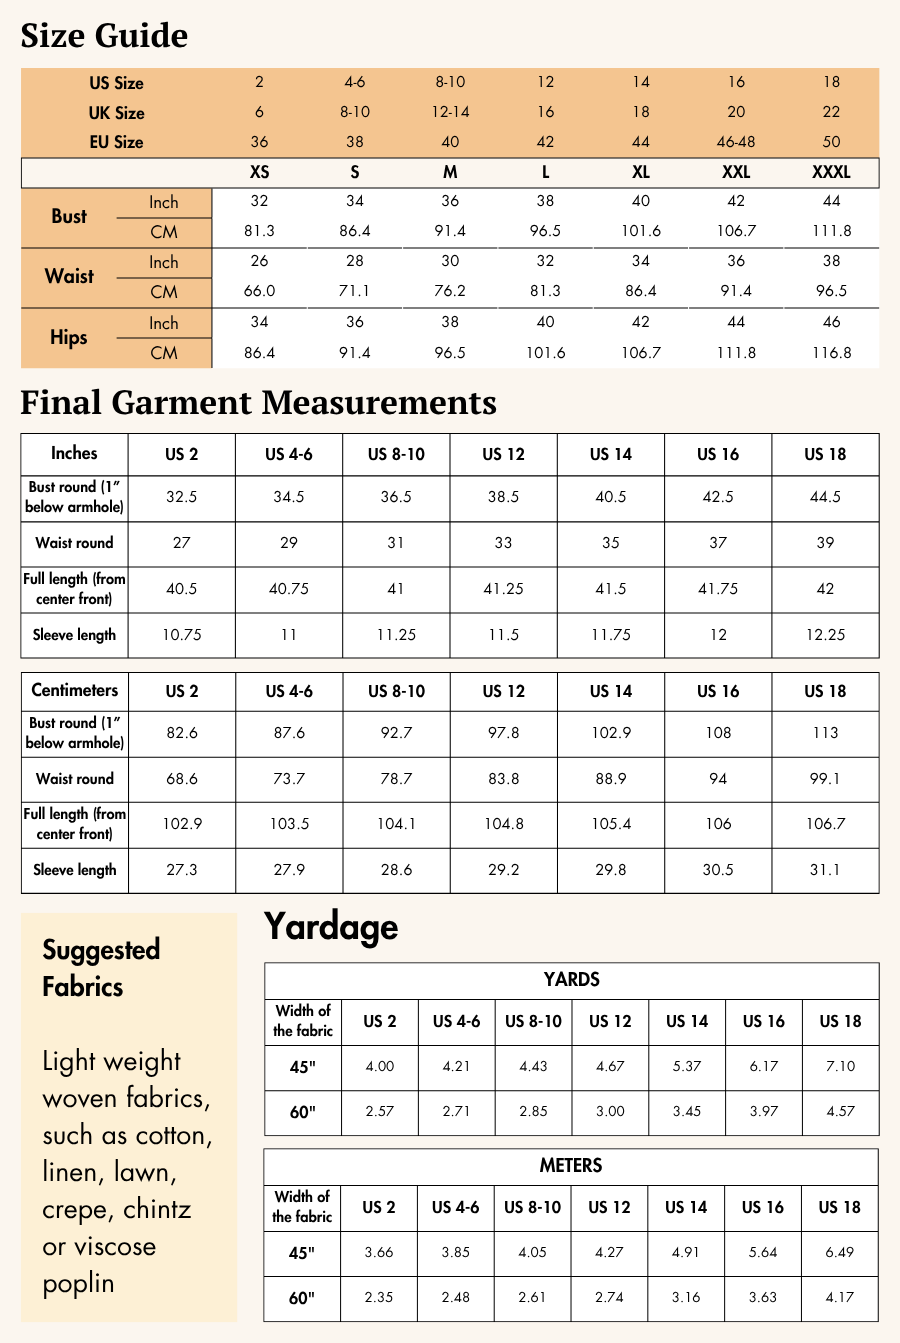
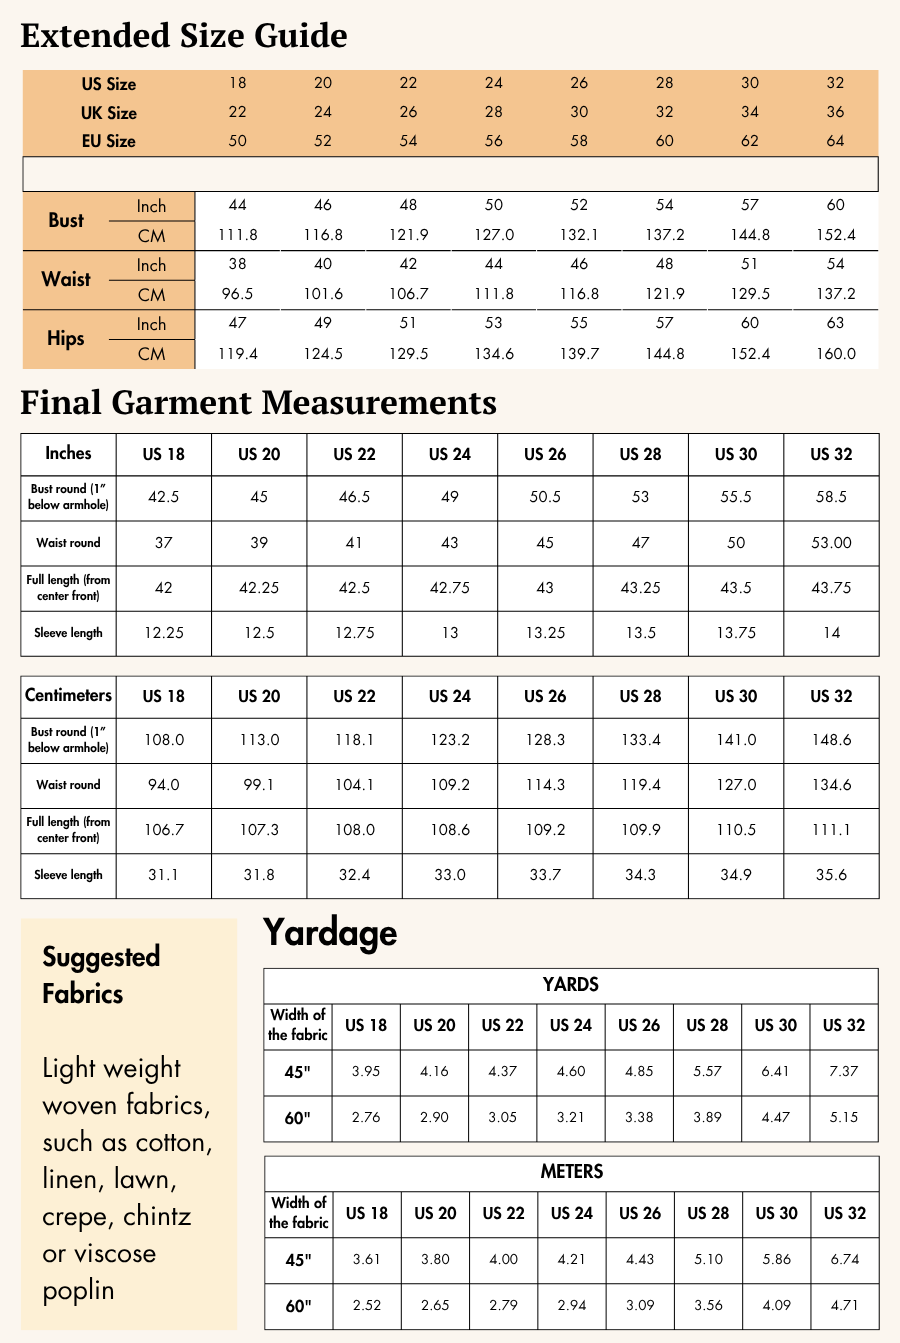
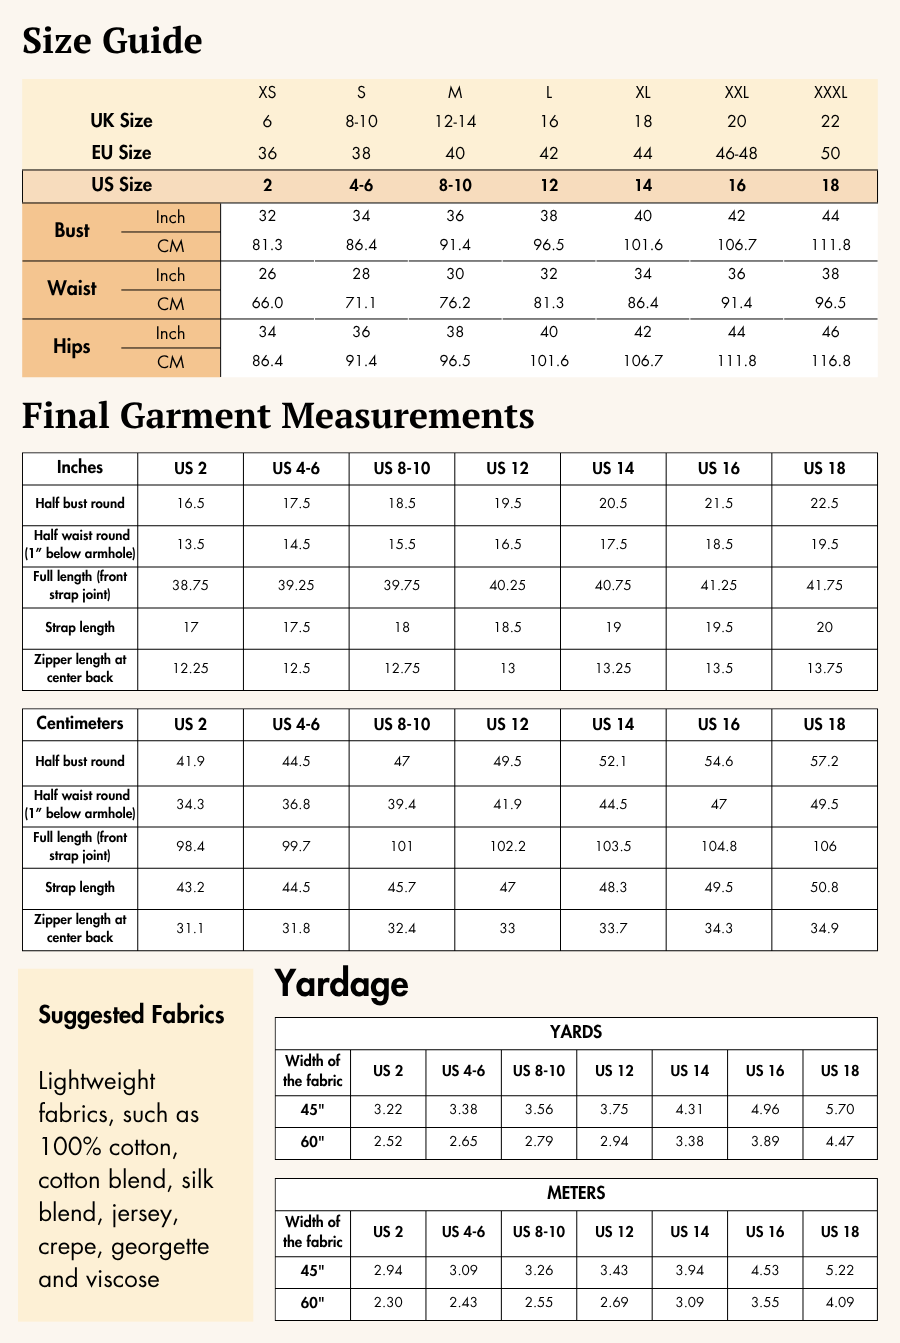
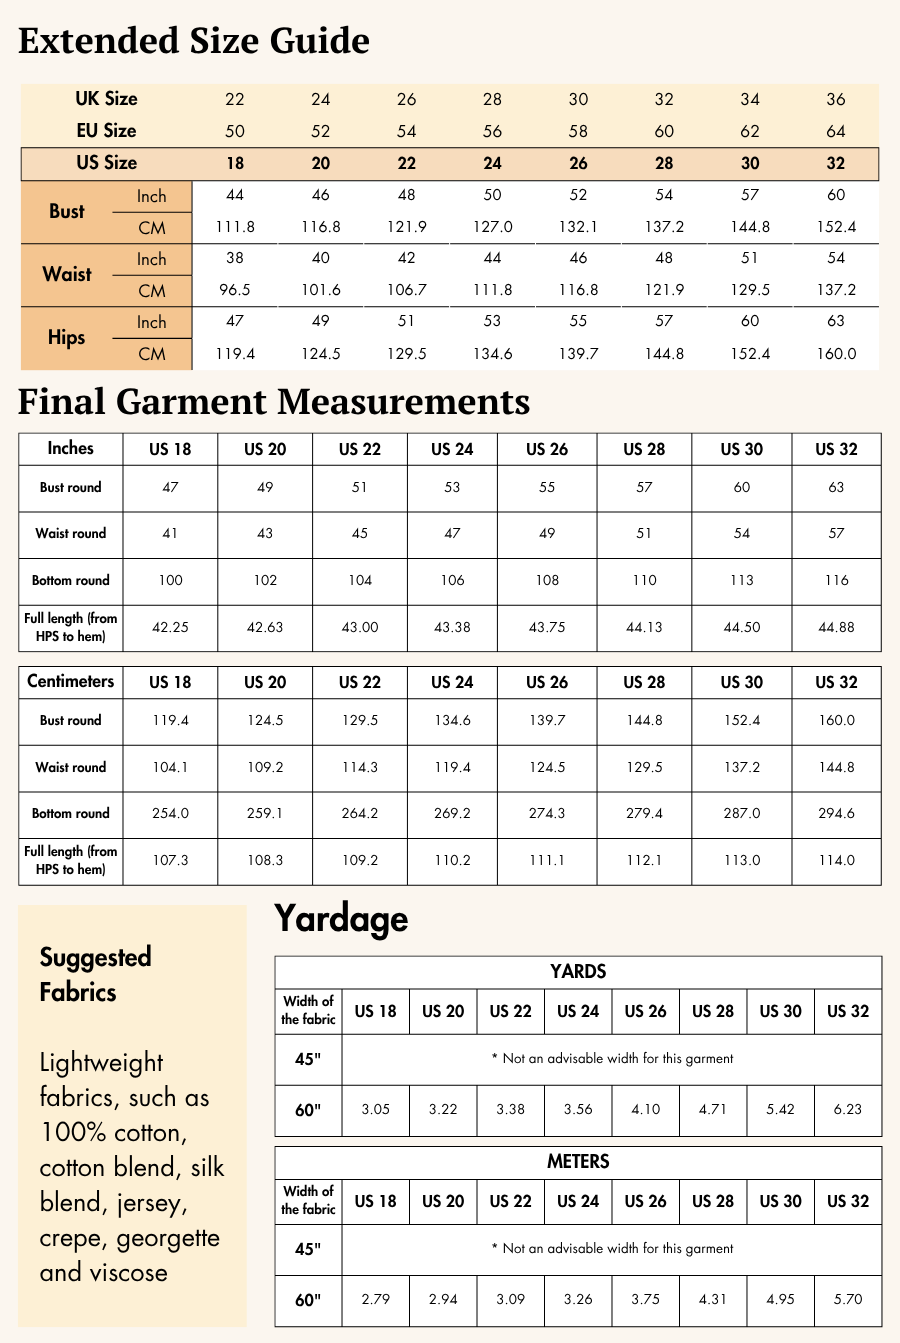
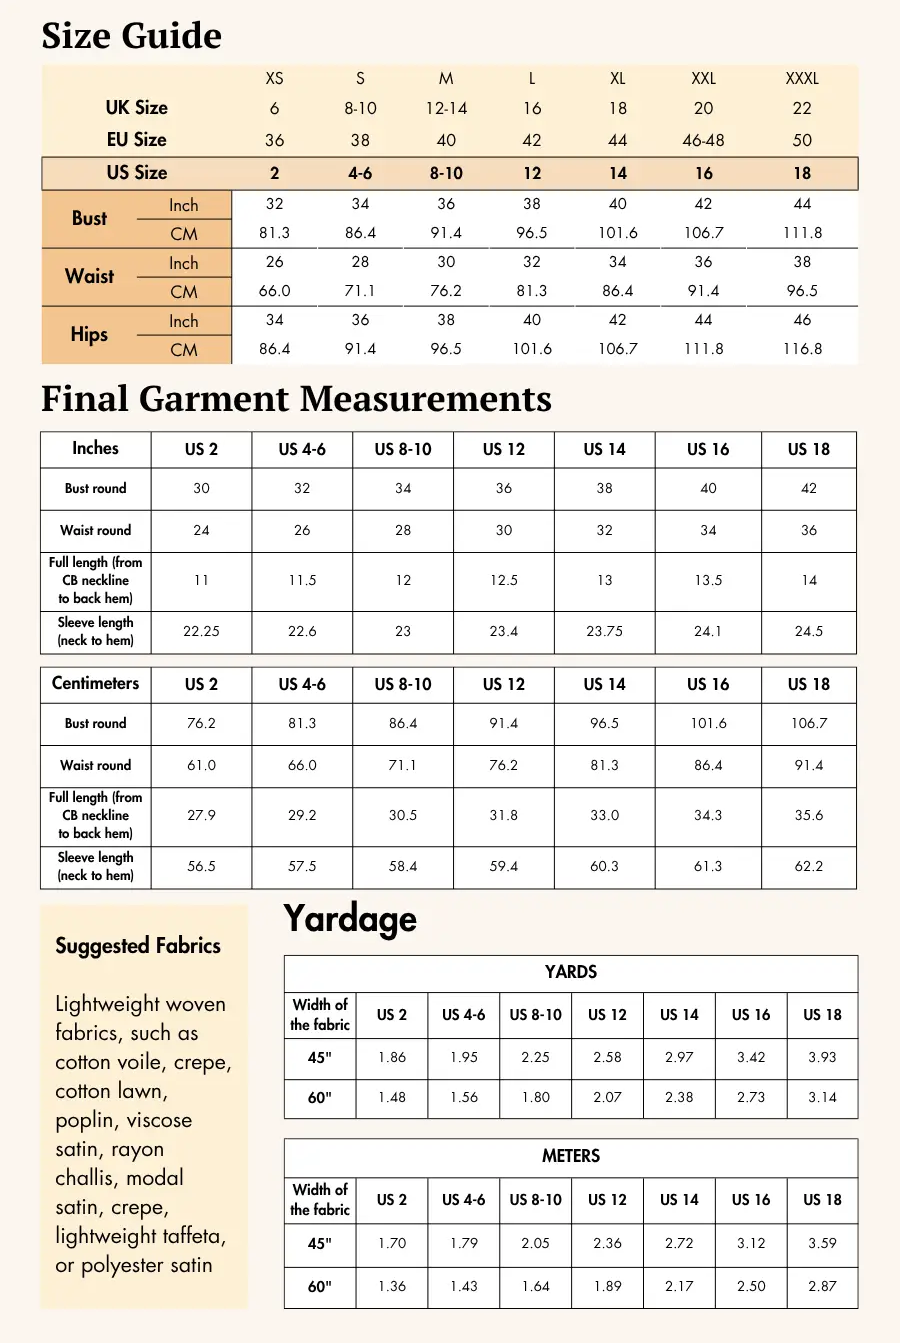
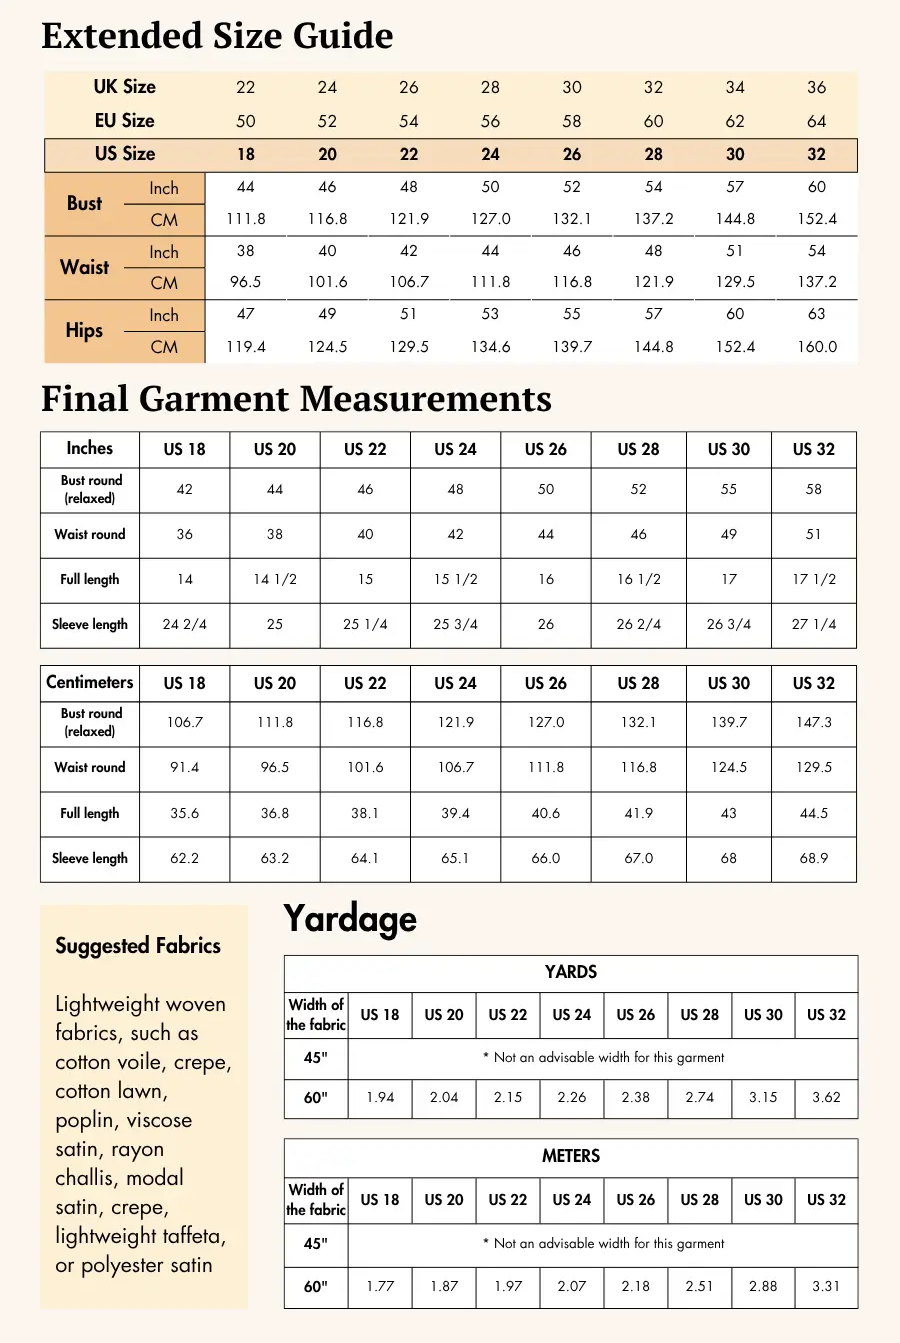
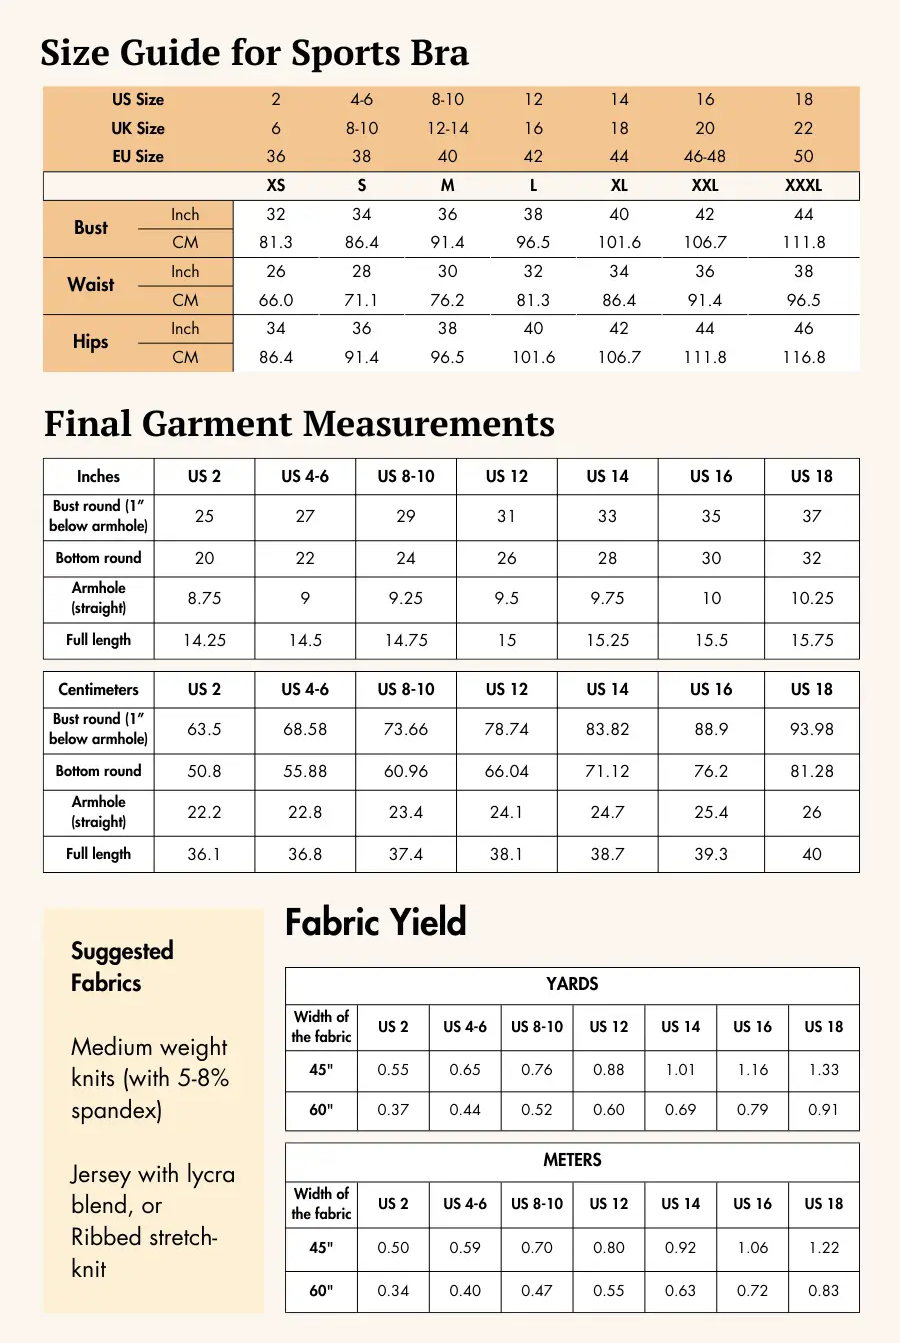
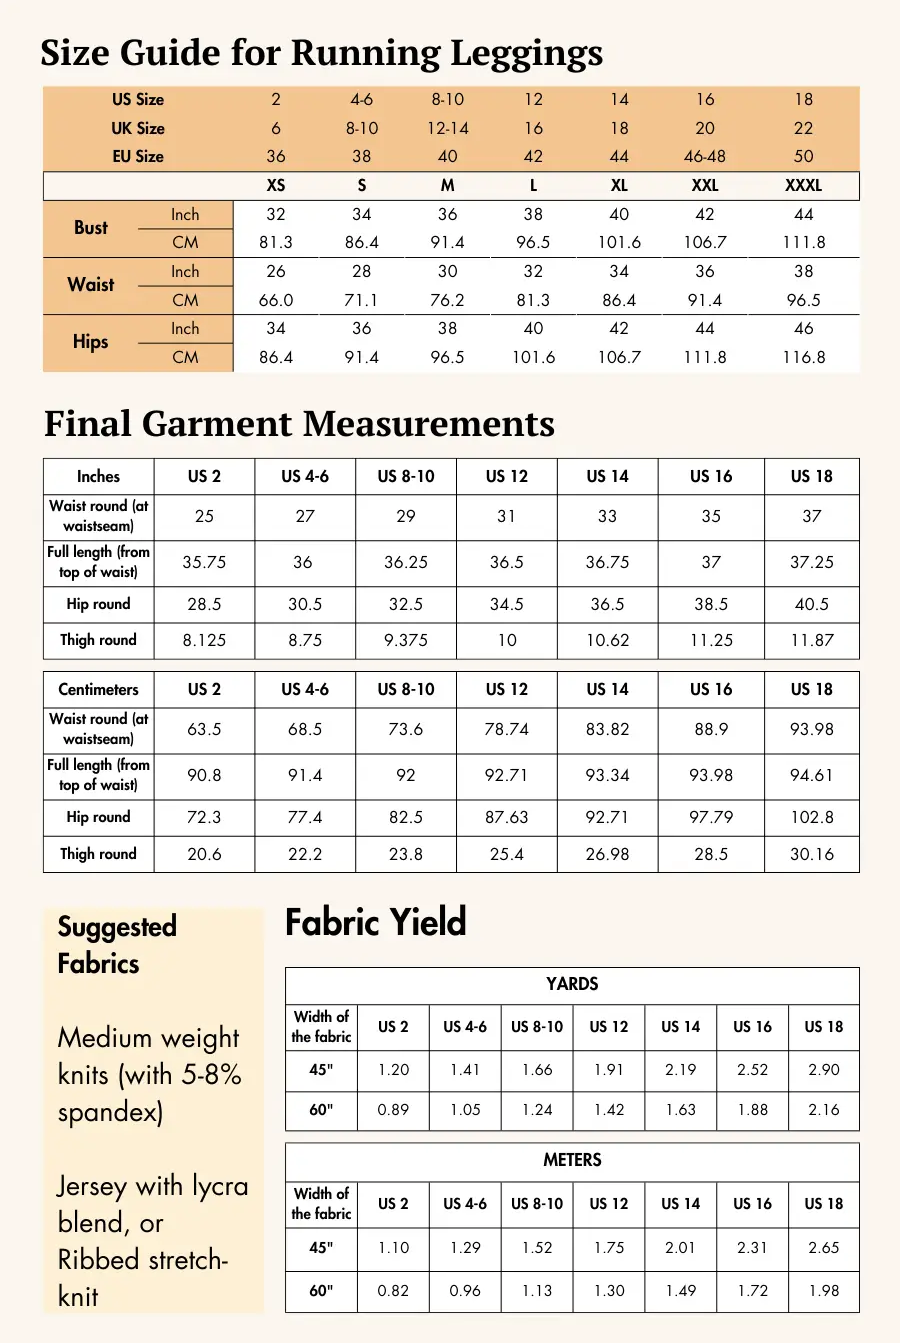
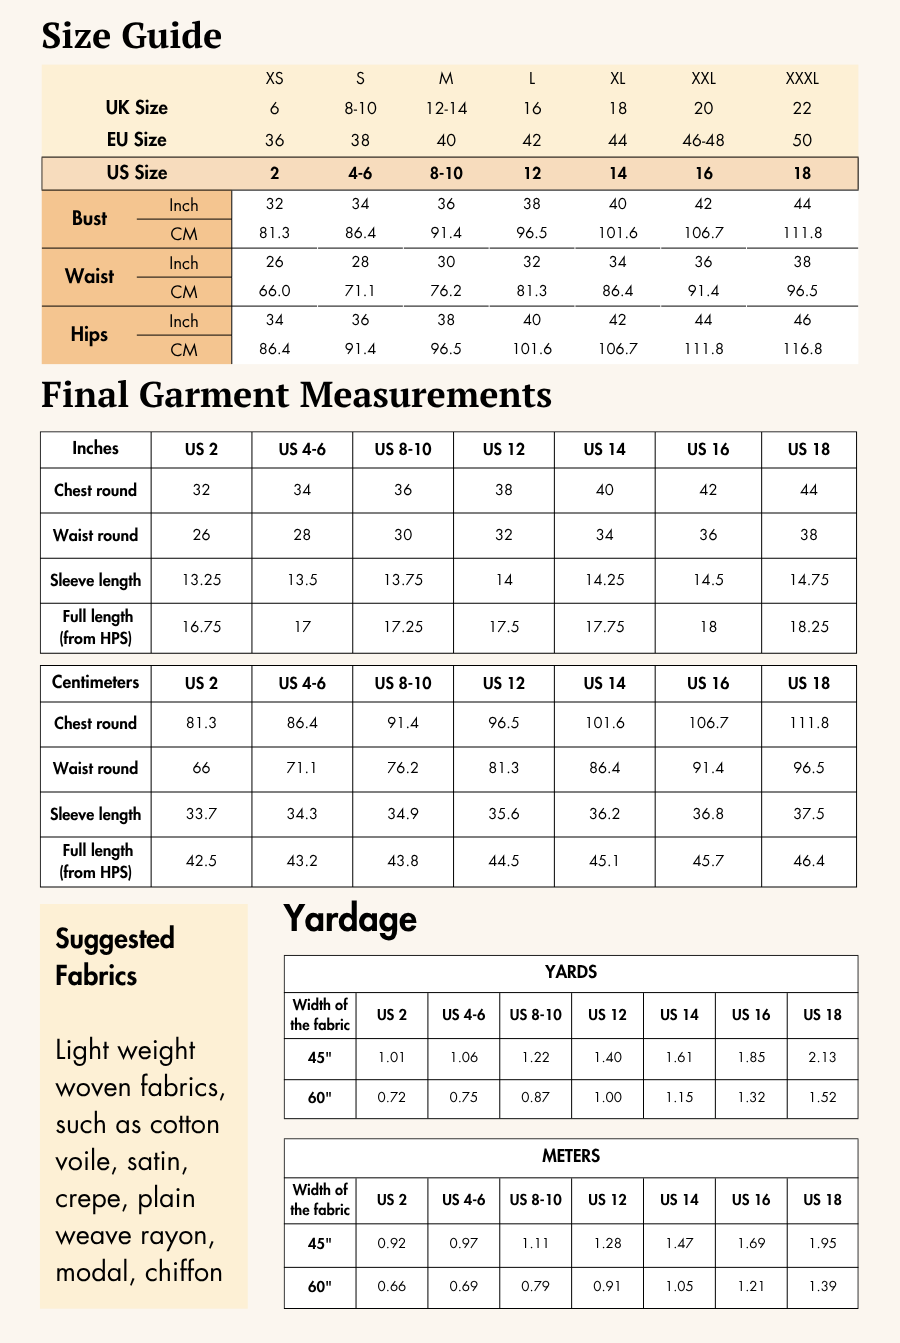
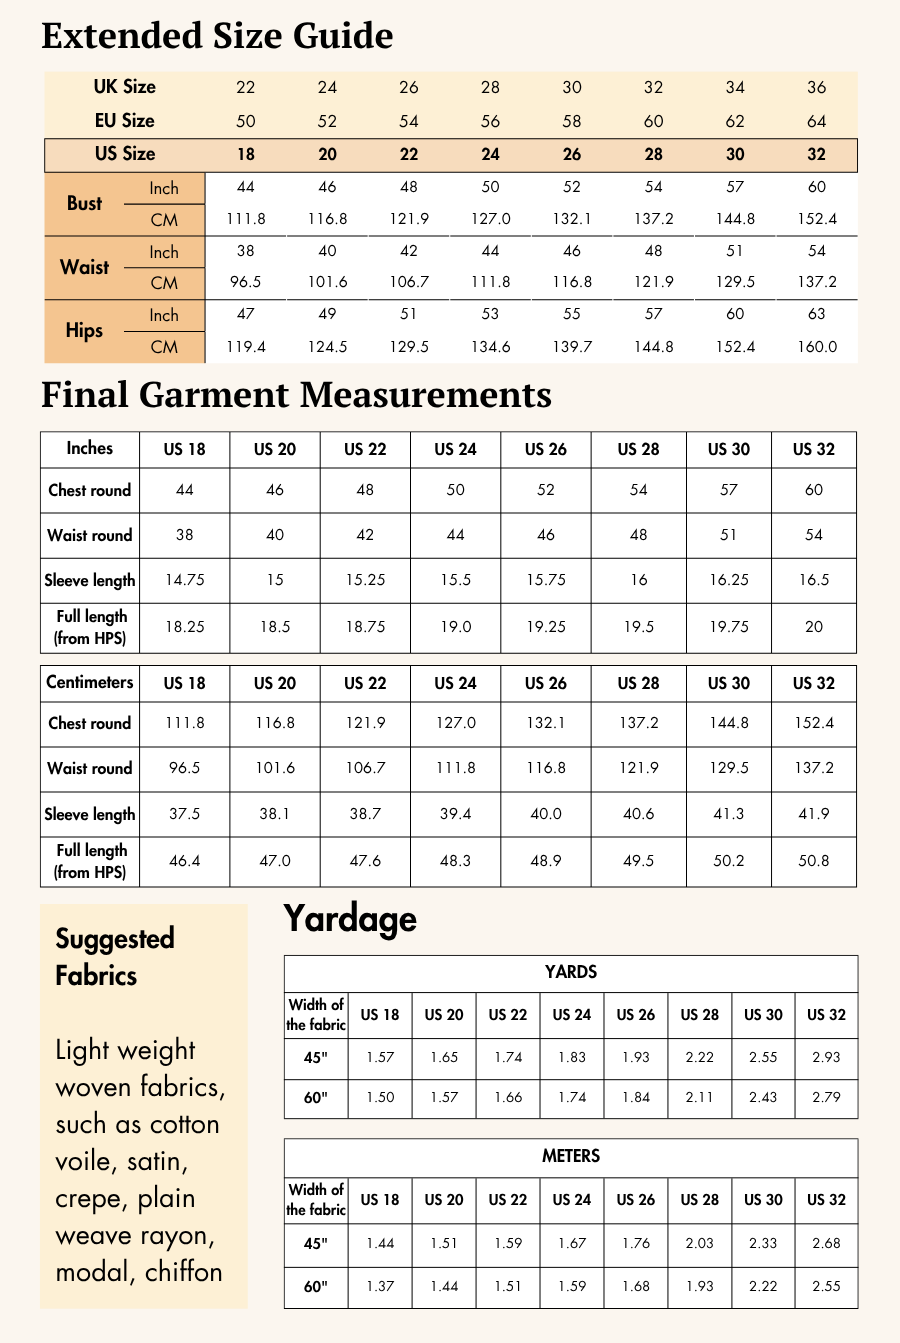
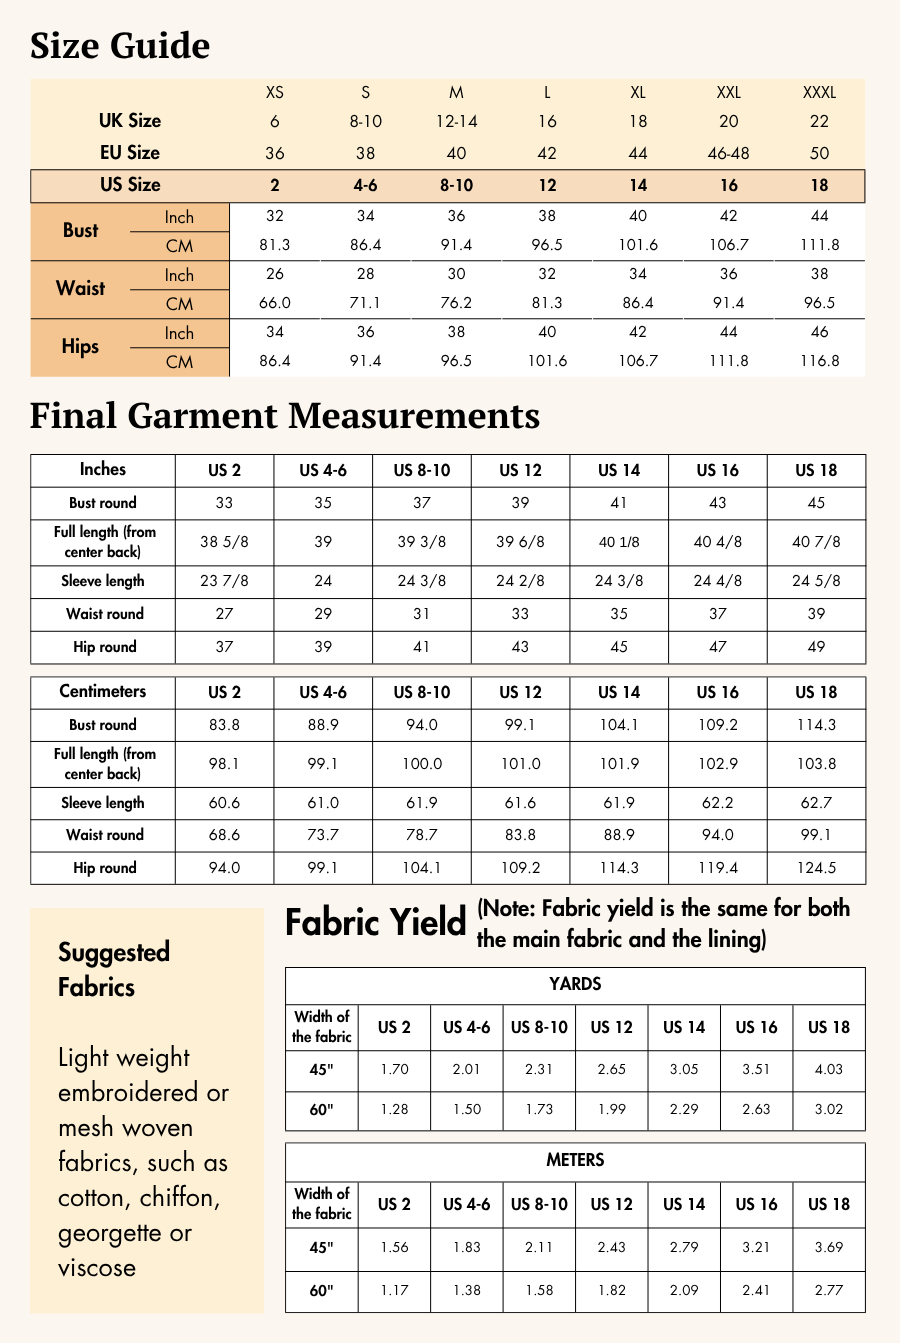
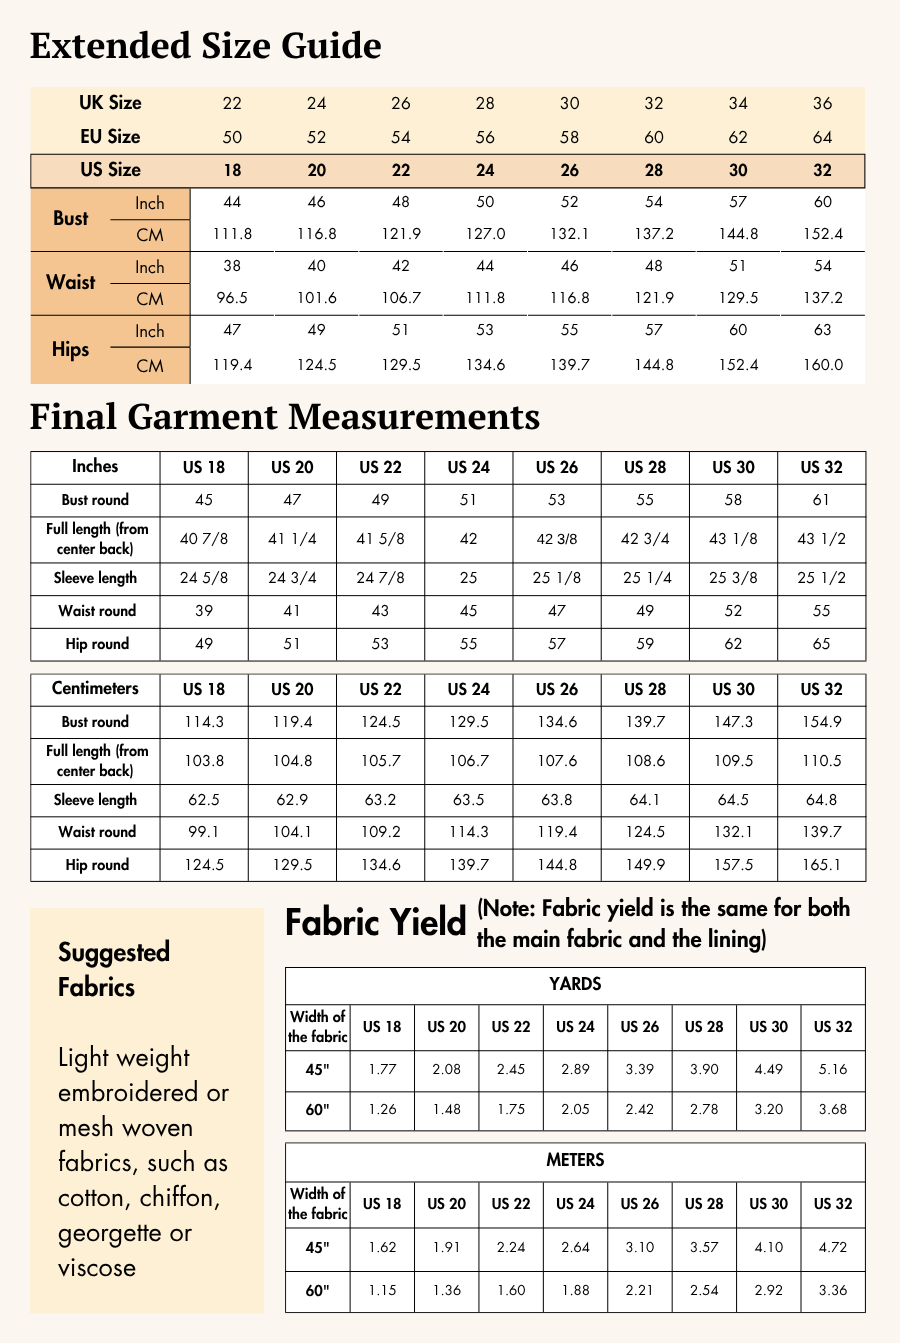
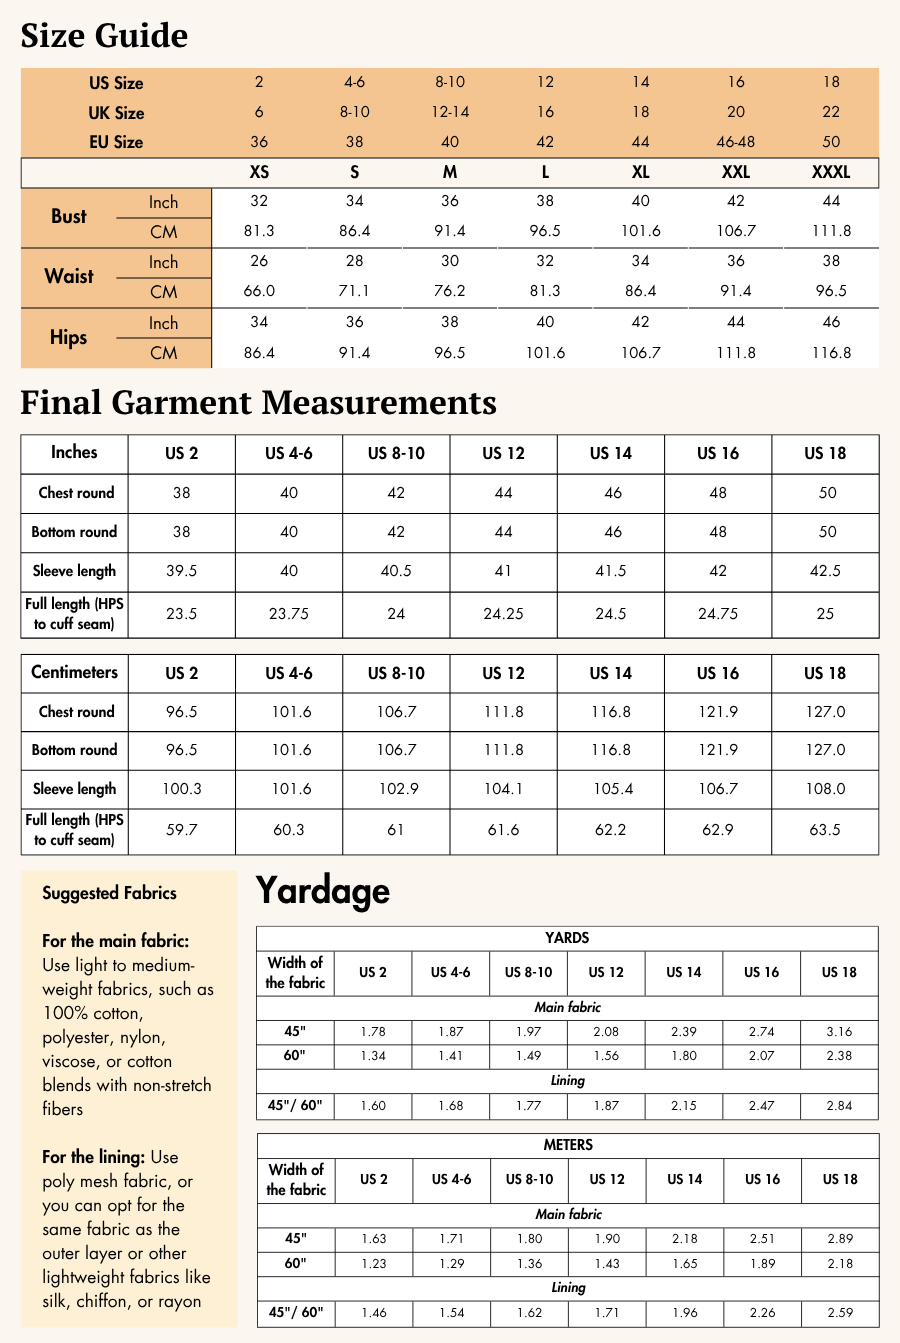
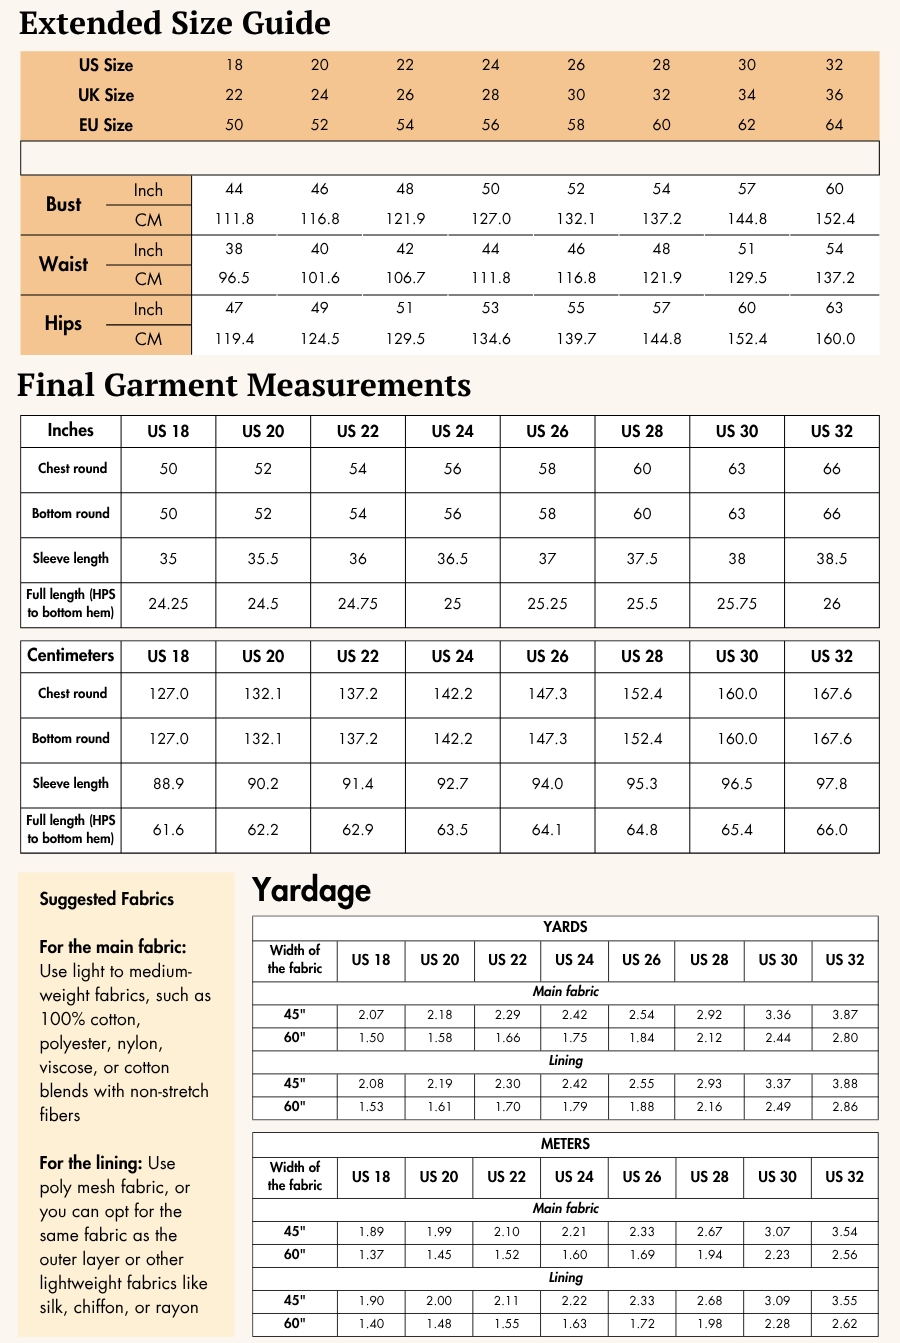
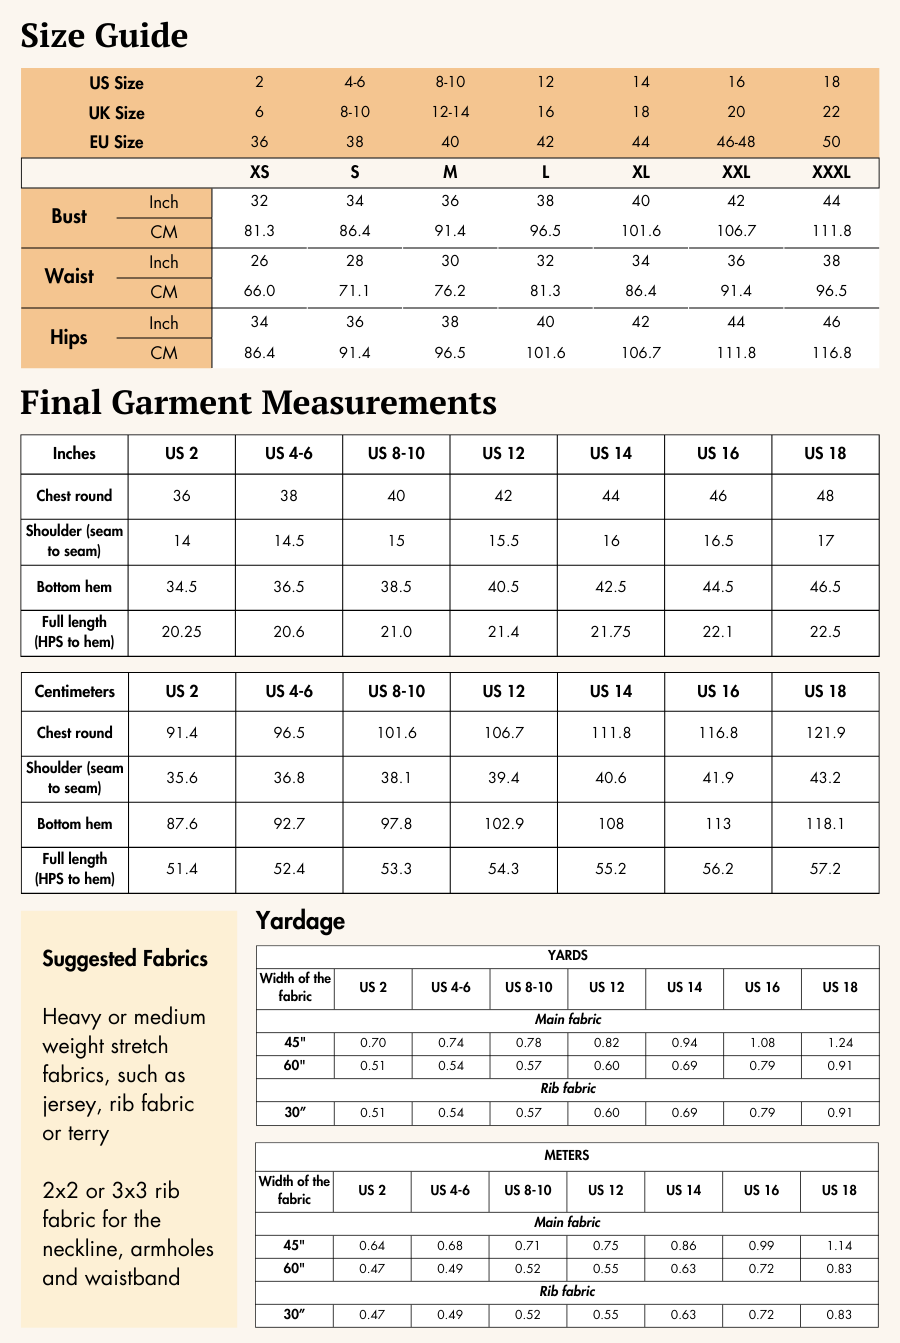
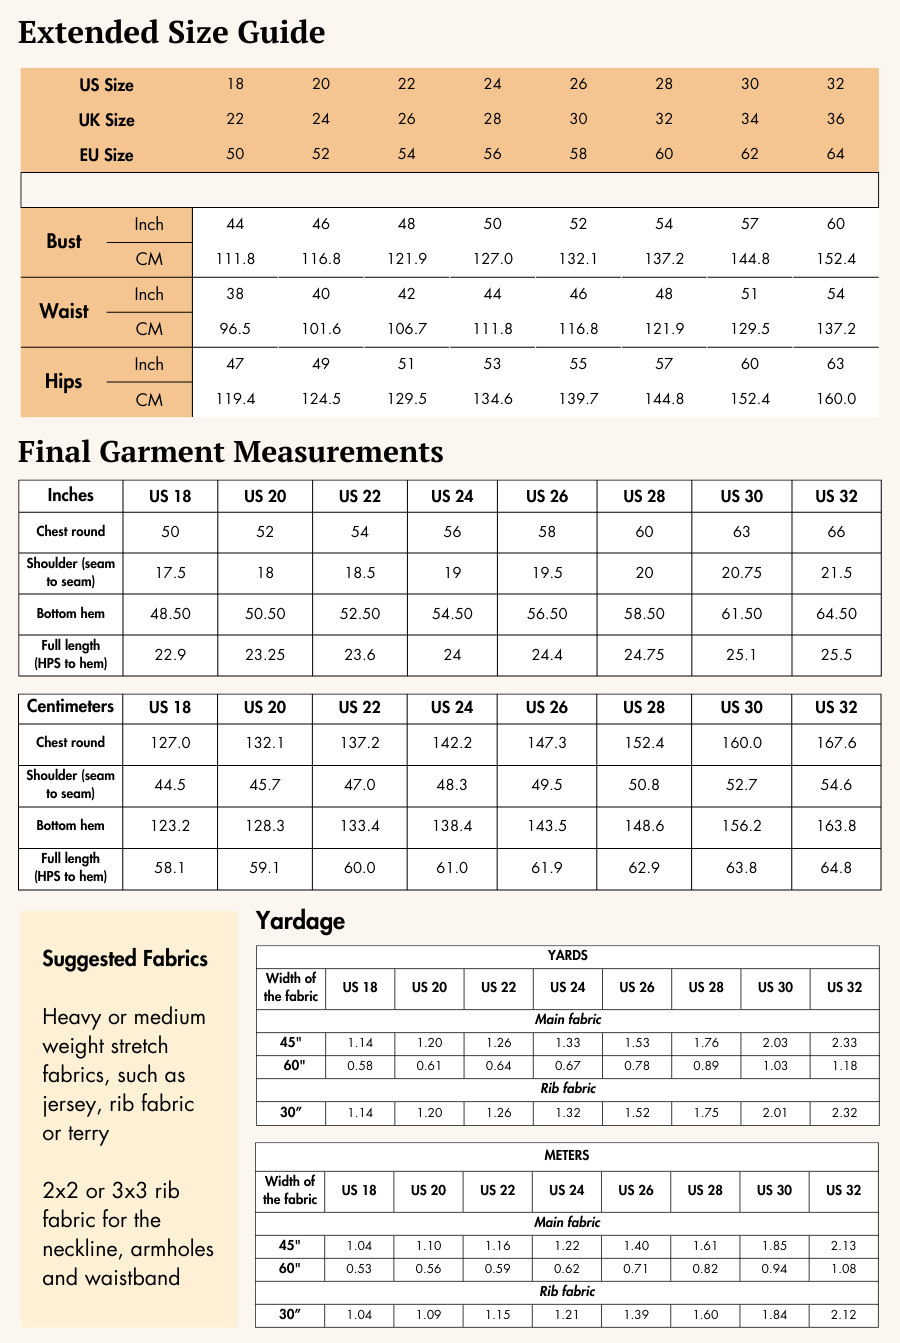
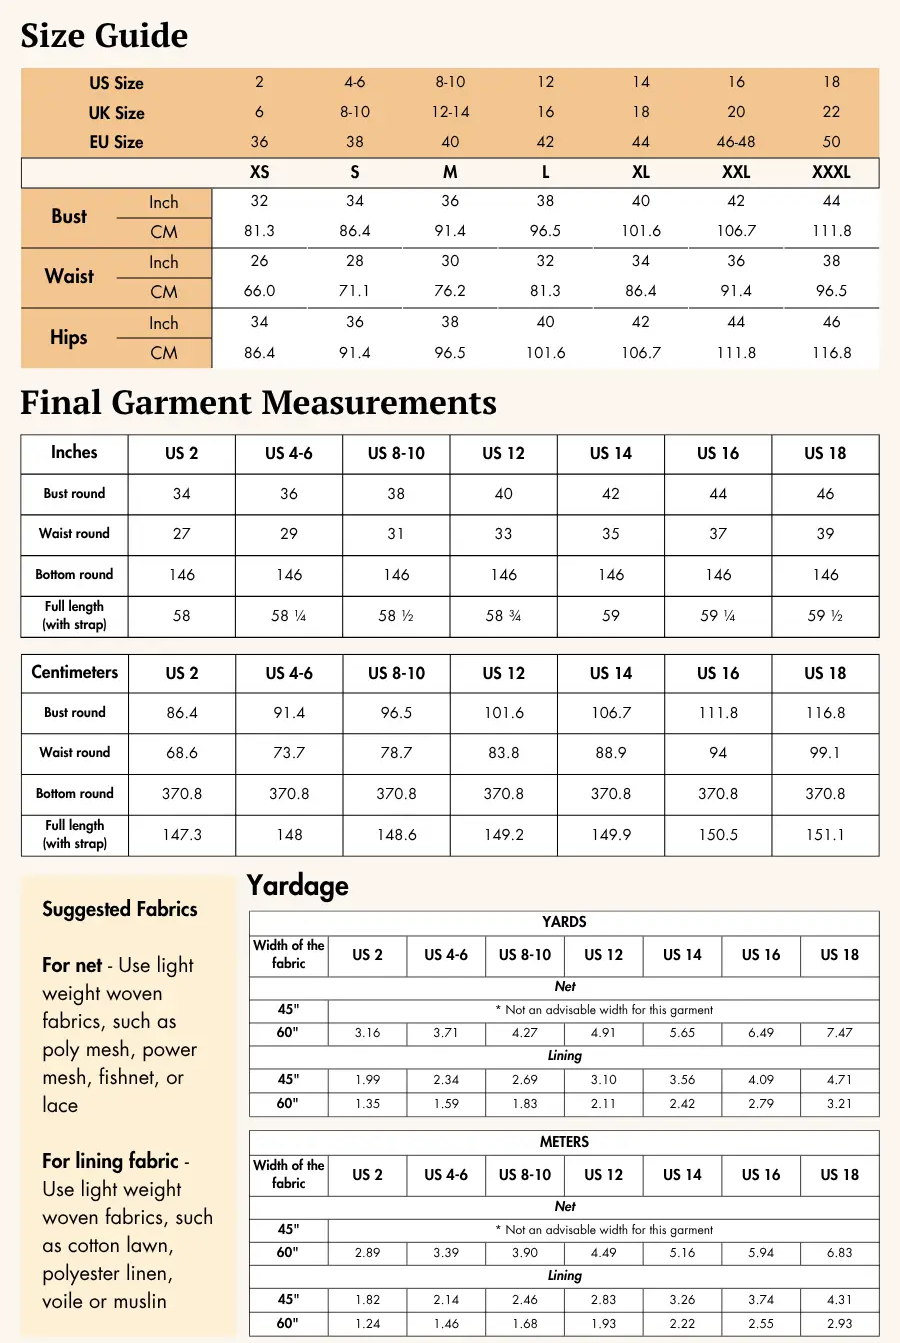
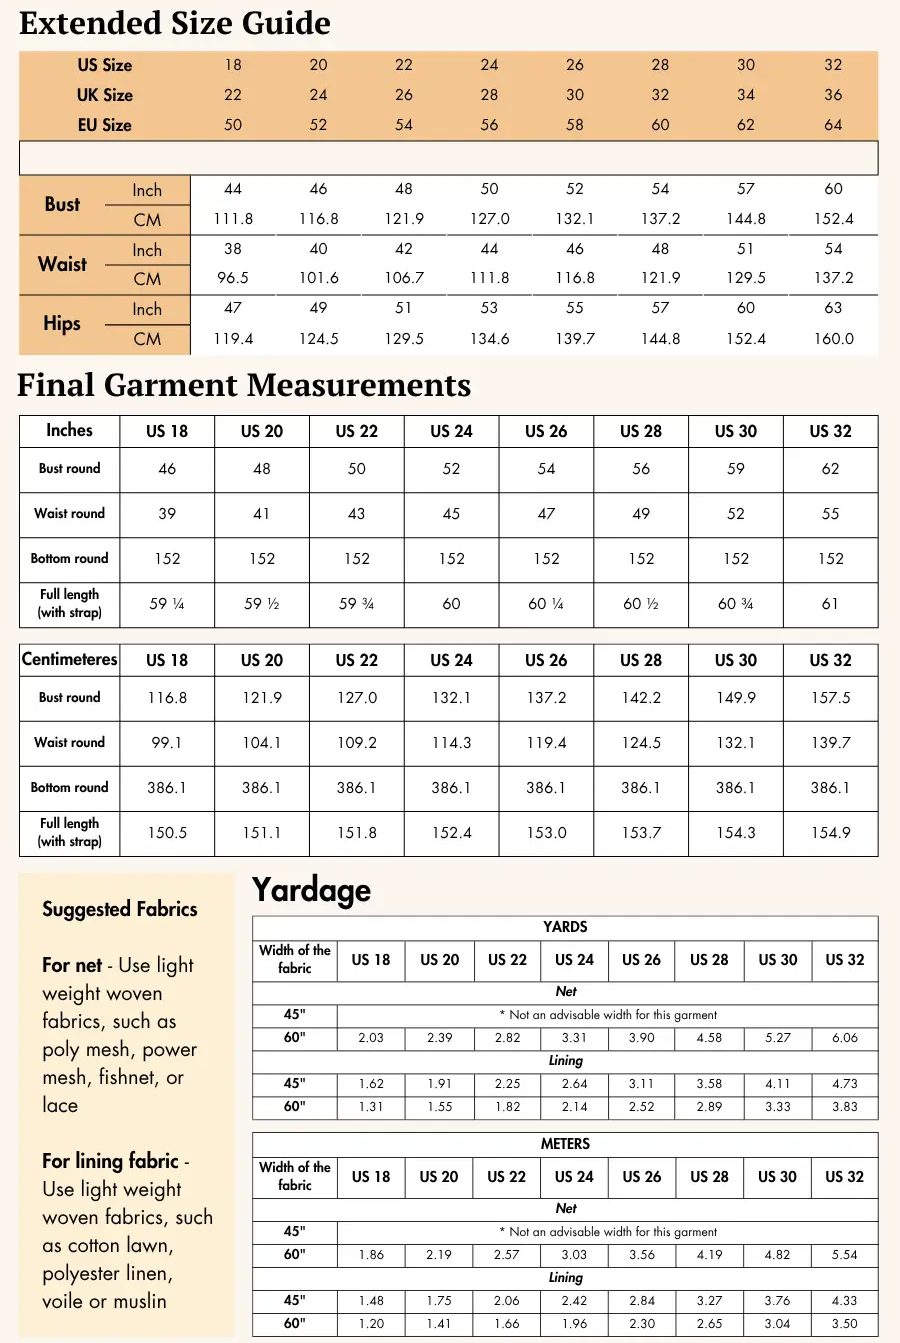
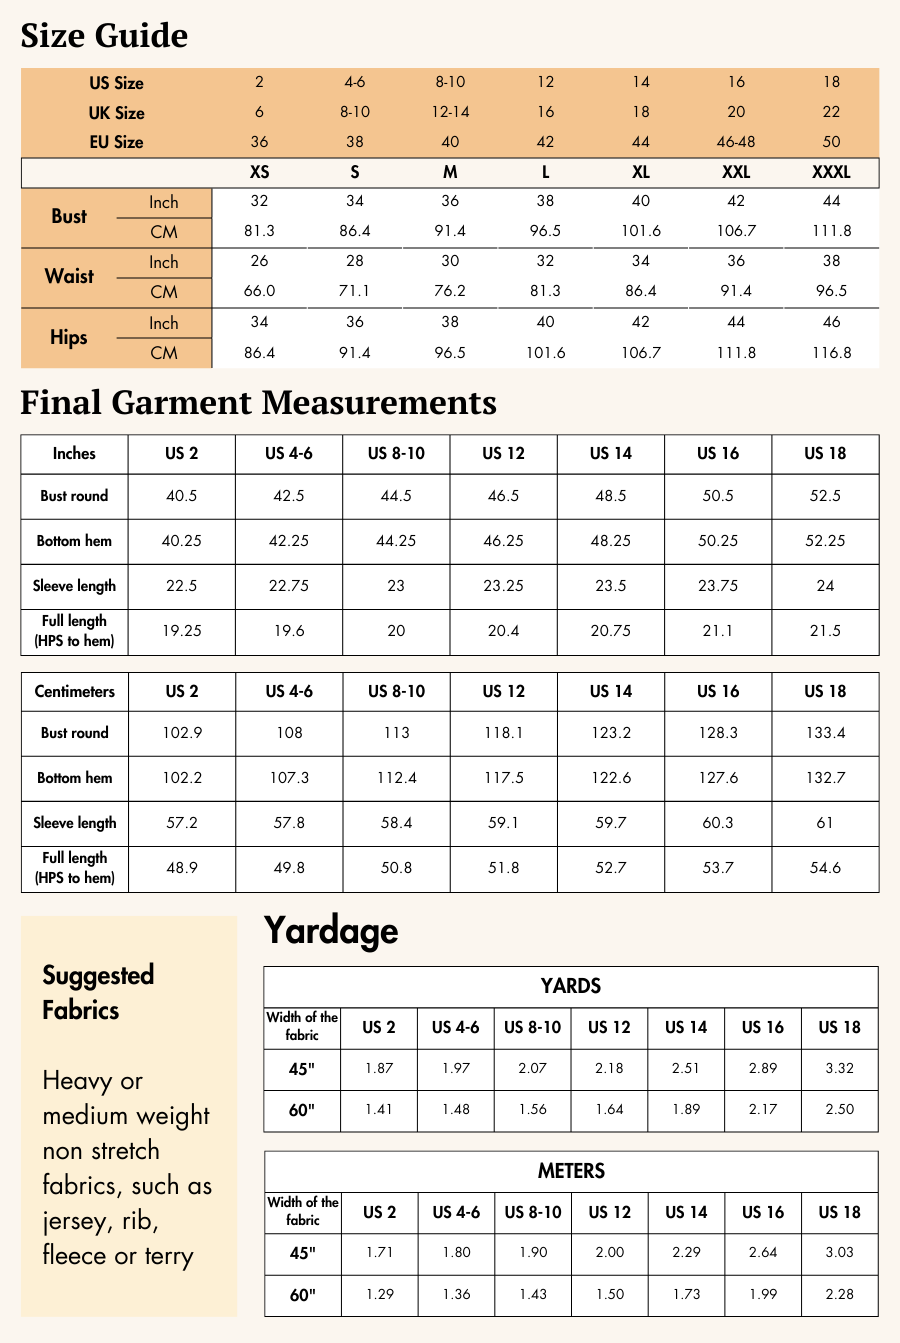
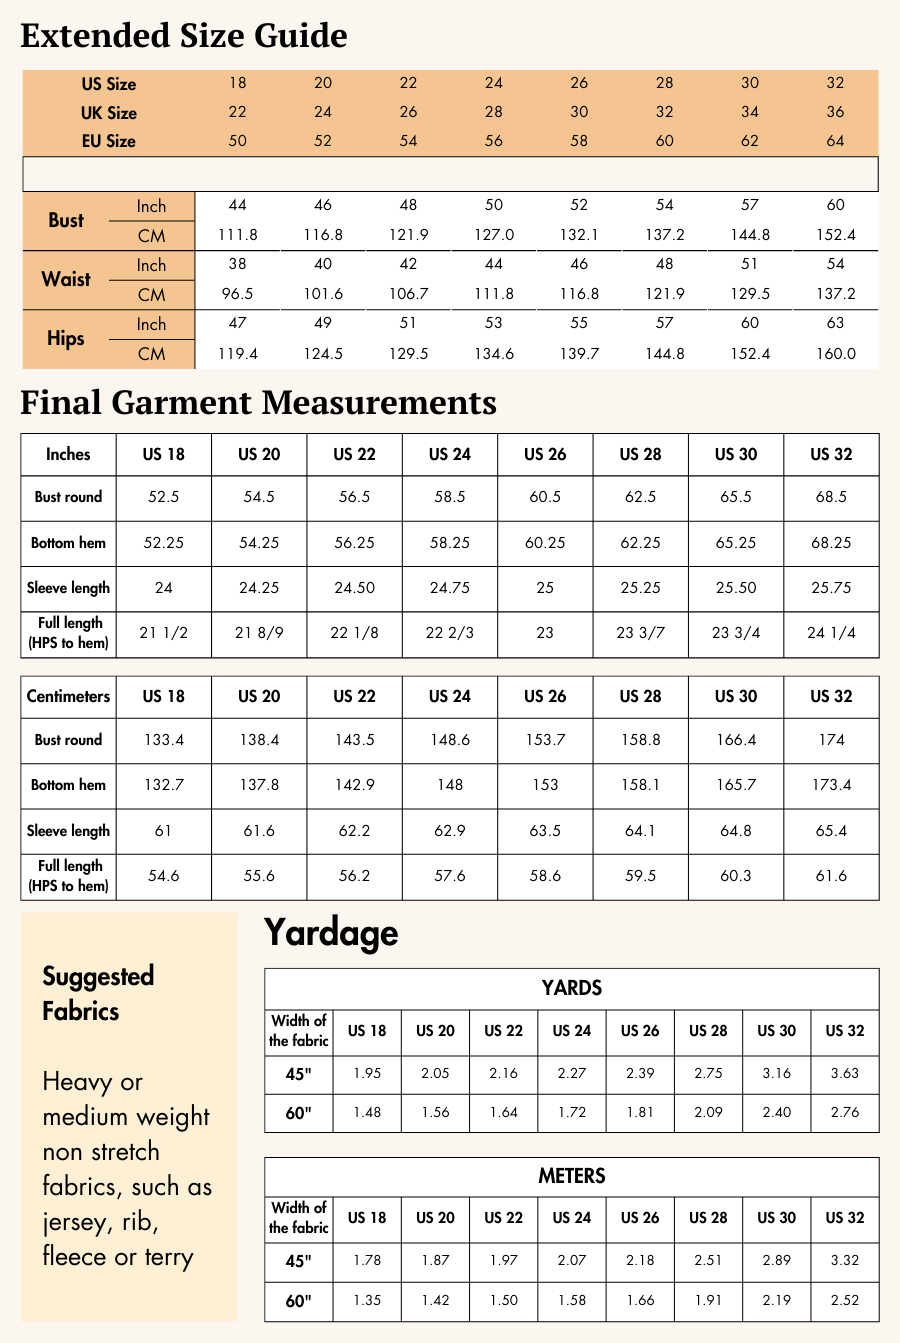
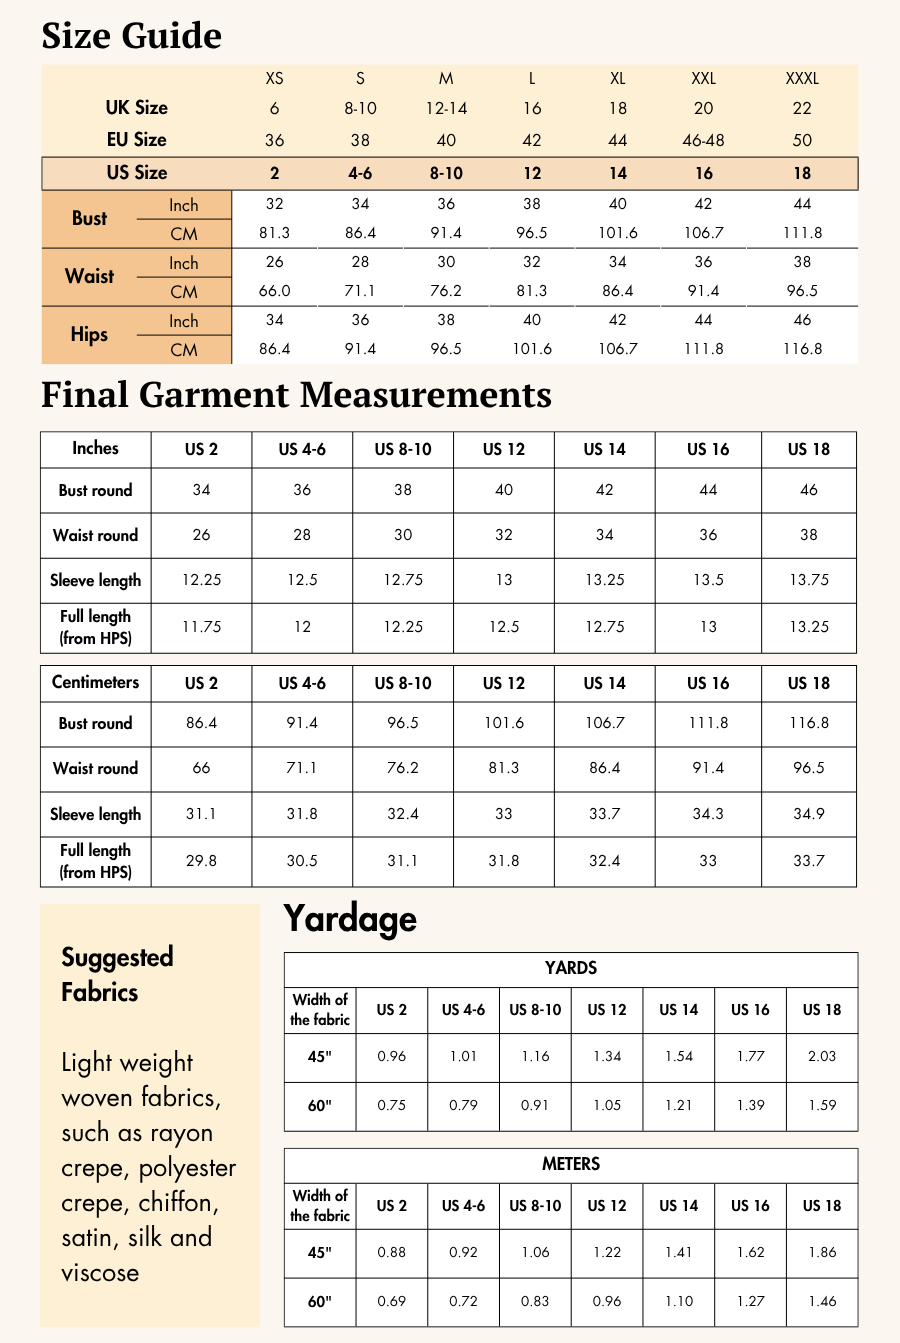
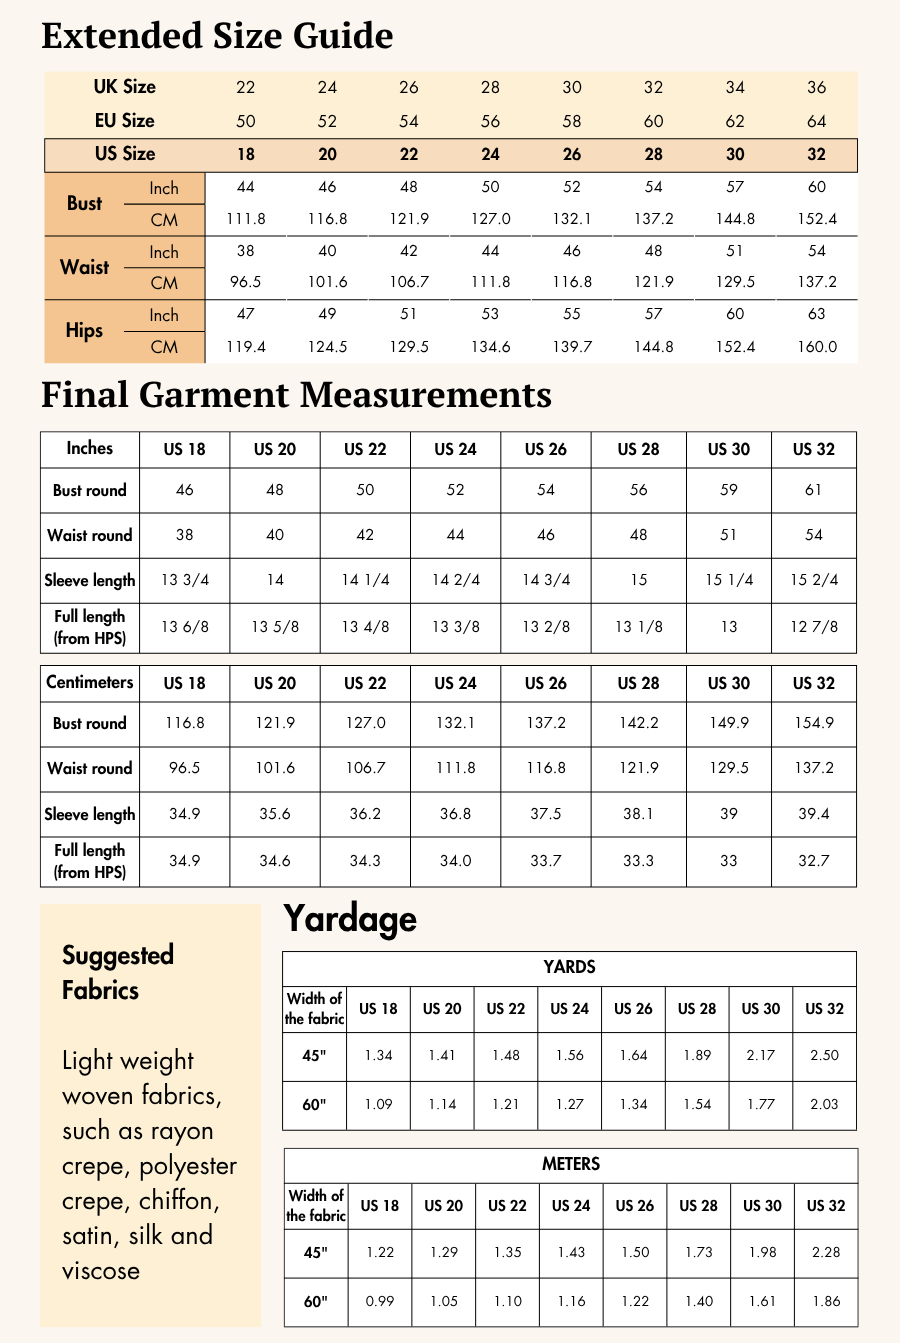
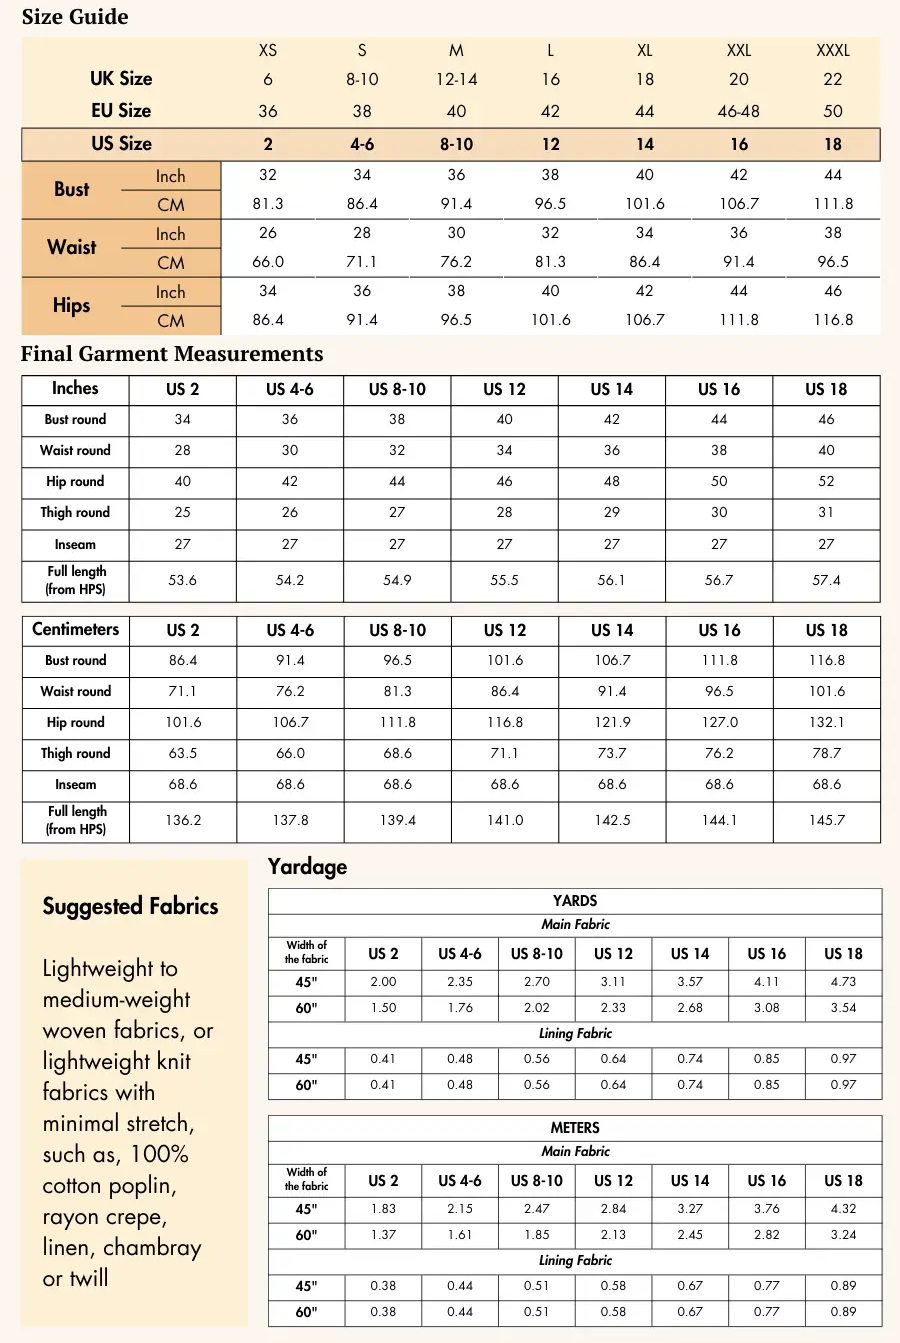
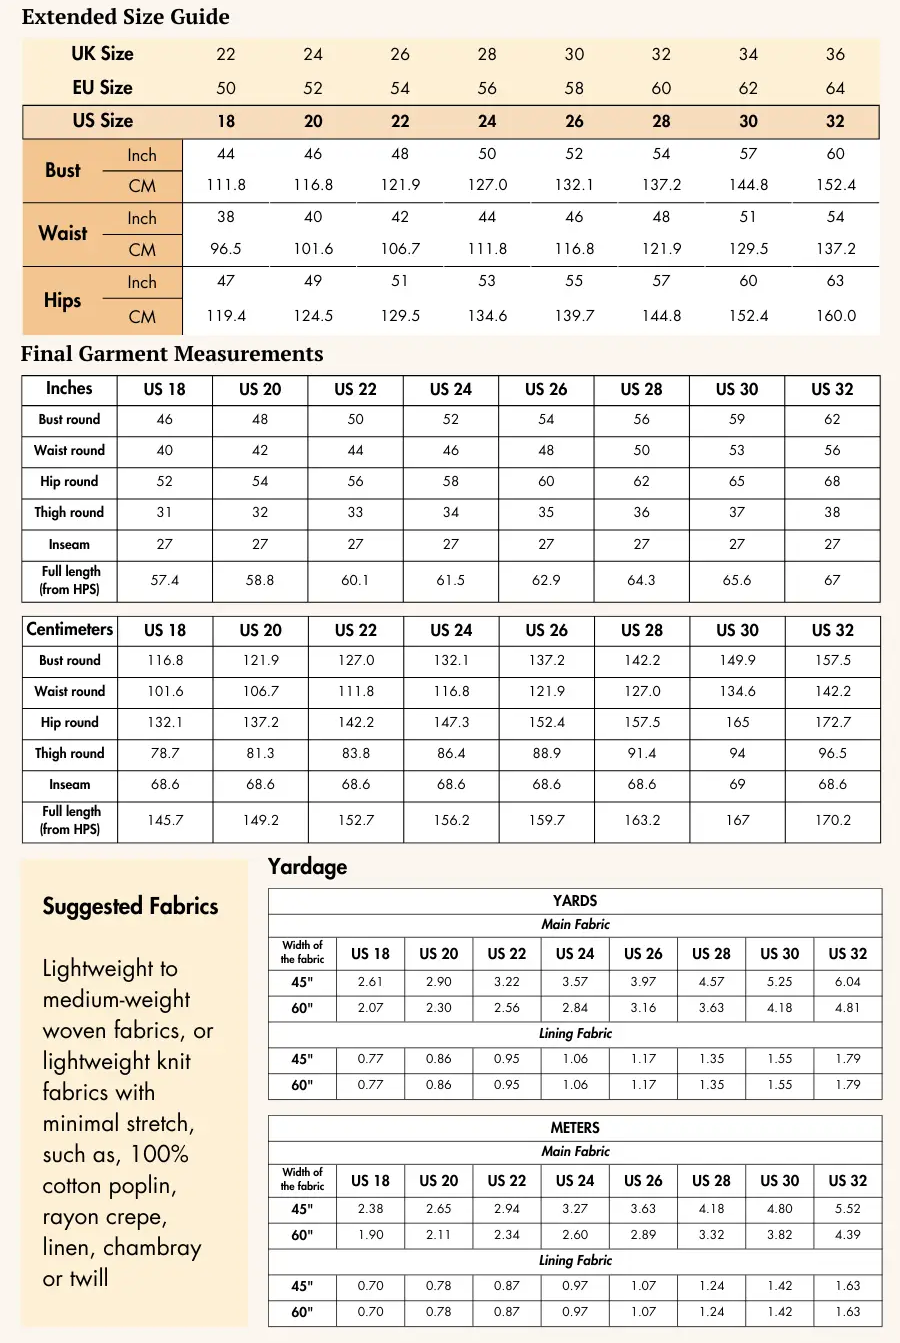
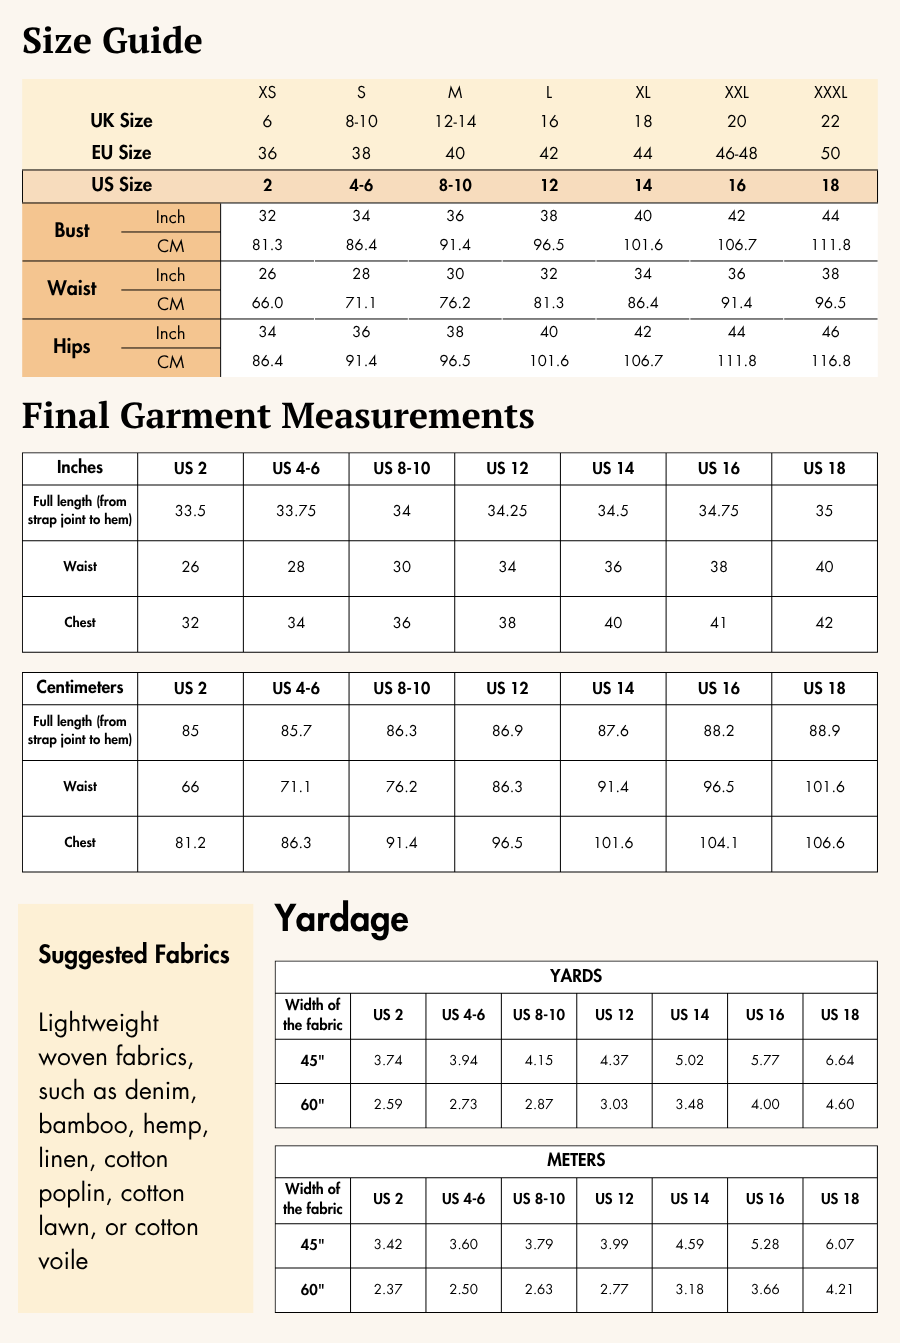
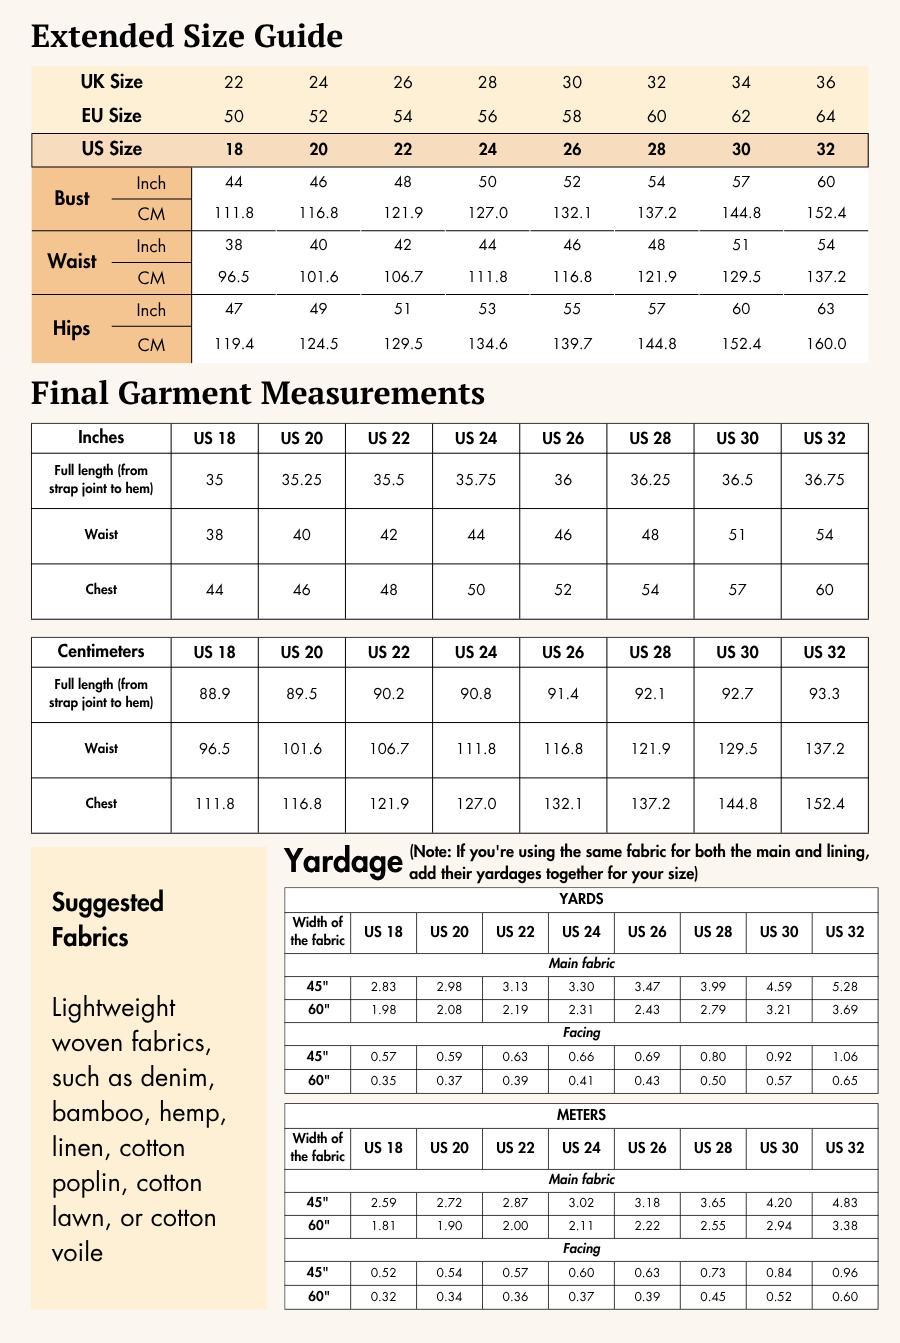
The Camellia Dress pattern is available for sizes US 02 - US 32 | UK 06 - UK 36 | EU 36 - EU 64. Check the Camellia Dress Size Chart and measure yourself to select the correct size (see the garment and body measurement tables).
Verify how much fabric you need by referencing the fabric yield table.
Printing Your Digital Sewing Pattern
Before cutting your fabric, print your digital pattern at 100% scale on the correct paper size (usually A0 or A4/US Letter). Once printed, trim and tape the pages together following the pattern guide. Now your pattern is ready to use!
If you want to learn more about how to Print Digital Sewing Patterns, click here.
Pattern Inventory: What Pieces to Prepare
For sewing the Camellia Wrap Dress, cut all of these pieces:
-
Center Front – cut x2 fabric (A)
-
Front Side Top – cut x4 fabric (B)
-
Front Bottom – cut x2 fabric (C)
-
Center Back Top – cut x4 fabric (D)
-
Back Bottom – cut x2 fabric (E)
-
Tie Knot – cut x2 fabric (F)
-
Strap – cut x2 fabric (G)

Pattern Marking


-
Lay out all pattern pieces according to the cutting diagrams. Ensure the grainline arrow for each piece runs parallel to the selvage for best drape.
-
Transfer all markings: Notches, grainlines, center fronts/backs, fold lines, circles, buttonholes, and strap/zipper placements, using chalk, pen, or tailor’s tacks onto the wrong side of your fabric.
-
Cut notches anywhere they appear on the pattern edge—these are crucial for proper alignment and assembly.
-
Mark the center front on all pieces cut on the fold.
Cutting Layout
- Reference the correct layout diagram in the Camellia Sewing Guide for your chosen size and fabric width (45” or 60”).

-
If using fabric with nap or a directional print, buy extra yardage and align pattern pieces accordingly.
-
Pin or use pattern weights to secure each piece for accurate cutting.
-
Trace the shapes and cut along the outlines, carefully removing any marking lines after cutting.
Fabric Cutting and Preparation
-
Cut out every required piece per your size from your main fabric. For pieces needing two cuts, fold fabric as shown in cutting diagram.
-
Cut all notches as shown on the pattern.
-
Double-check that you have all pieces before you start sewing.
Seam allowance: Follow the seam allowances as indicated on the pattern file layers. These are provided specifically for each piece to ensure accurate construction. The Camellia pattern uses a 1.1 cm (or 0.45 inch) seam allowance all around, 1.9 cm (or .75 inch) at the hem and 1.9 cm (or 0.75 inch) at the center front piece.
Step-by-Step Sewing Instructions

1.Place one of the center top pieces and one of the front side top pieces with right sides together, aligning the notches (fig.1a). Sew along the seamline to achieve figure 1b.
Repeat this step for the other side of the center top with the other front side top piece (fig.1).

2. Repeat the step 1 with the other center front piece and both front side pieces for the lining.

3. Place the wrong side of the tie knot on the right side of one of the prepared front panels, aligning the notches on the armhole and neckline (fig. 3a). Sew from the neckline notch to the side seam notch to achieve figure 3b.
Repeat this for the other tie knot piece on the same prepared front panel (fig. 3).

4. Fold the strap in half lengthwise with the right side facing. Iron to flatten. Sew along the length-wise seam line of the strap, leaving both ends unstitched (fig.4a) Turn the straps right side out to achieve the figure 4.
Repeat this process for the other strap.

5. Position the center front of both straps onto the armhole of the front top (fig.5a). Place the other front Strap in-between top piece (which is the front lining) over the straps them with right sides facing together. Pin them in place. Sew along the seamline of the neckline and armhole together to achieve figure 5b.
Turn them right side out (fig. 5).


6. Fold the seam allowance of the tie knots twice from the seamline and sew on the edge to finish the raw edges of the seam allowance.

7. Fold the center front of each front bottom pieces twice to finish the raw edges. Sew along the edge of the center front seam.
Repeat this for the other bottom piece.

8. Place the left side bottom waistline on top of the top waistline (fig 8a). Sew them together to achieve figure 8b. Next, place the other bottom piece on the right side and repeat the process (fig. 8).
Alternatively, you can place all three pieces together at the top waistline and sew them simultaneously.


9. Place the center back piece on the waistline of the back bottom piece. Sew along the seamline. Repeat this process with the other two pieces.

10. Serge the waistline of the remaining two center back pieces which will get attached as back lining.

11. Position the end of each strap at the strap joint of the back top piece (fig.11a). Pin the straps in place. Place the other center back top piece over the straps. Sew across the straps and back pieces to achieve figure 11b. Leave a few stitches at the center back for the zipper attachment.
Repeat this step for the other strap and back pieces (fig.11).


12. Align the front and back of the dress with right sides together. Match all the seamlines of the side seam. Sew the side seam.

13. Place the front side of one zipper tape on the right side of the dress. Pin it in place up to the zipper notch. Sew along the edge of the zipper teeth.
Ensure that the back lining is not stitched together with it. Set the back lining aside.
Repeat this process with the other zipper tape.

14. Close the zipper. Fold the dress from the center back. Pull out the zipper tape and sew from the zipper end, ensuring to bring out the stitches underneath the zipper end to secure it.

15. Sew along the center back seamline of the back dress panels from the zipper end to the hem.

16. Set the back lining on the unstitched area of the back across of the top of the zipper tape. Ensure the lining faces right side to the right side of the dress. Sew across the back to finish the lining at the top area.
Repeat the same process on the other side.

17. Turn the dress right side out. Place the right side of the lining center back on the pulled-out zipper tape. Sew along the edge of the zipper teeth. Turn the lining to the wrong side. Use a pointed tool to poke at the corners to create a neater shape.
Repeat this process with the other lining piece.

18. Fold the hem seam allowance twice and sew along the edge to finish the raw edges.

Pressing & Final Touches
-
Iron the dress at every stage—especially after seams and topstitching—for crisp edges and a professional look.
-
Check all seams are secure, ends are enclosed, zipper is smooth, and the straps/ties are sturdy.
-
Try on your wrap dress, tie it as desired, and admire your finished garment!
Winslet’s Sewing Guide for Camellia Dress includes clear diagrams that walk you through each step, making it easy to follow and complete your project with confidence.
For an overview of Winslet’s Sewing Guides, click here.
Ready to Sew Your Own Wrap Dress?
For a beautifully drafted pattern and step-by-step instructions from start to finish, try the Winslet’s Camellia Wrap Dress Sewing Pattern. With inclusive sizing and thoughtfully designed construction, you’ll enjoy every minute of your sewing journey.
Purchase your Camellia Wrap Dress Pattern today and create a wrap dress you’ll reach for again and again.
Join the Community & Get Support
Show your creation on Instagram or Facebook with #MadeWithWinslets for a chance to be featured! For any questions or issues, email the Winslet’s support team at support@winslets.com.


