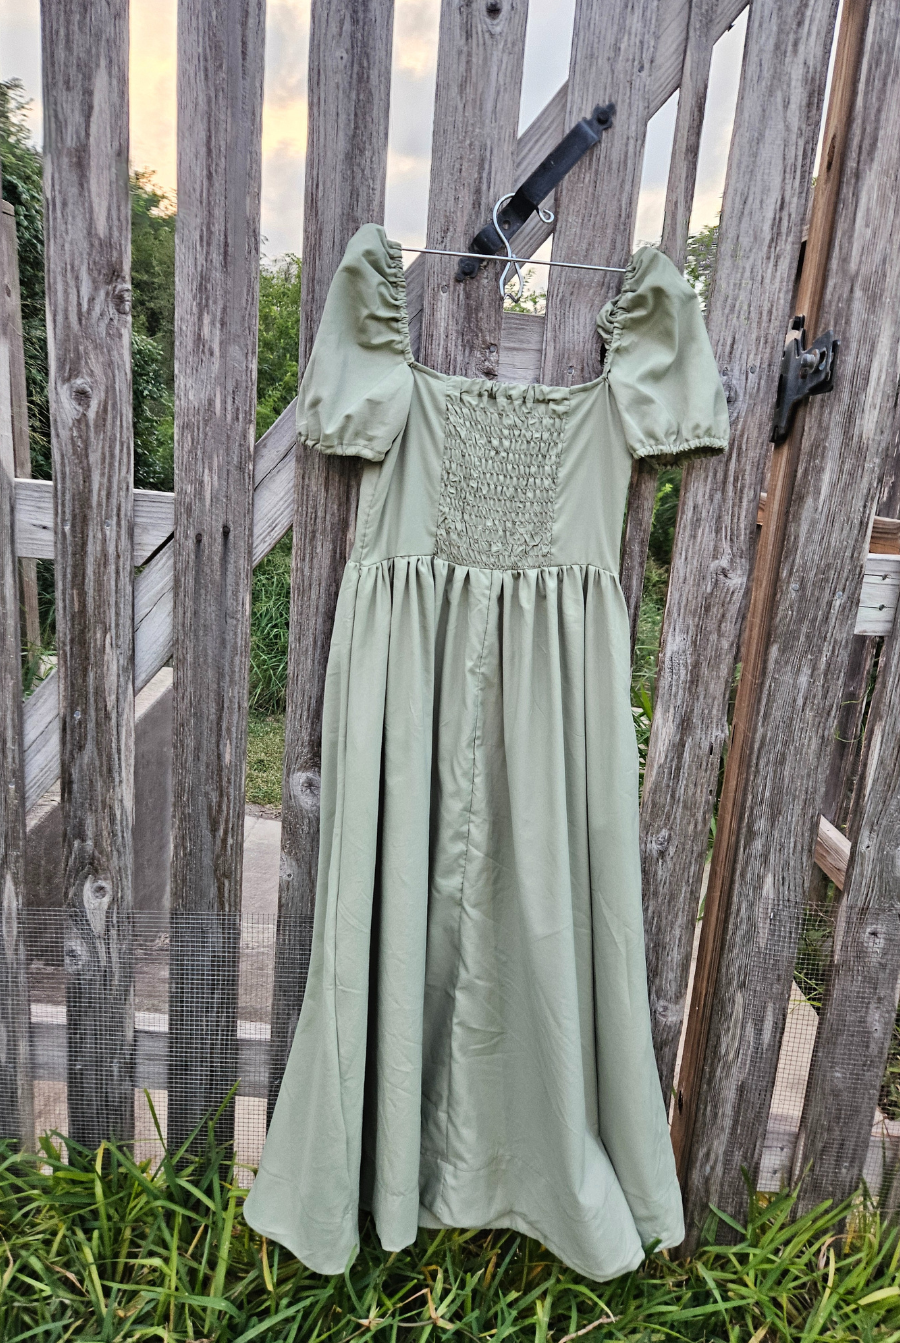
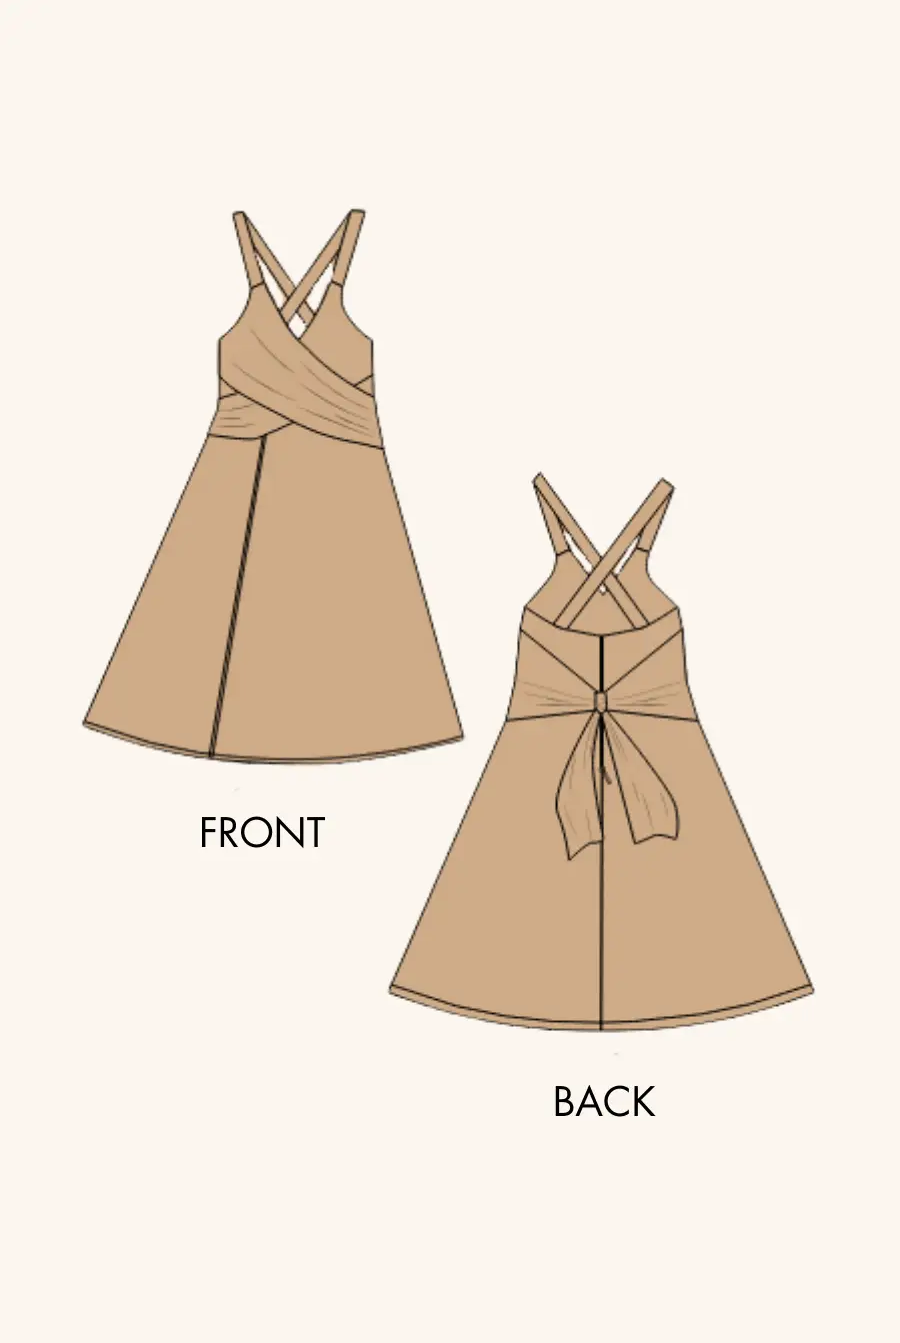
There’s something effortlessly elegant about a strappy midi dress—it’s polished enough for special occasions but comfortable enough for everyday wear. And when it comes with tie-up straps and a flattering fit-and-flare shape? That’s a must-have DIY project for any confident beginner.
In this post, I’ll show you how to sew a beautiful midi dress step-by-step. It’s perfect for summer styling, vacation wardrobes, and layering with cardigans in spring and fall.
Why You’ll Love a Midi-Length Fit-and-Flare Dress
-
Universally flattering: The cinched waist and full skirt look great on all body types
-
Adjustable: With tie-up straps, you get the perfect fit every time
-
Easy to sew: No darts or linings—just clean construction
-
Ideal for warm weather: Especially when sewn in breathable cotton or linen
-
Dress it up or down: Style with sneakers or heels, denim jackets or shawls
Want a pattern that’s simple and stylish? The Violet Midi Dress Pattern by Winslet’s makes it incredibly easy to sew your own dream dress.
Step 1: Choose Your Fabric to sew a Strappy Midi Dress
We recommend using breathable, soft, and structure-friendly fabrics. Great options include:
-
Cotton poplin or cotton lawn
-
Lightweight denim or chambray
-
Linen or linen blends
-
Bamboo or hemp fabric
The Violet Midi Dress is made from lightweight cotton—perfect for summer heat and easy to care for.
Step 2: Choose the Right Pattern to sew a Strappy Midi Dress
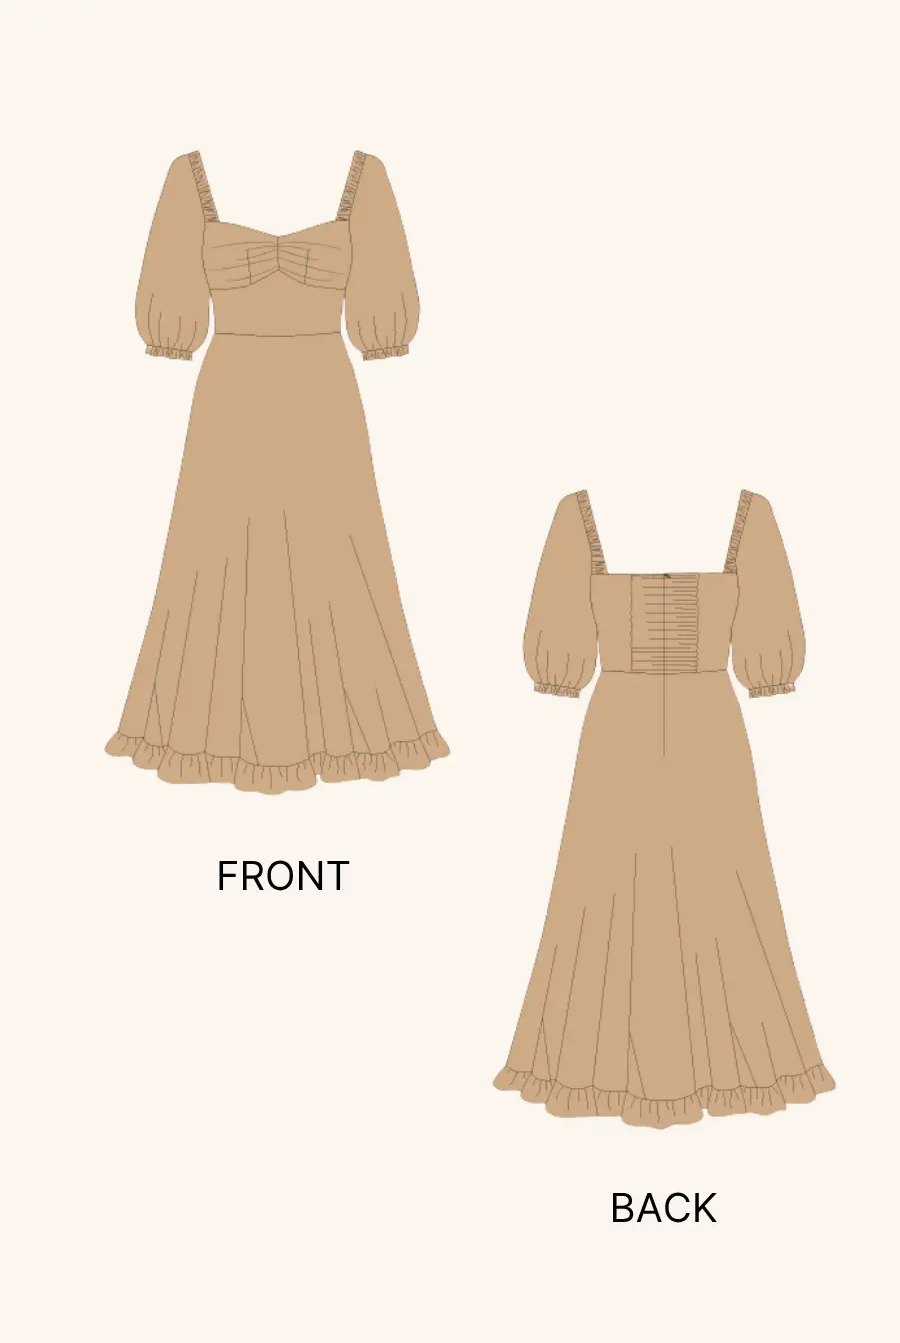
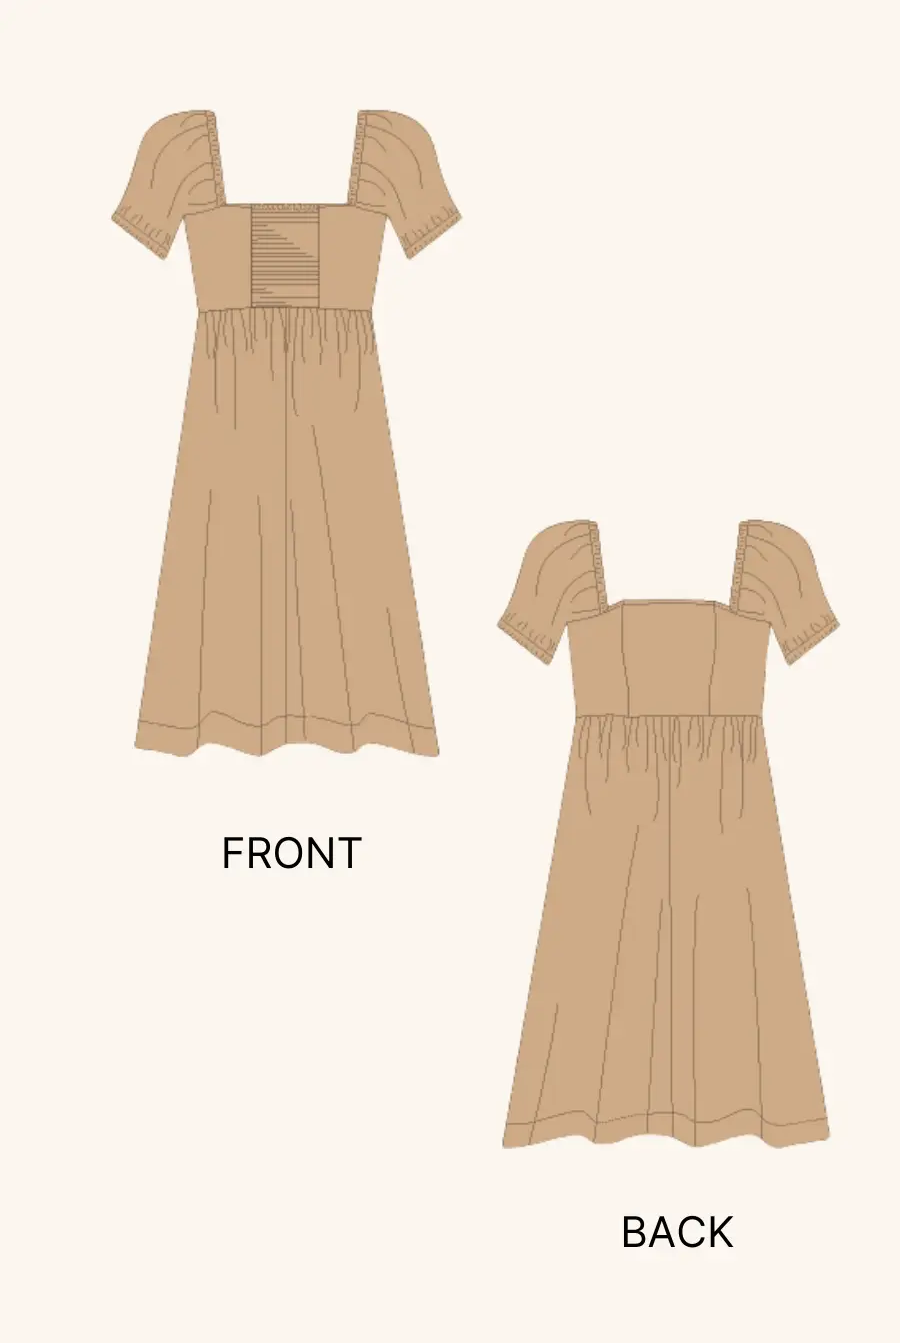
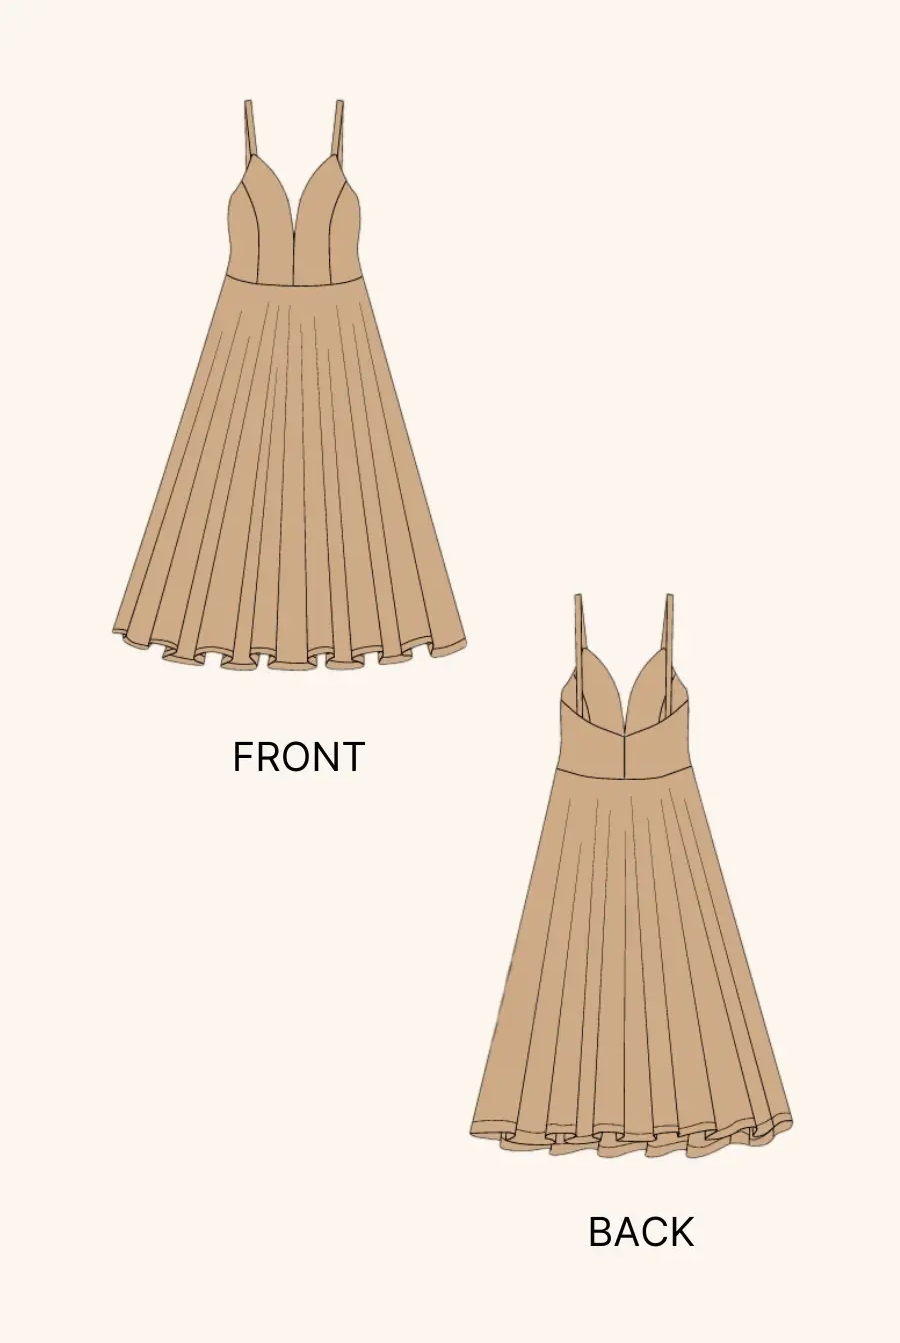
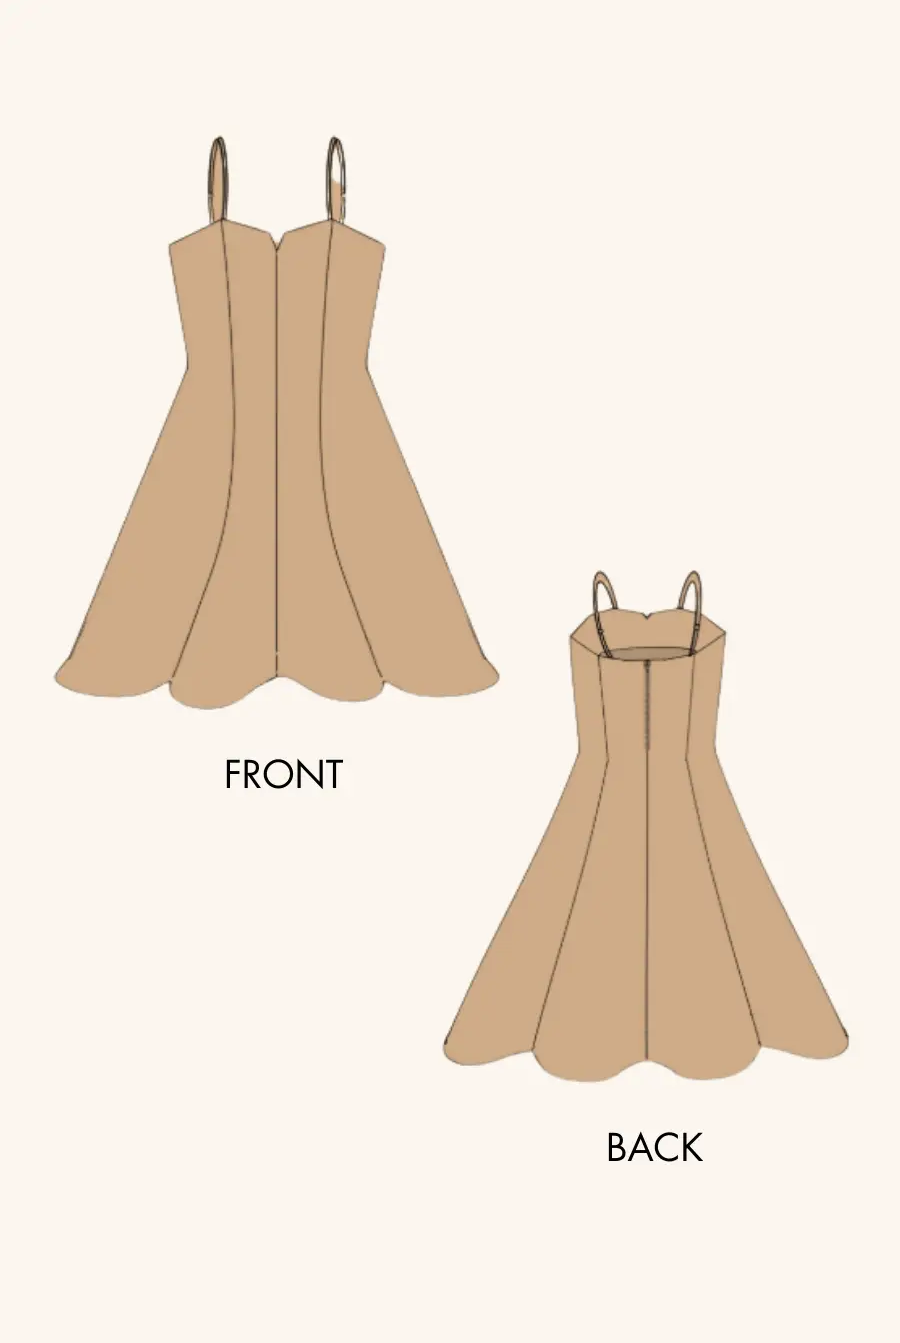
The Violet Midi Dress Pattern by Winslet’s is thoughtfully designed with:
-
Tie-up straps (adjustable length)
-
A fitted bodice with princess seams
-
Invisible back zipper
-
Flared skirt with hem facing for a polished finish
-
Clean neckline with facings
-
Beginner-friendly instructions with step-by-step illustrations
-
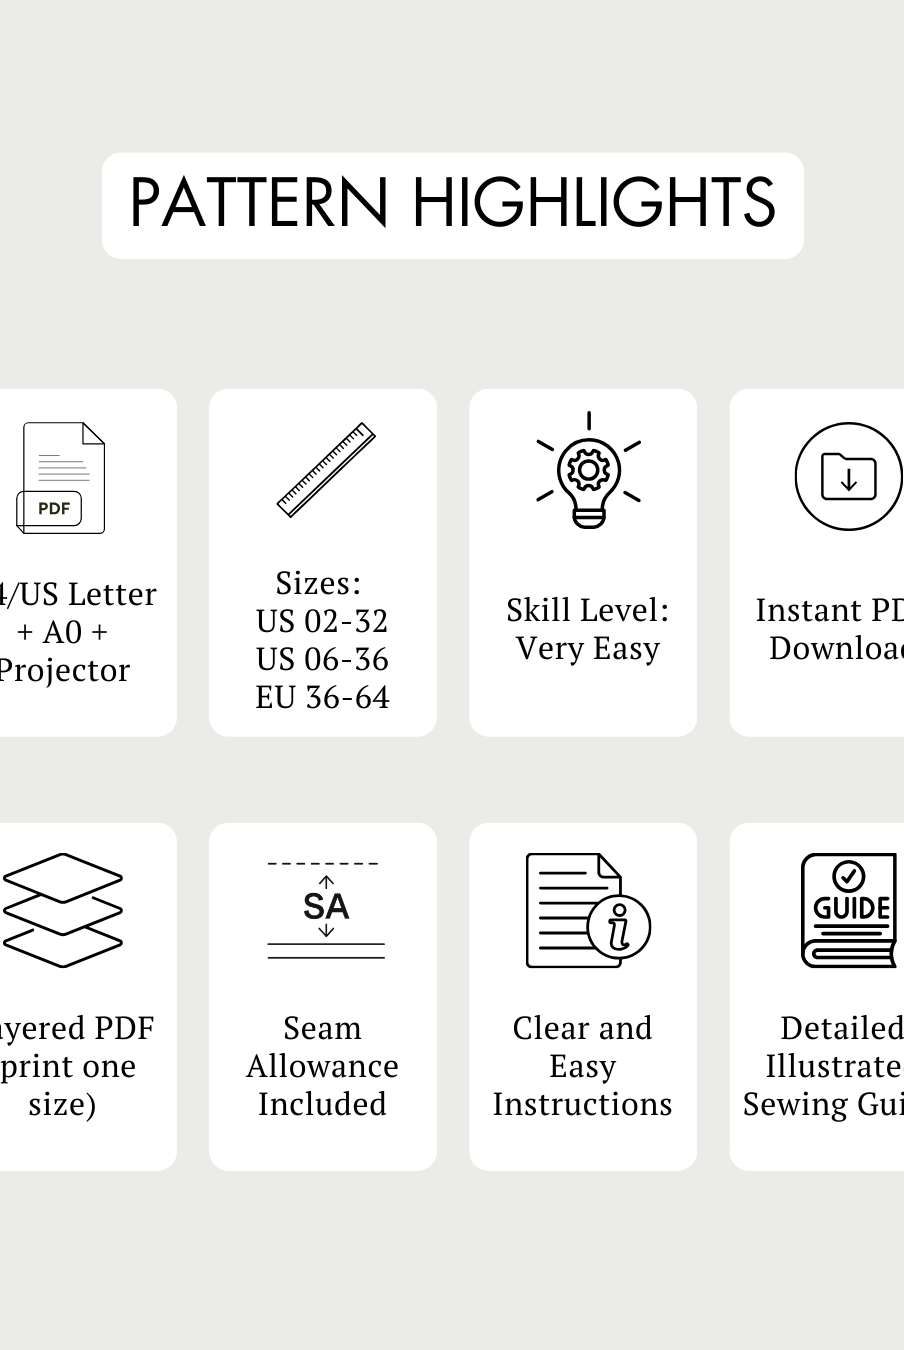
A0, A4, US Letter, and Projector formats
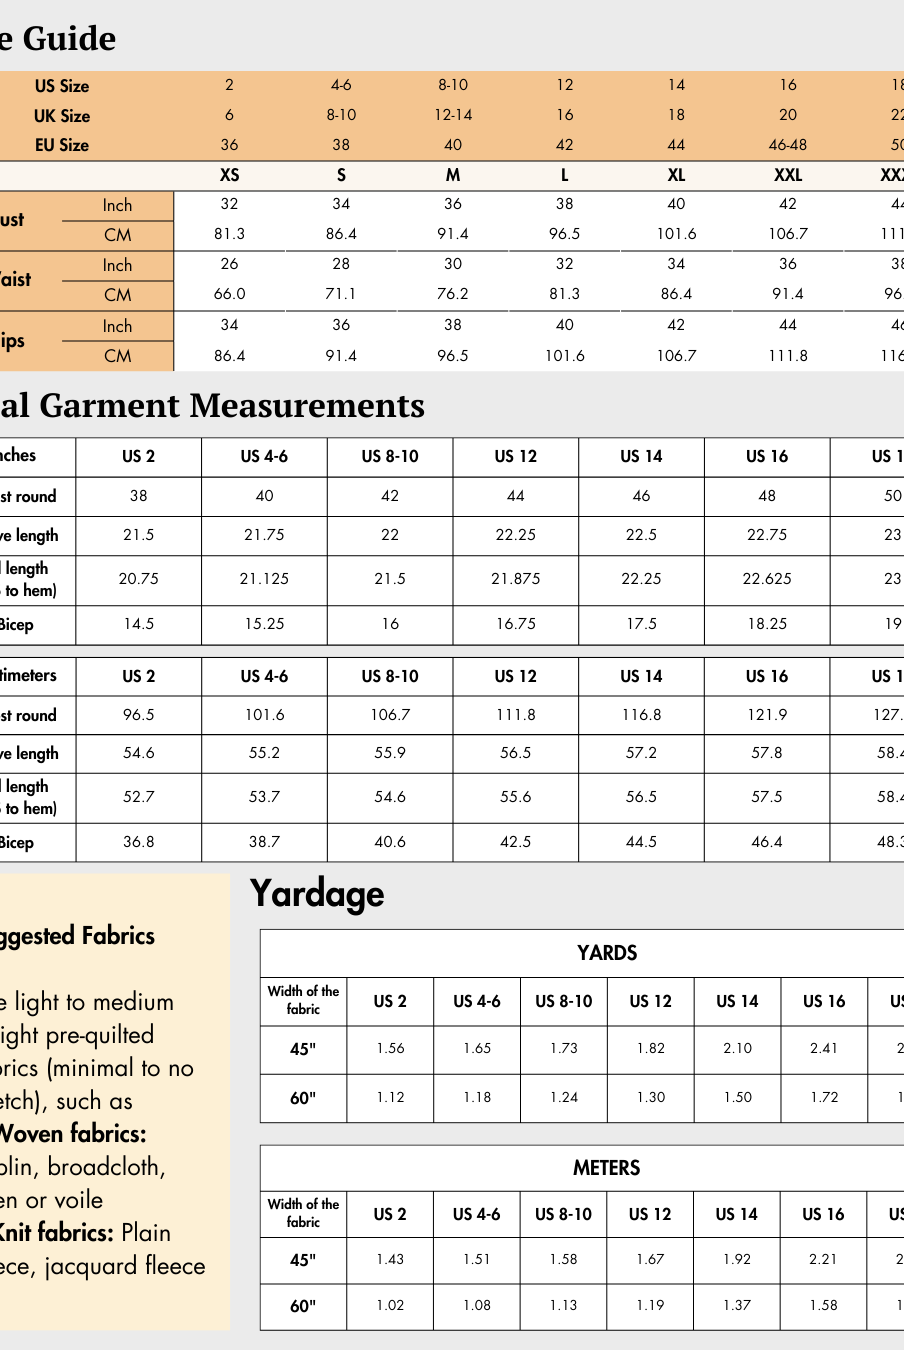
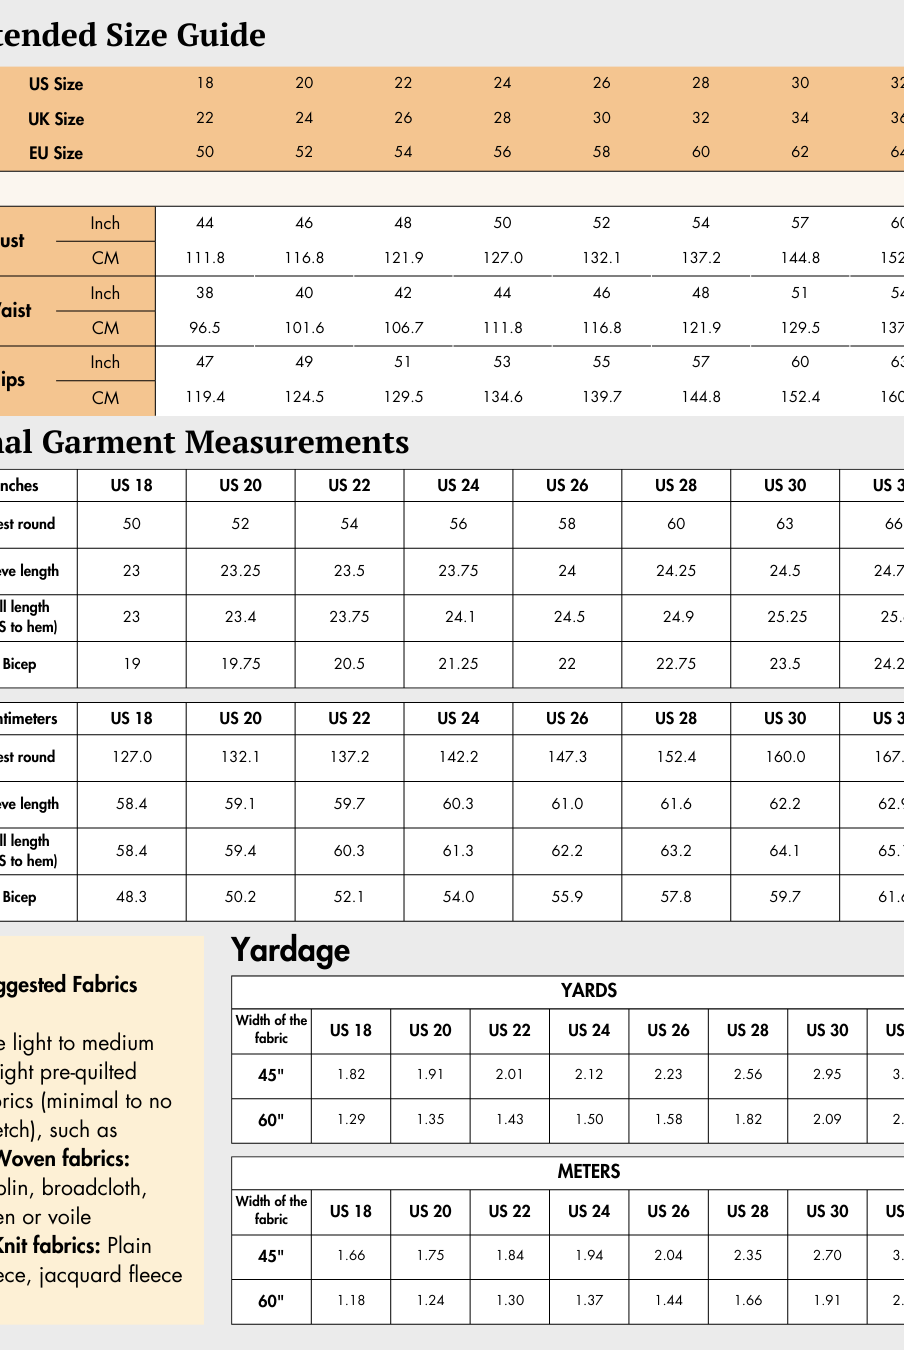
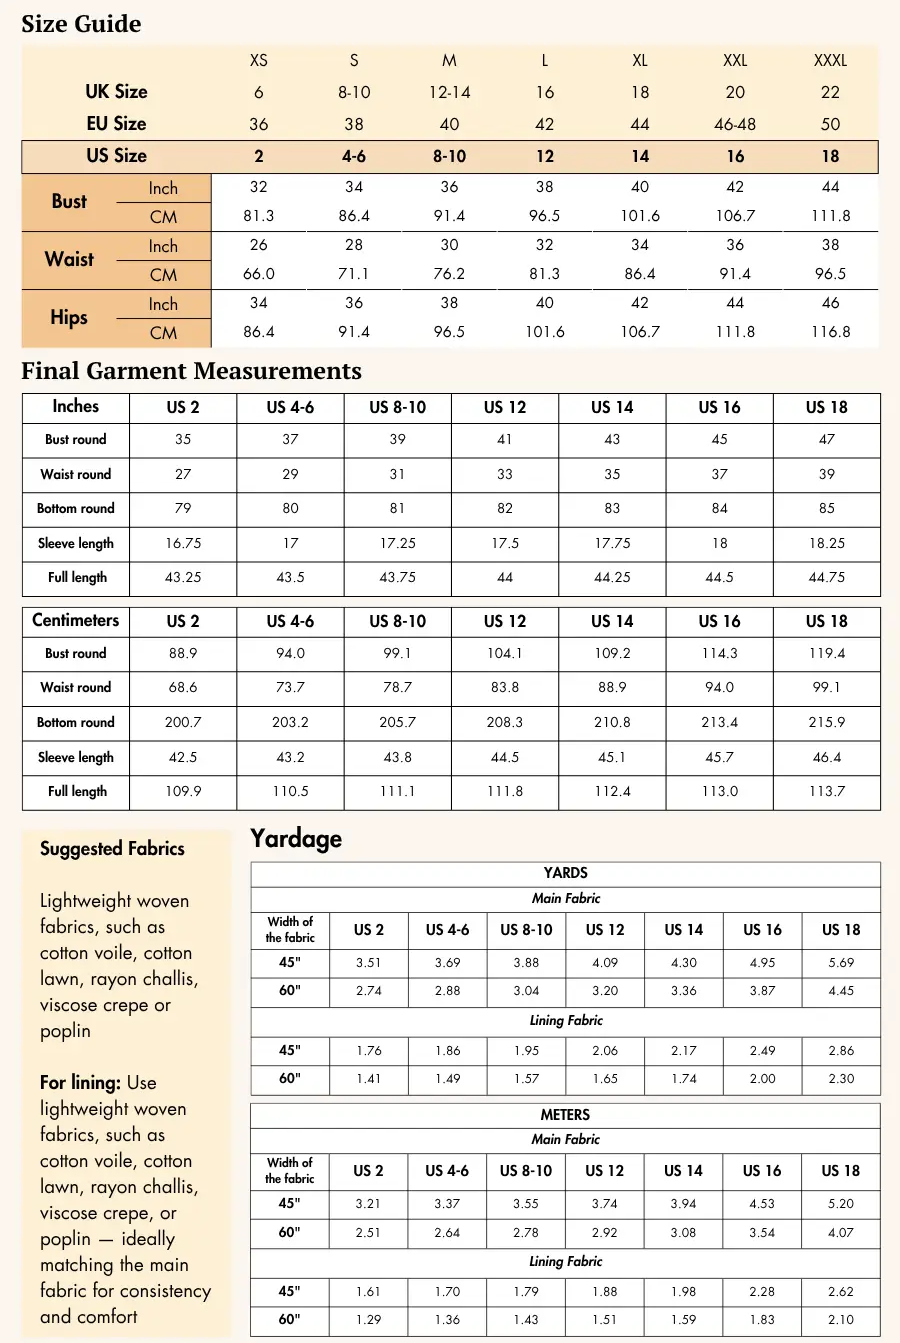
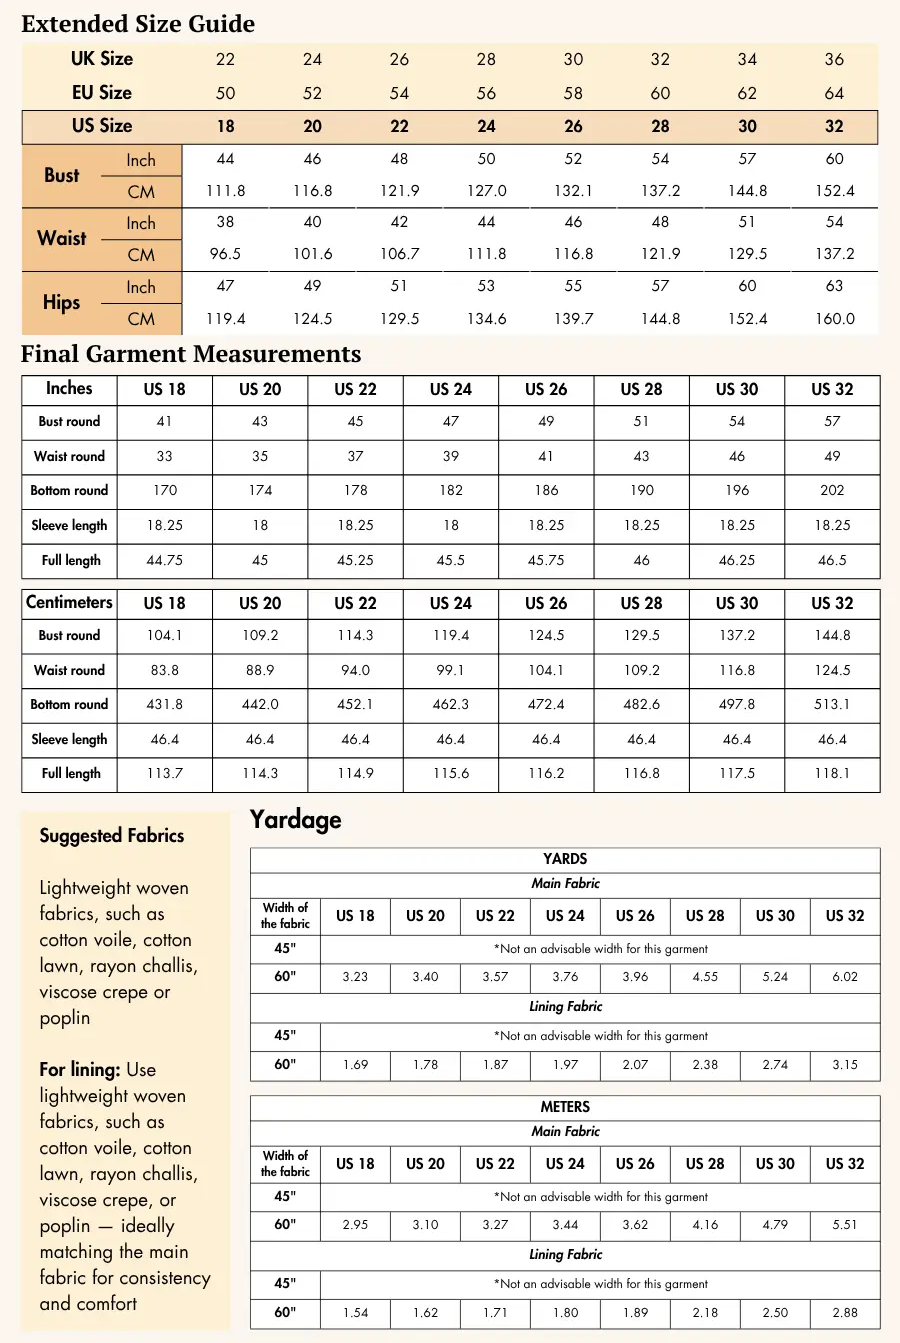
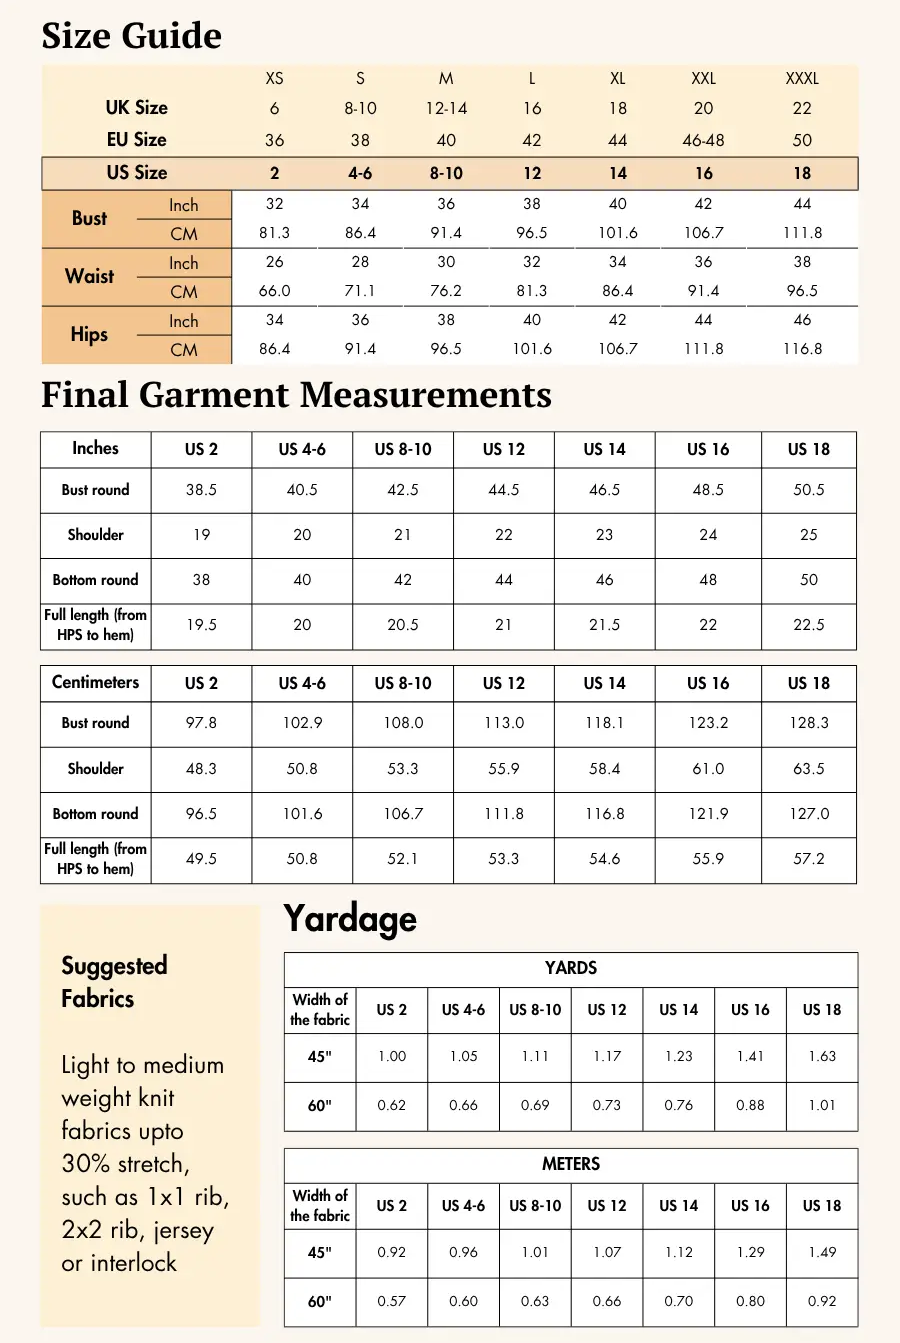
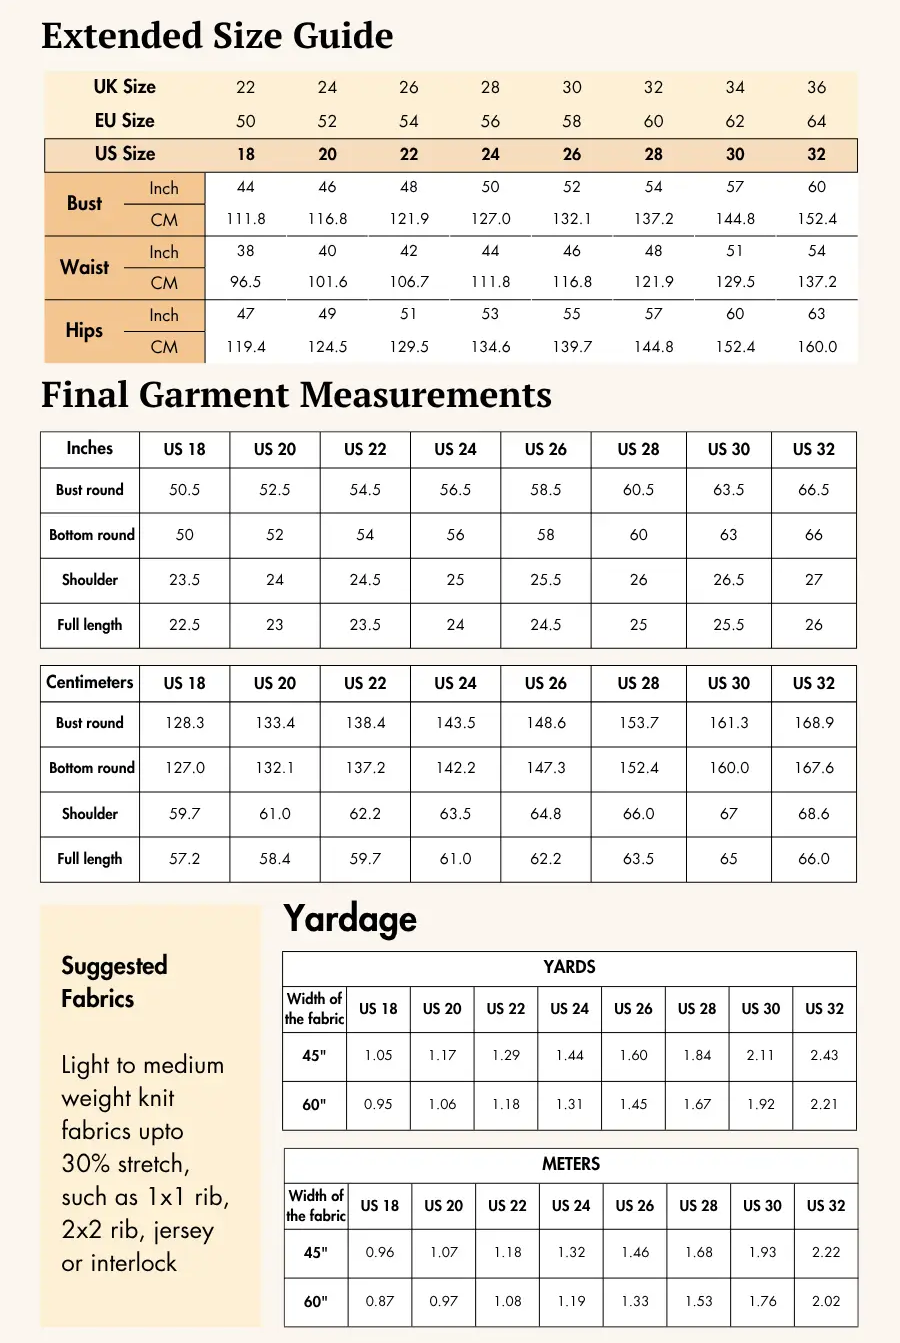
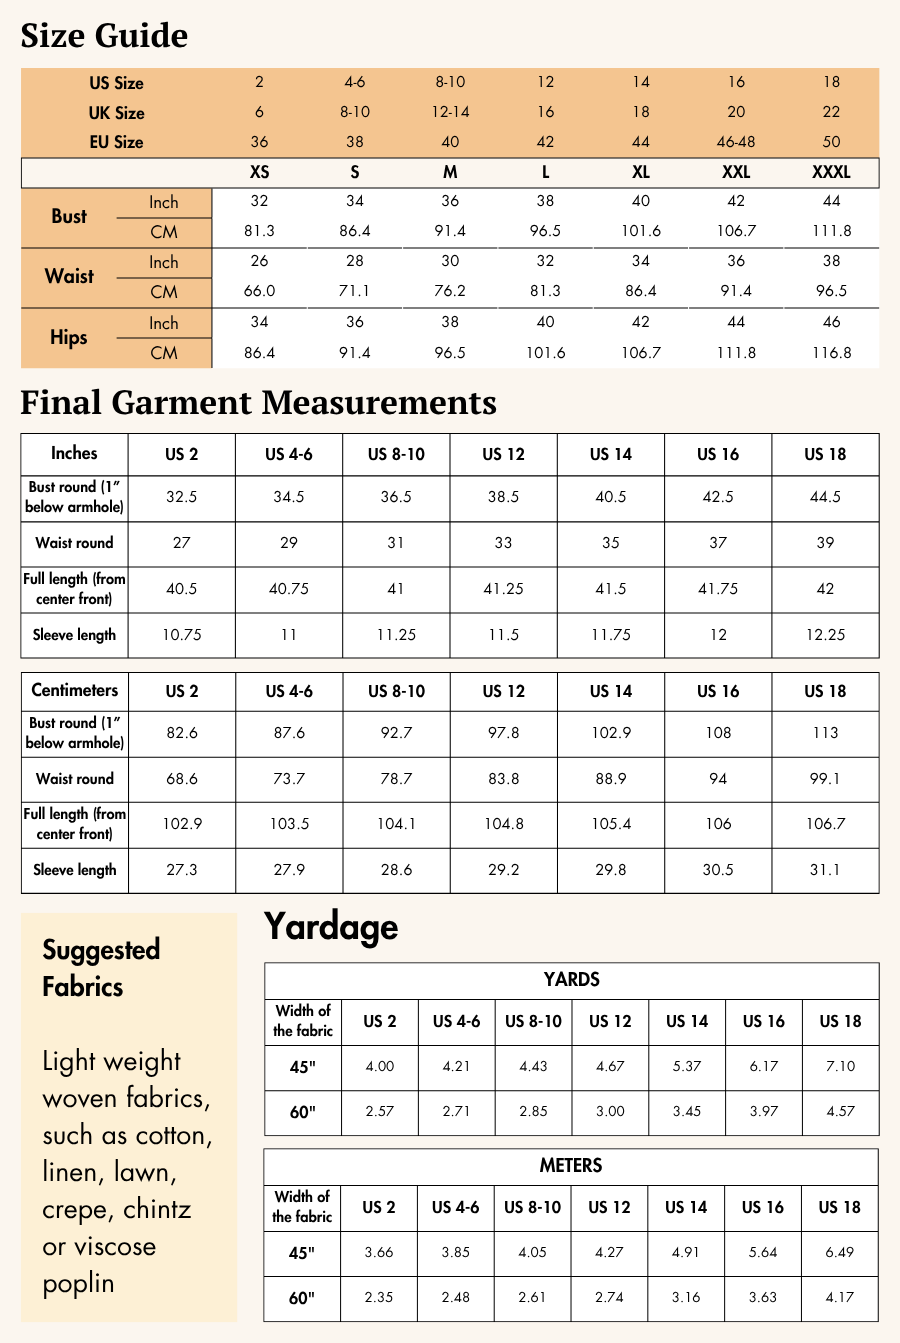
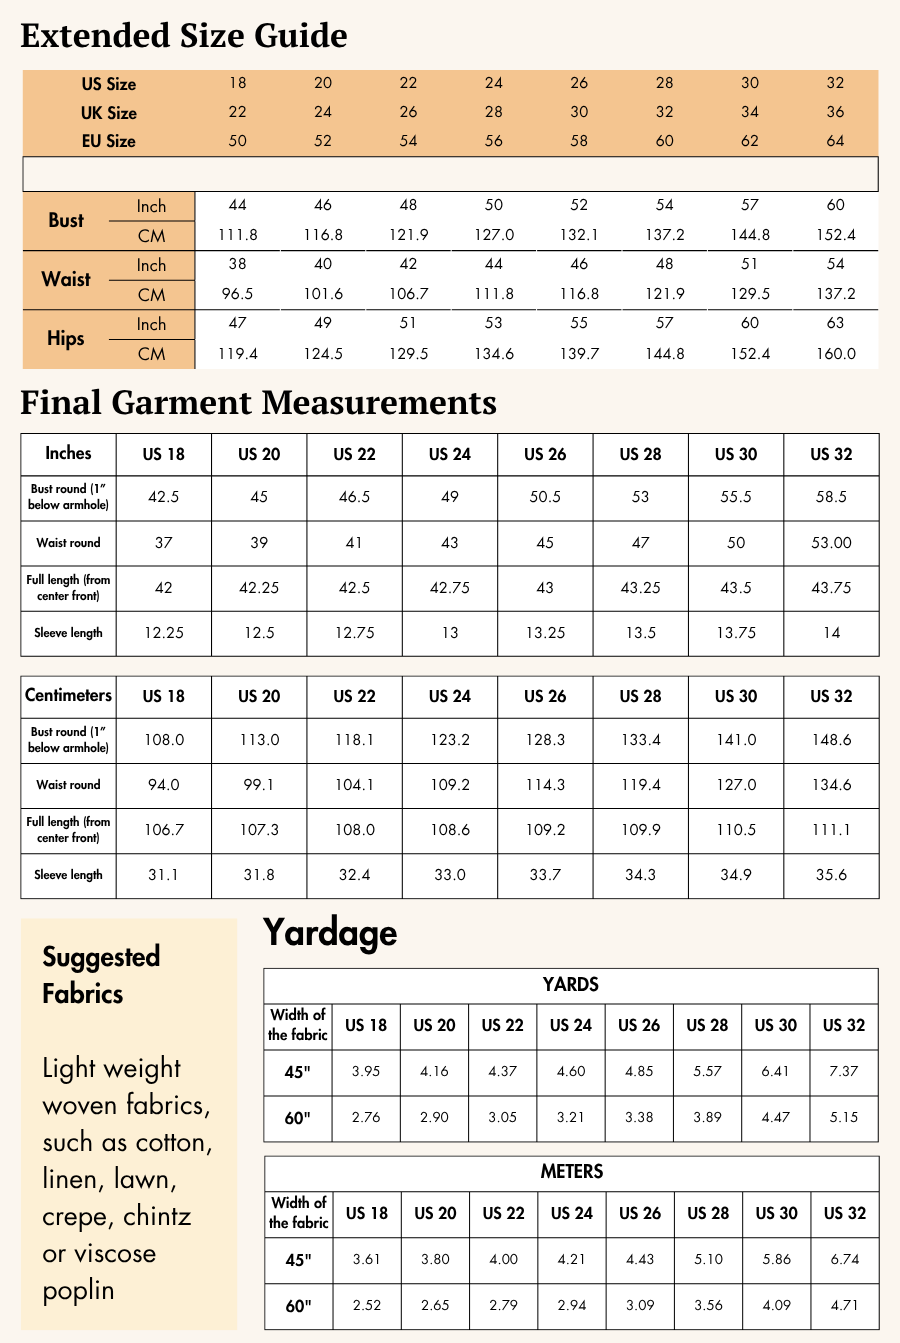
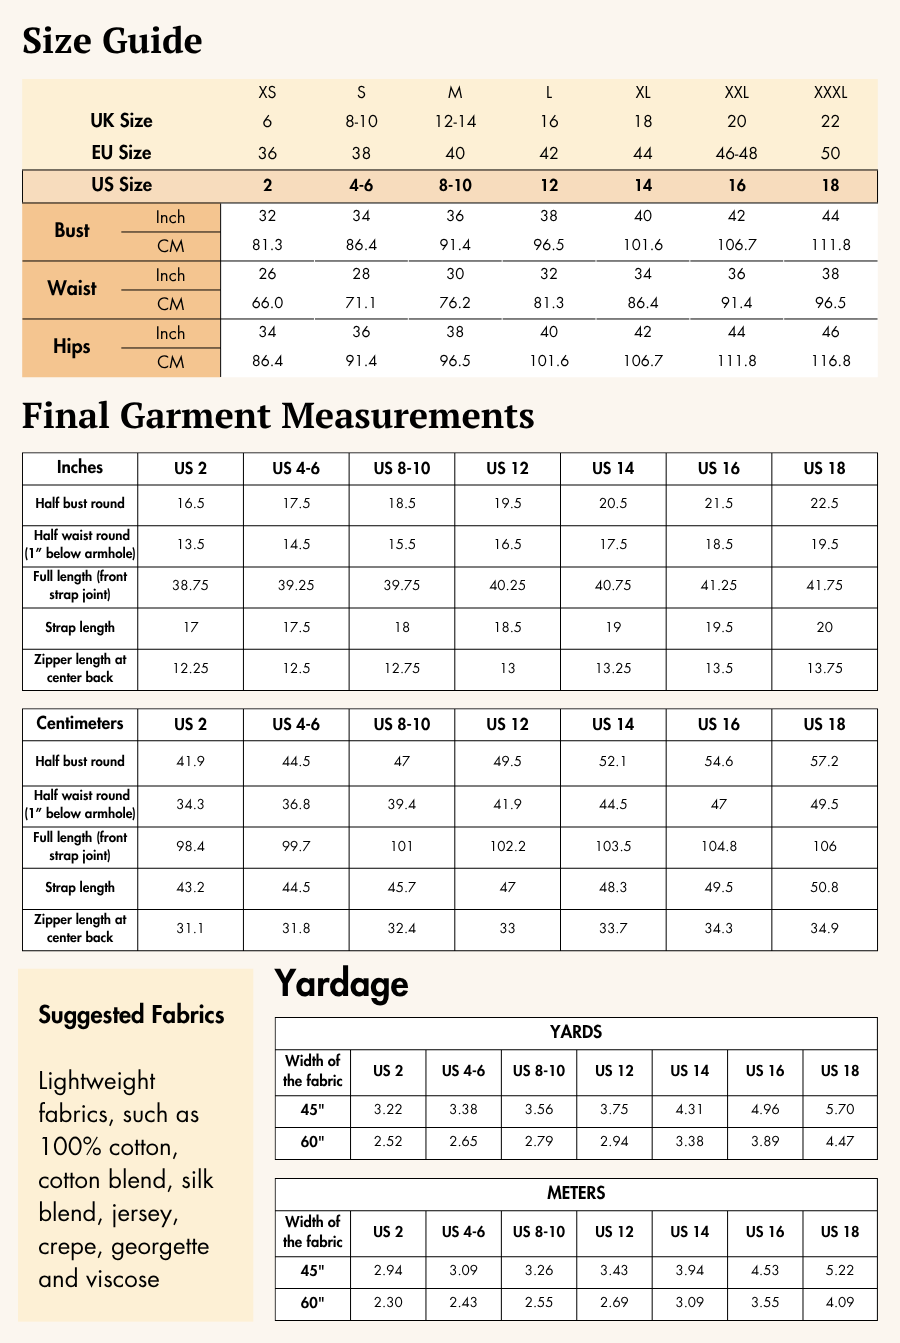
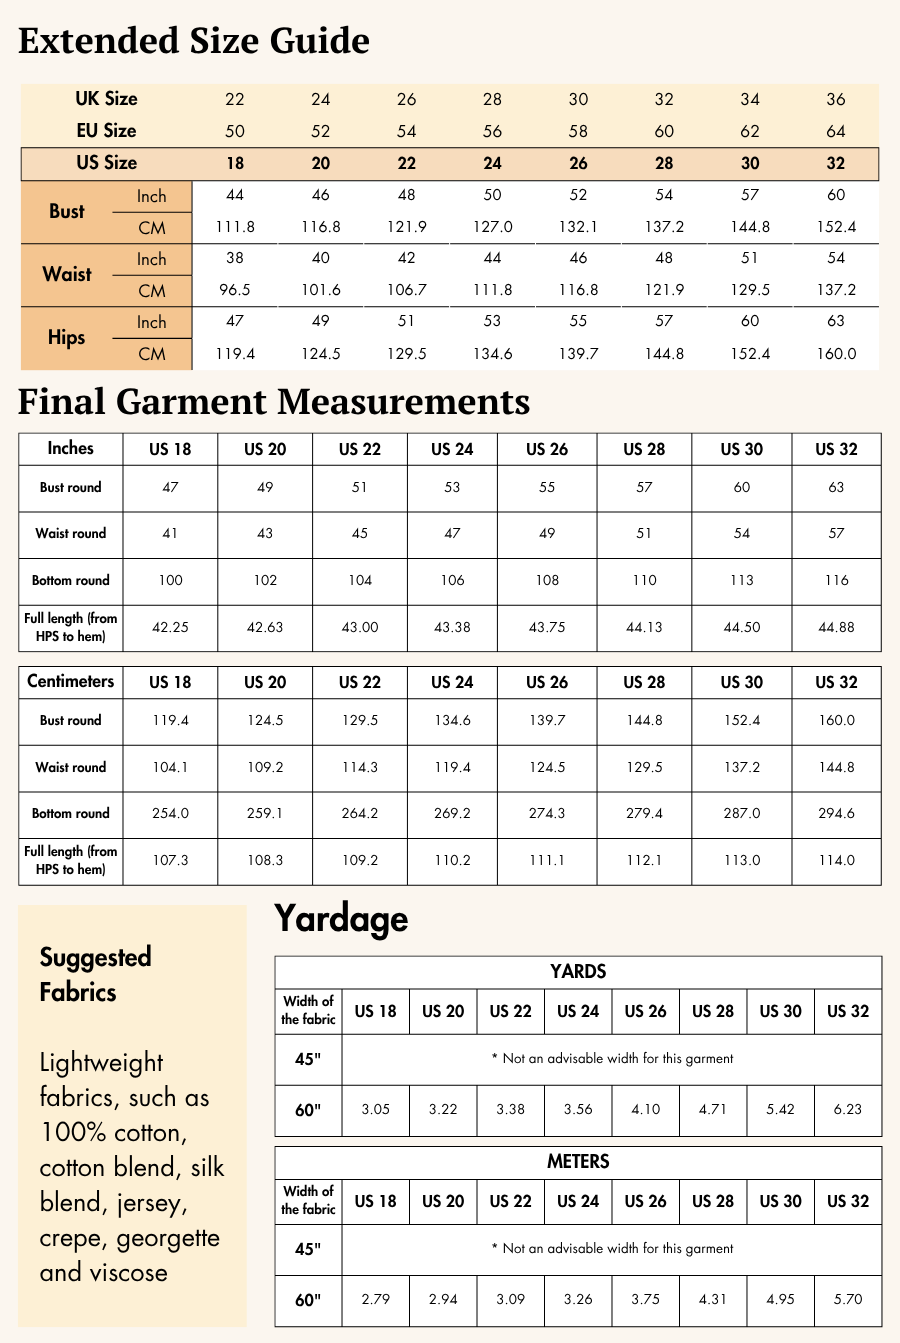
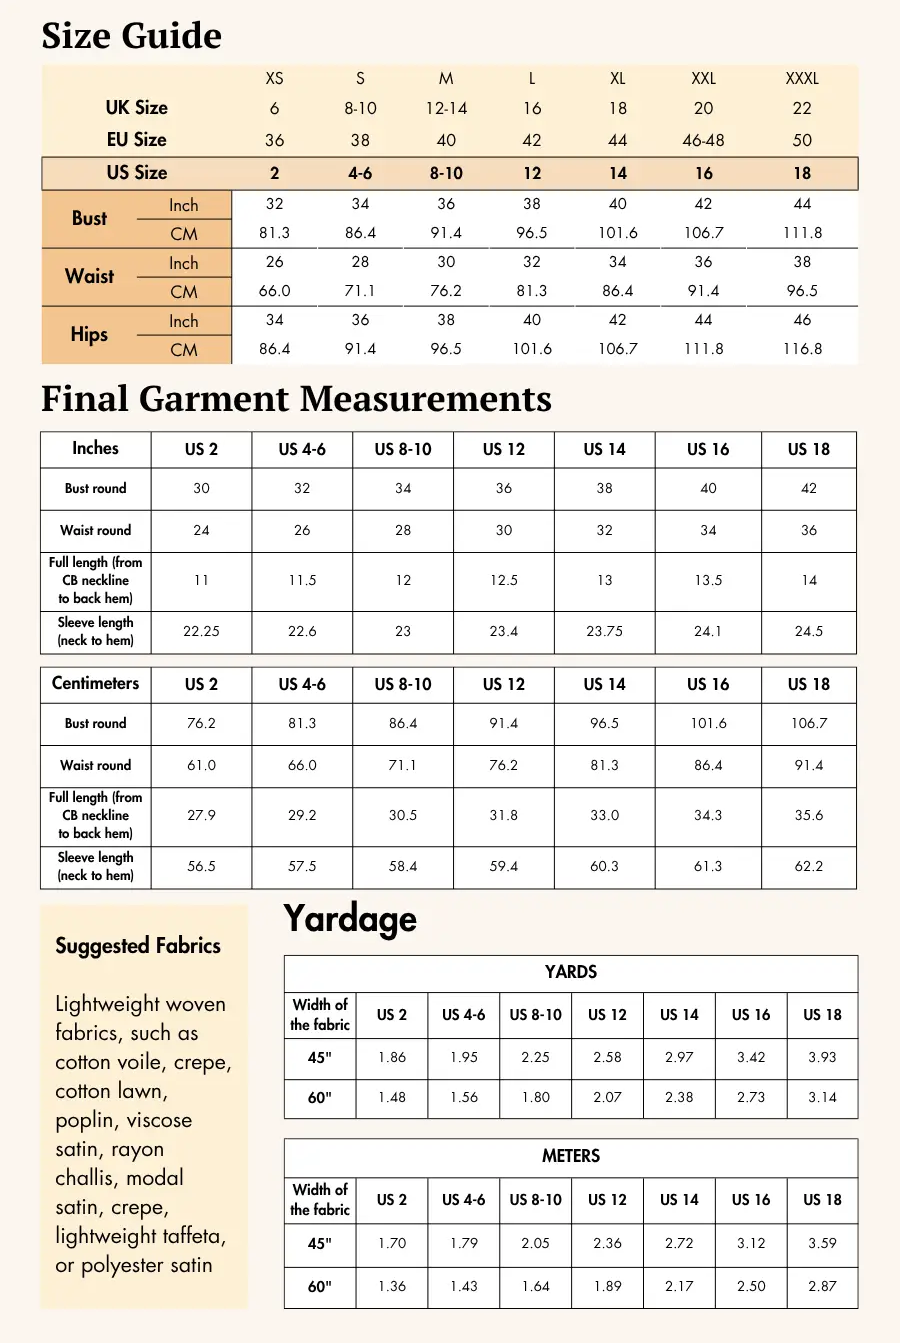
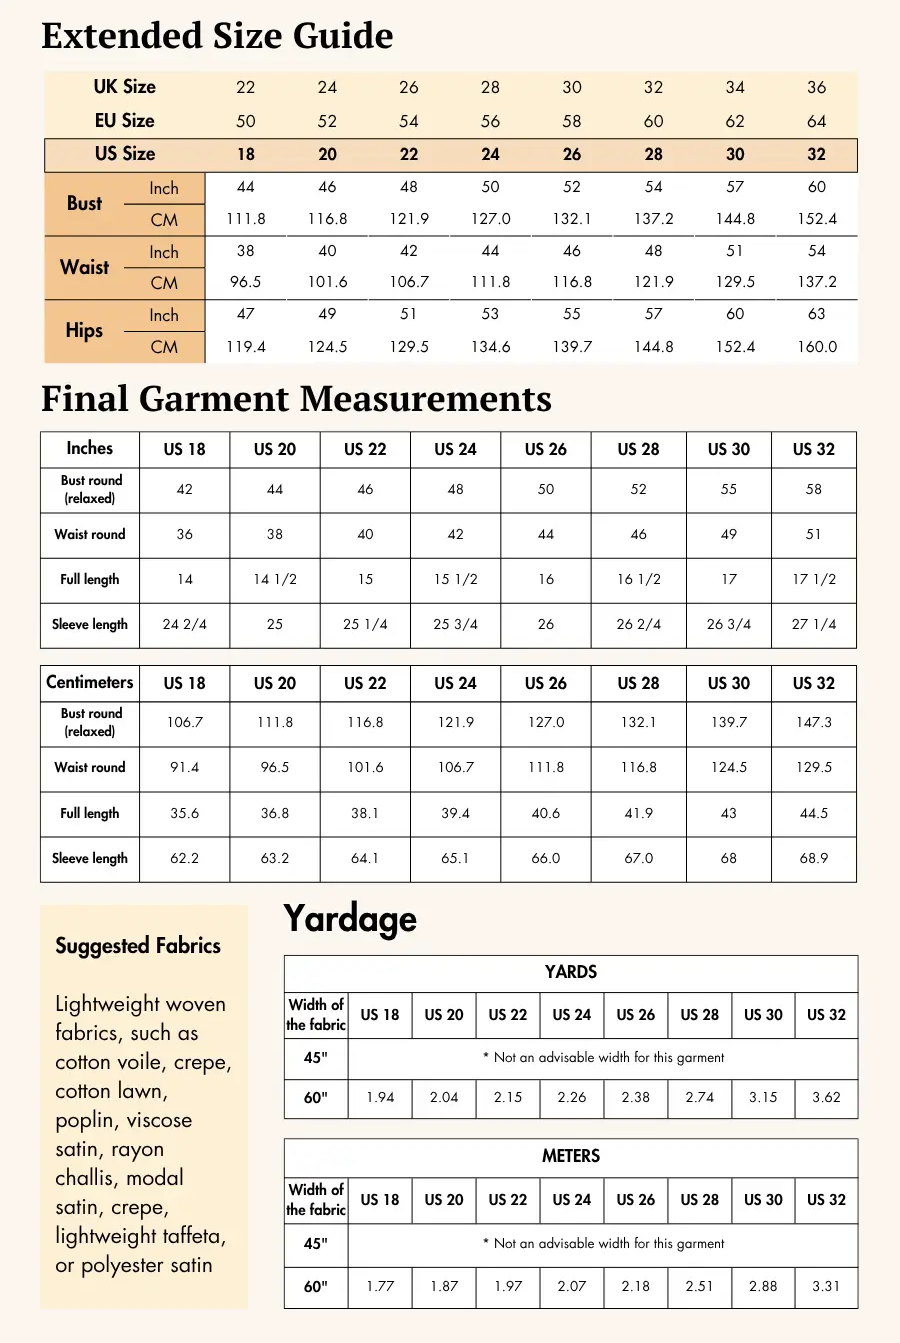
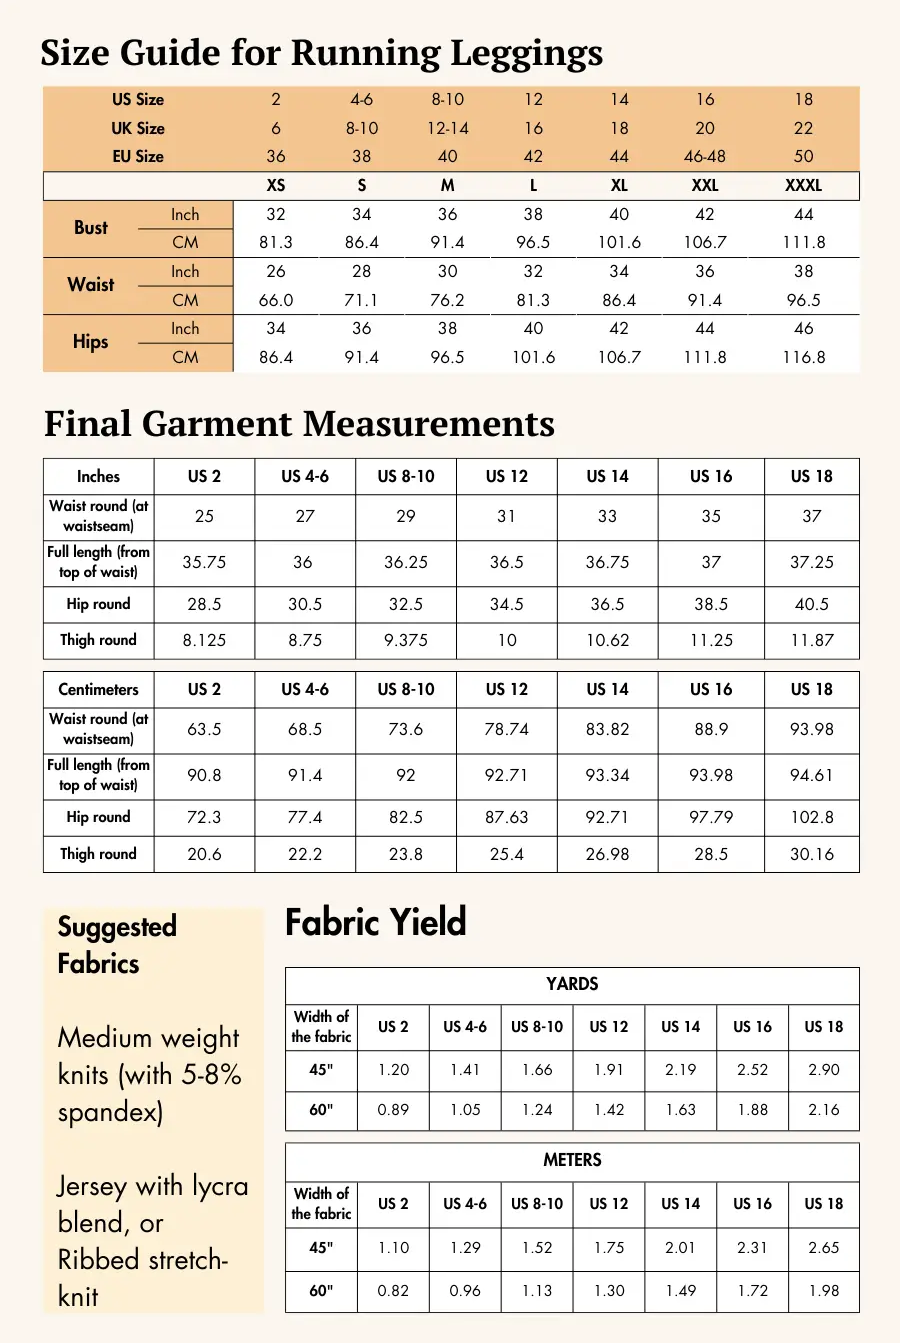
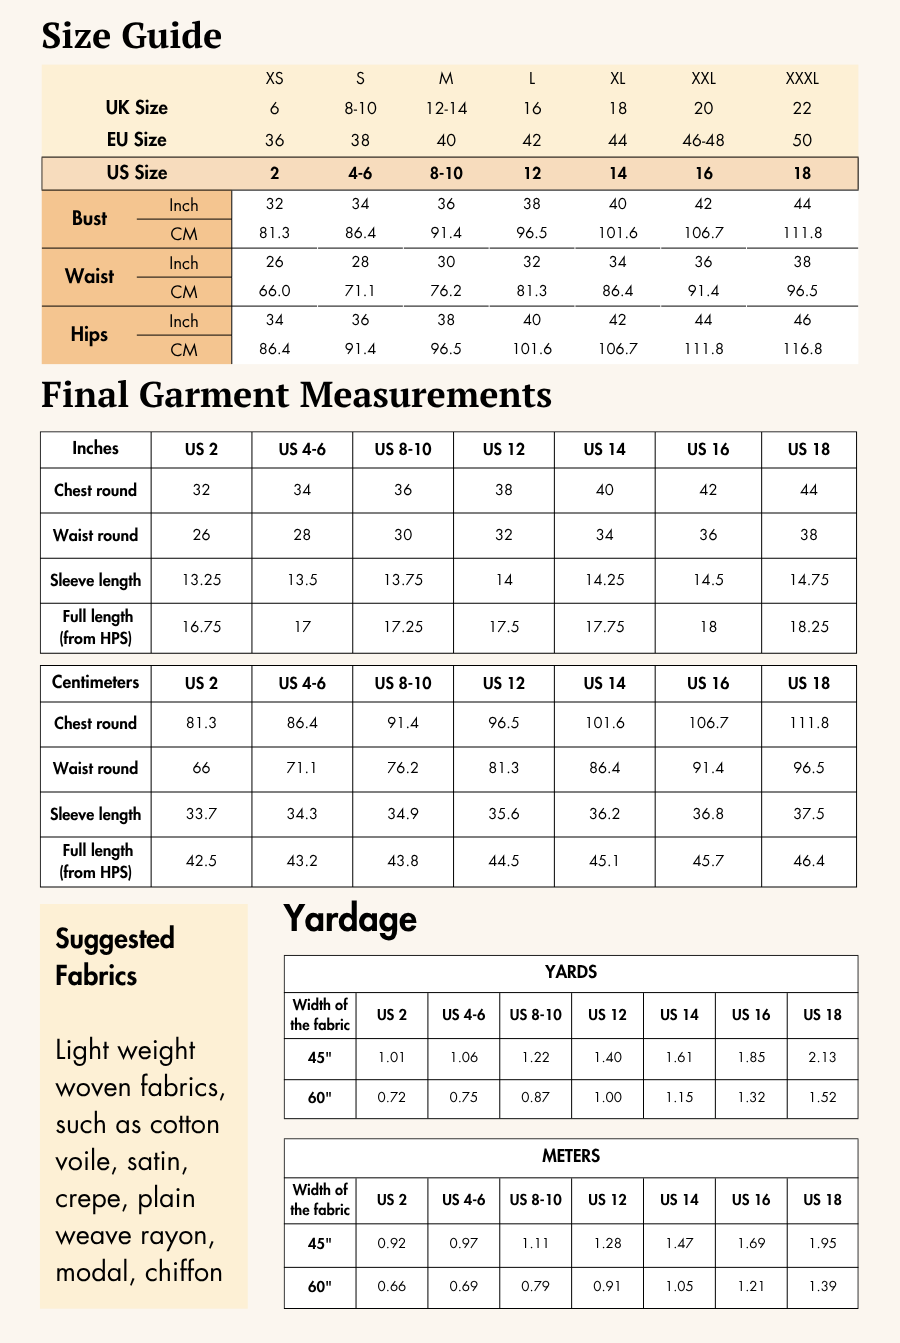
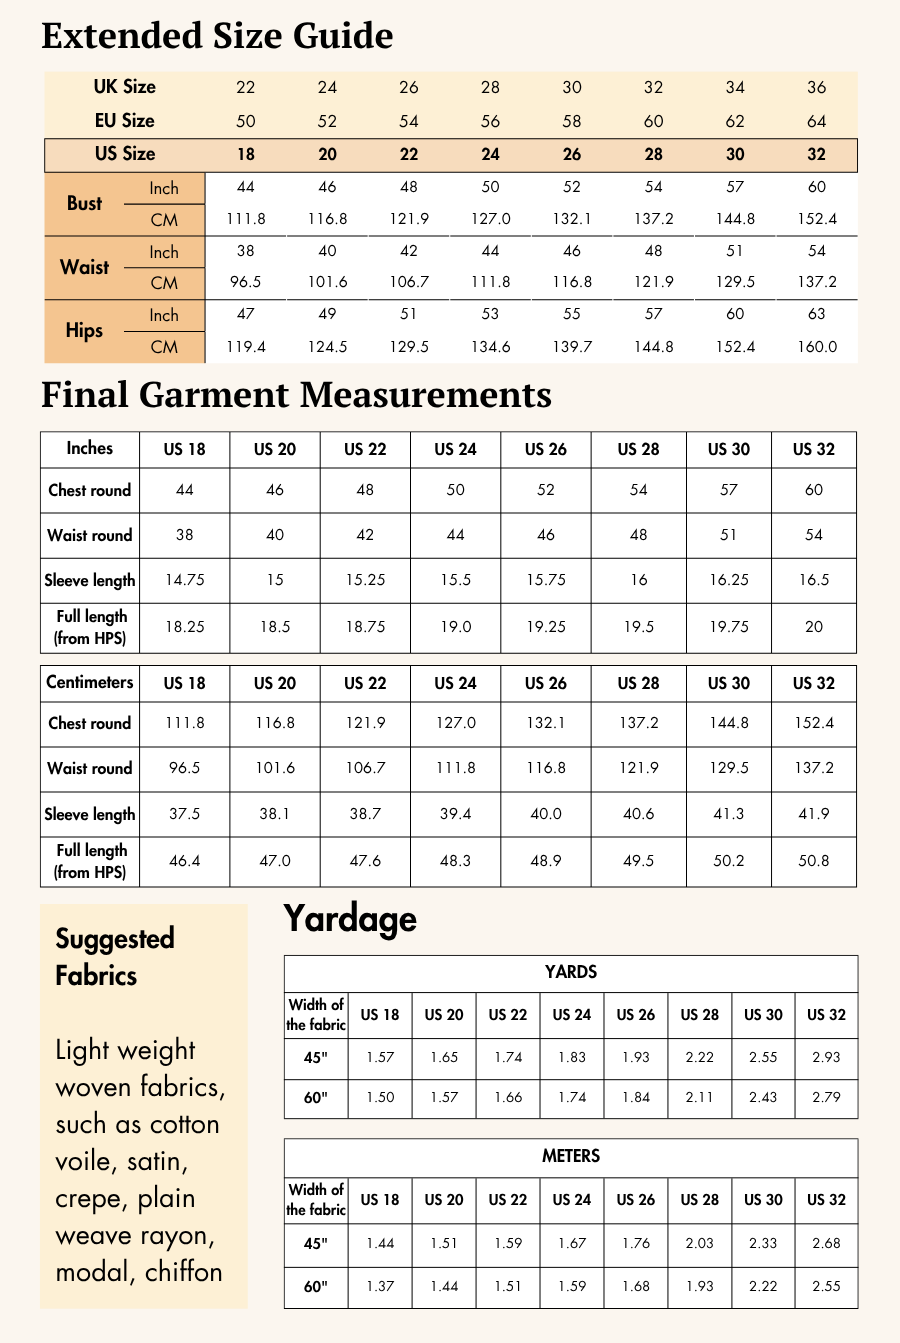
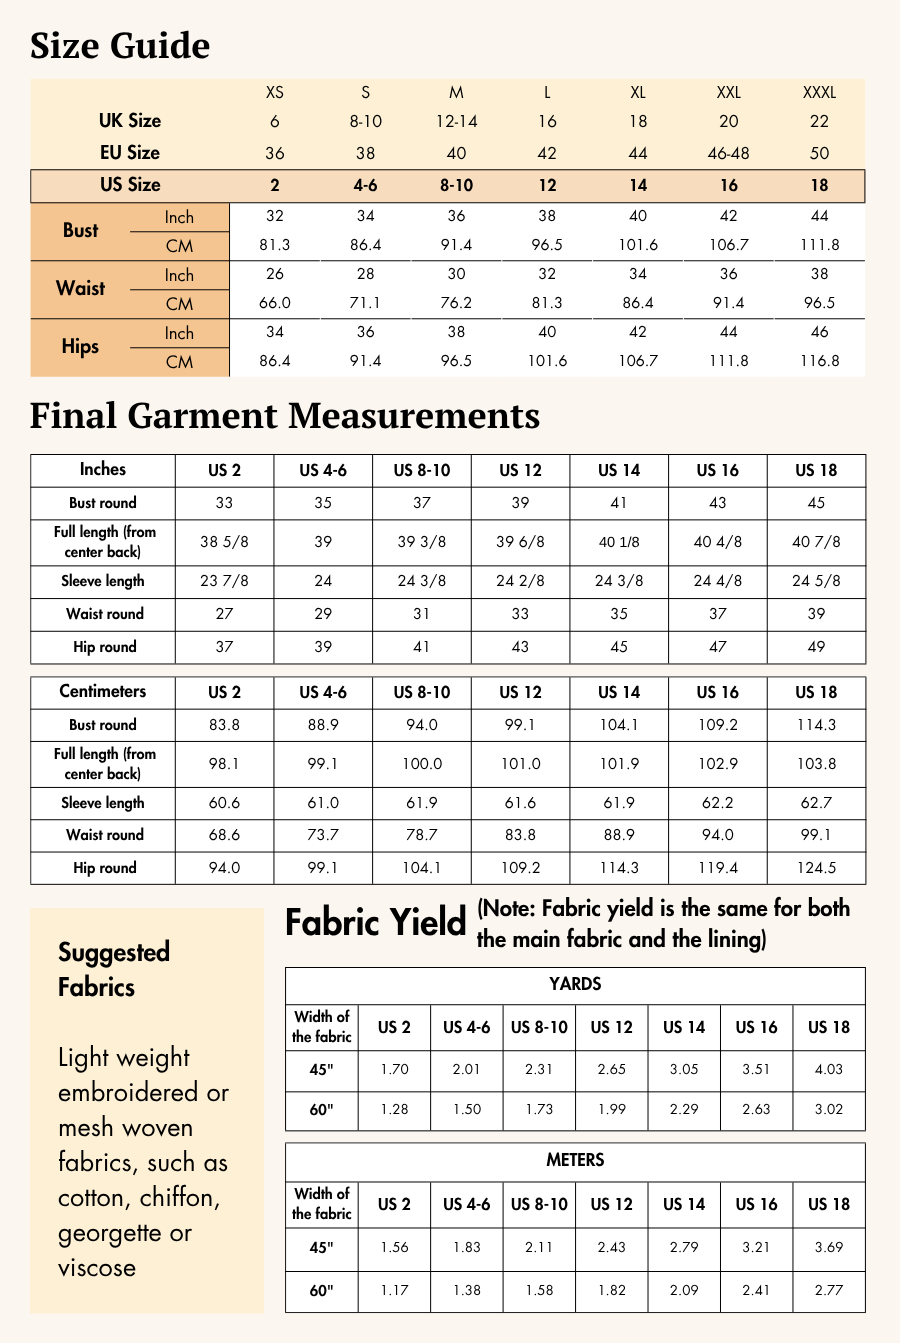
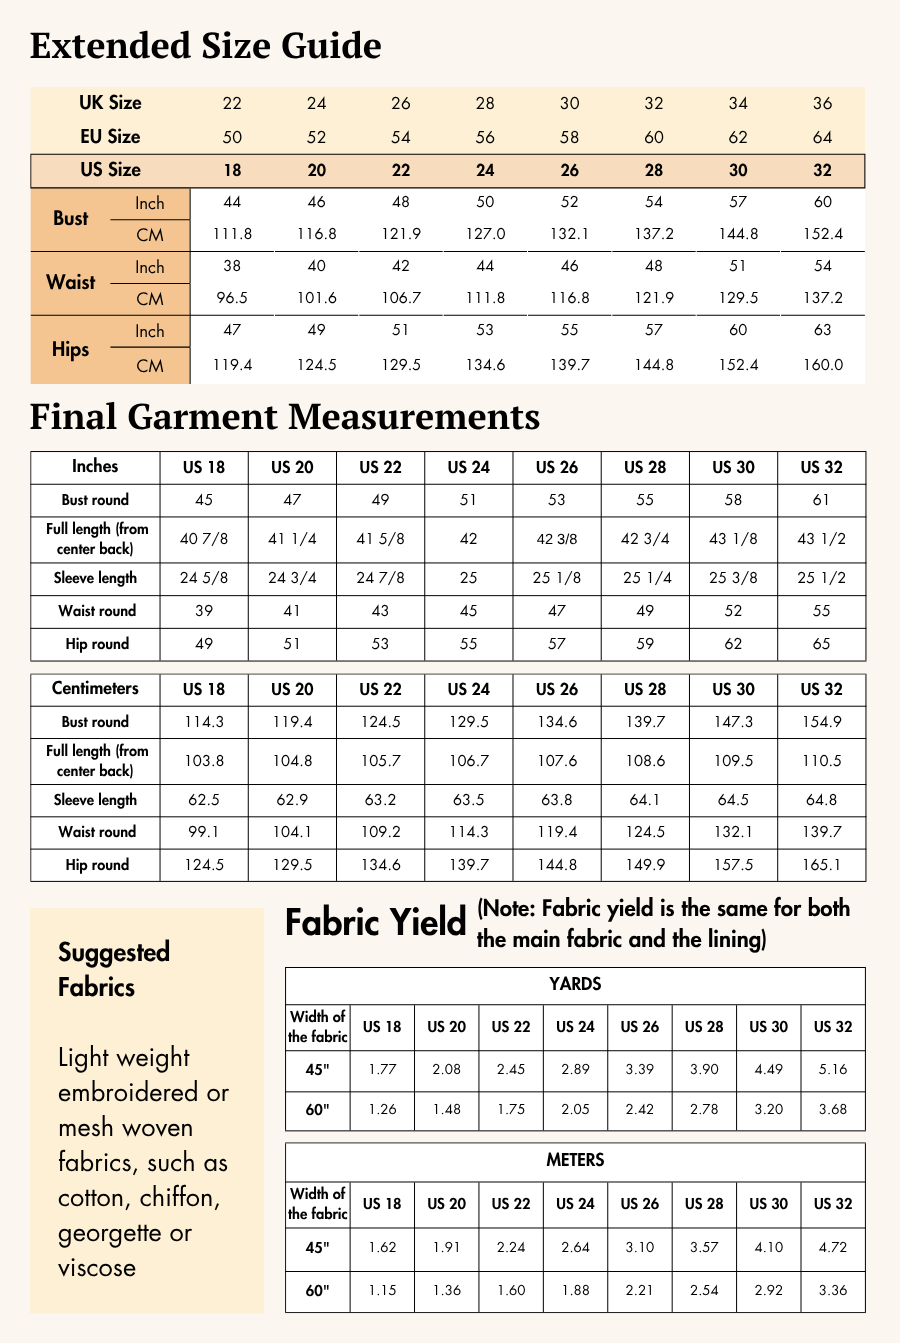
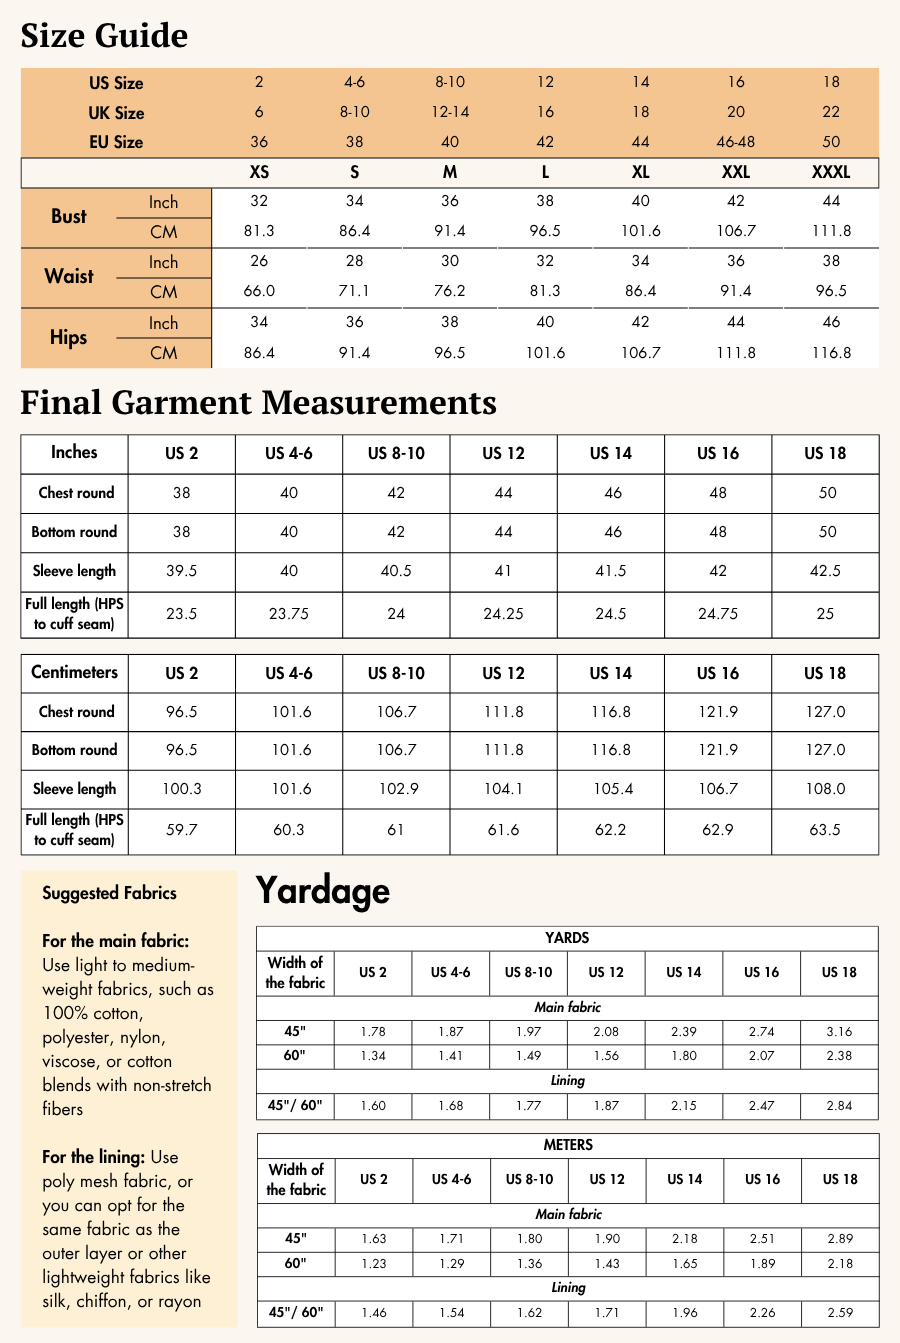
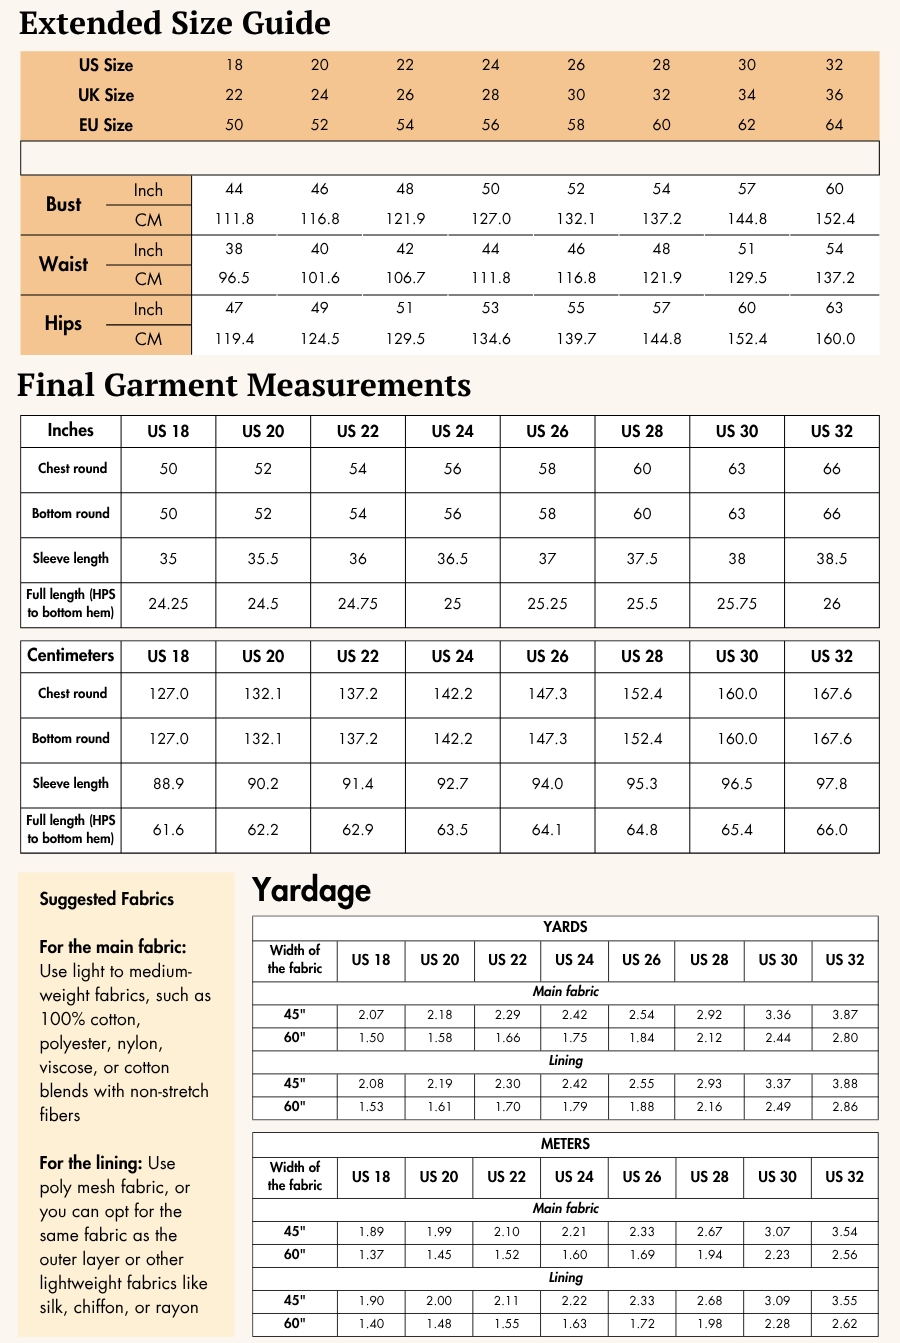
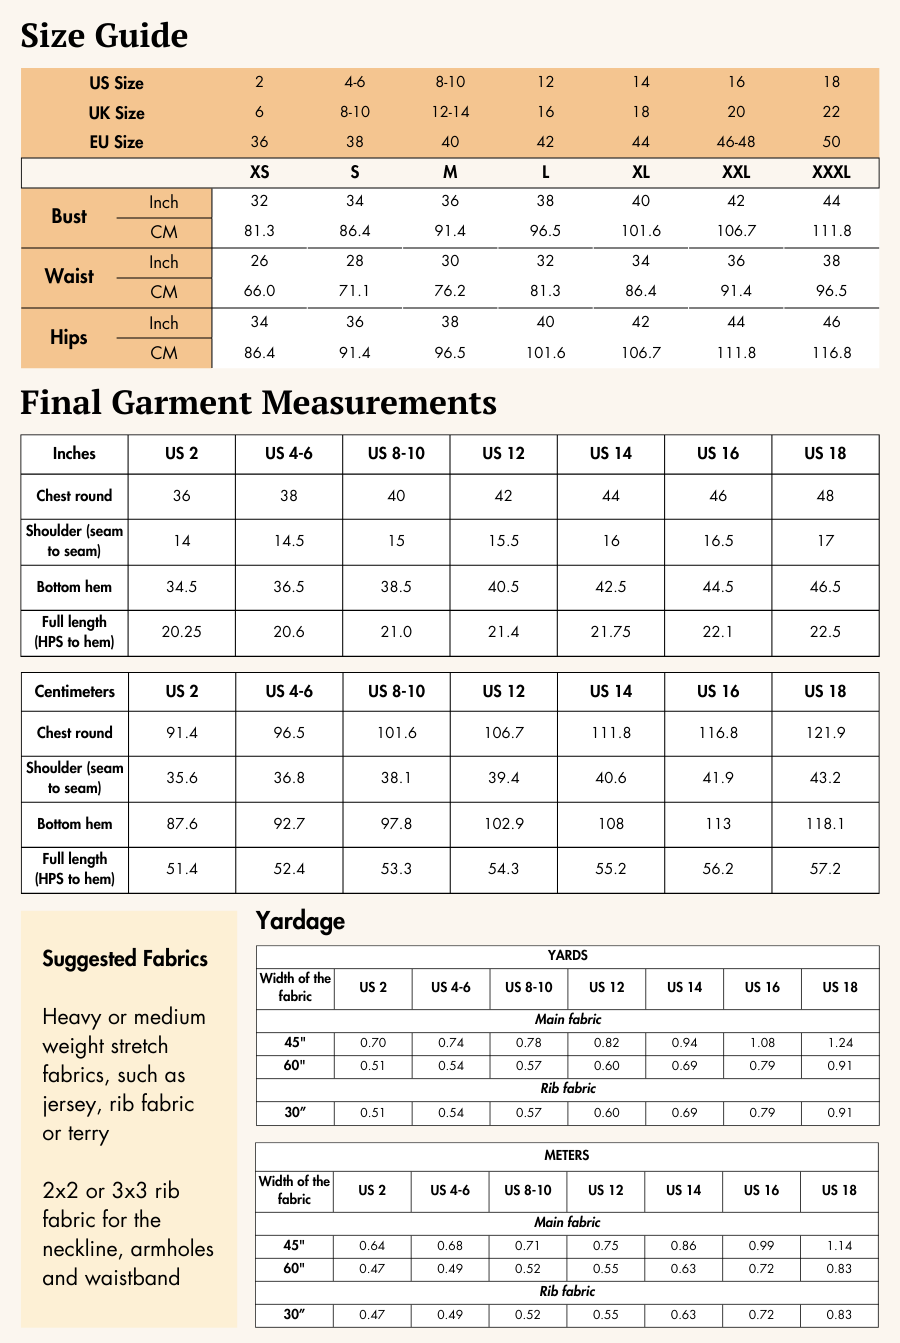
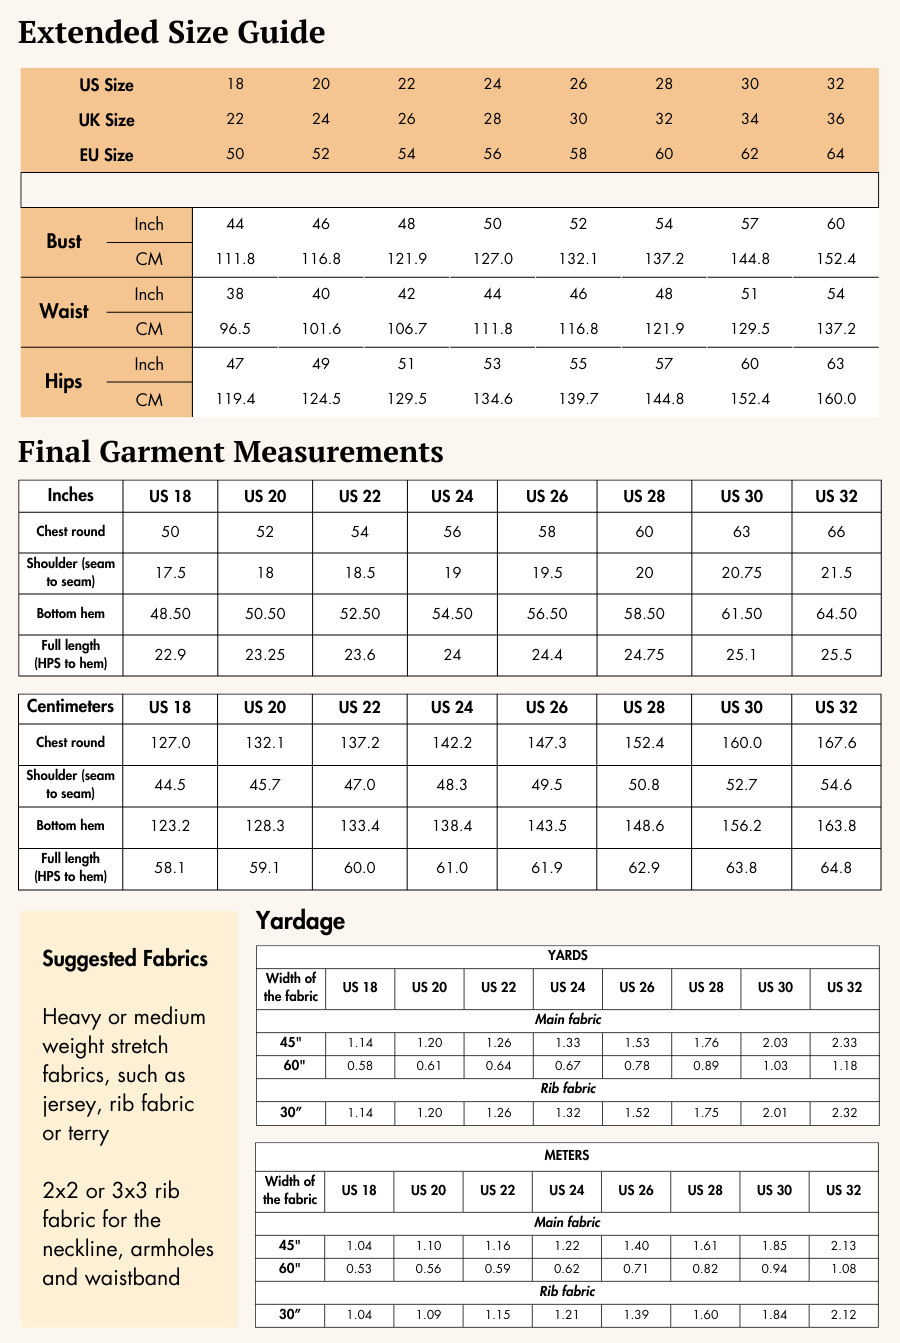
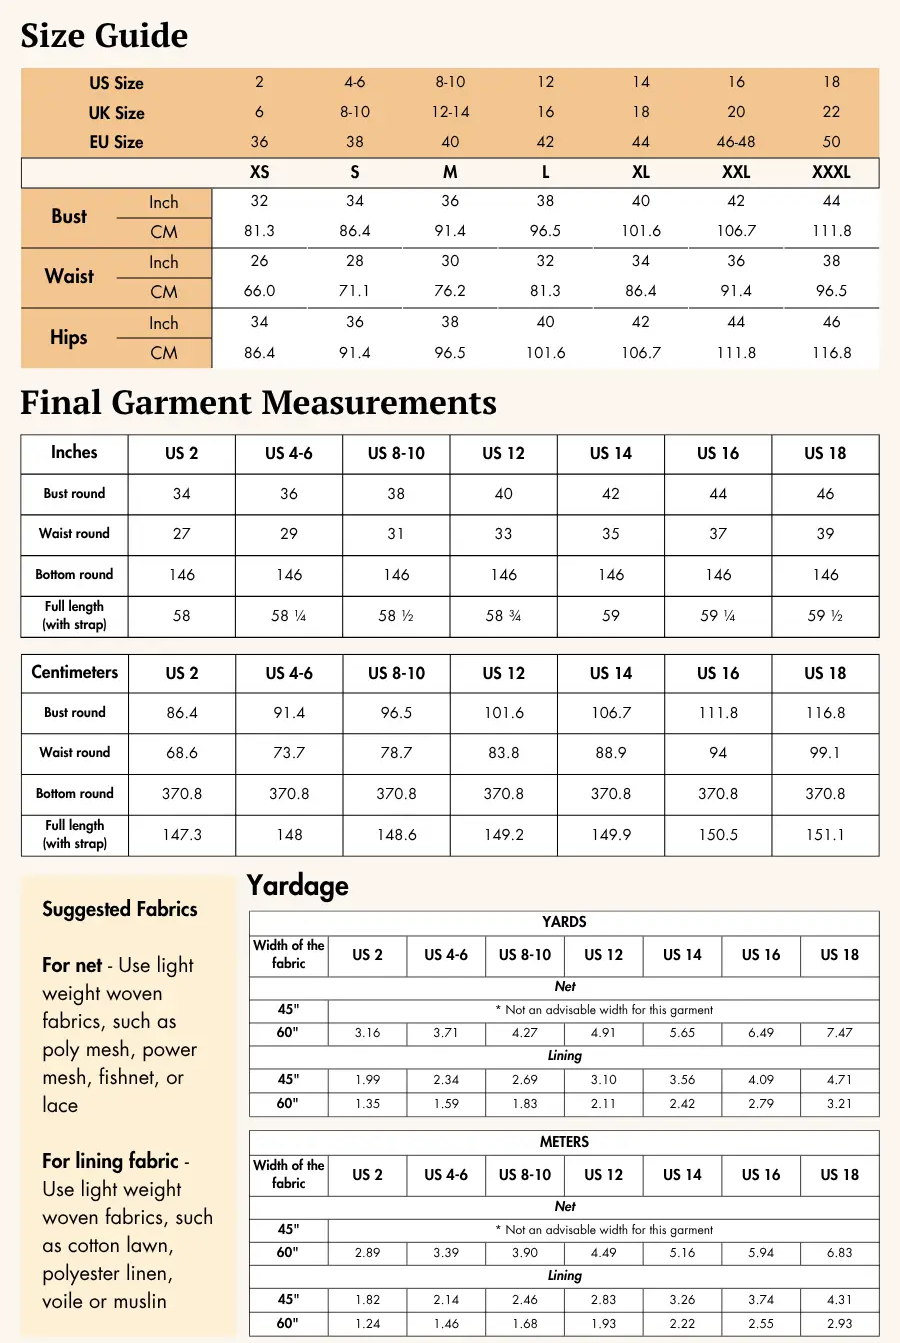
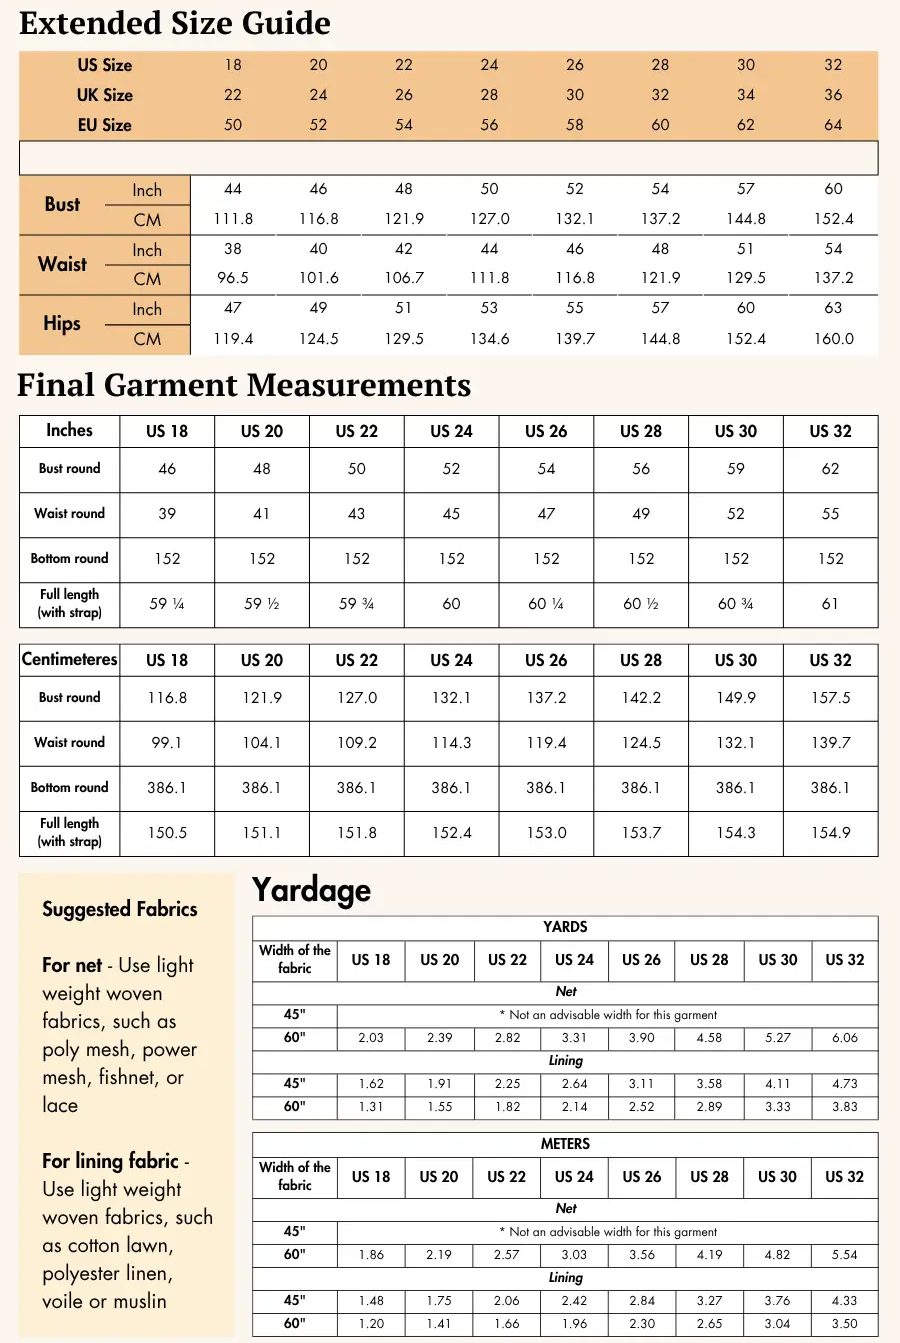
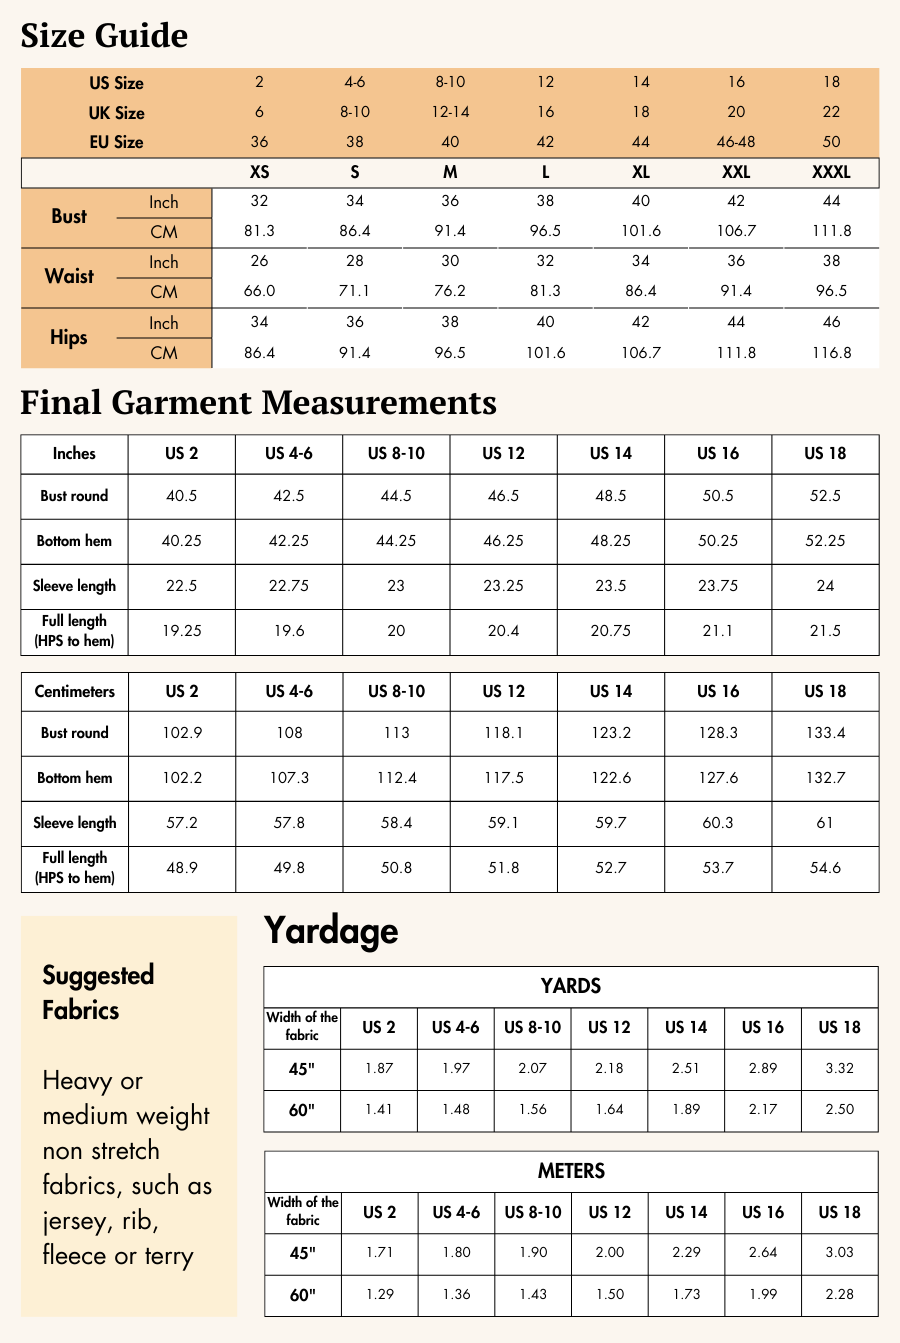
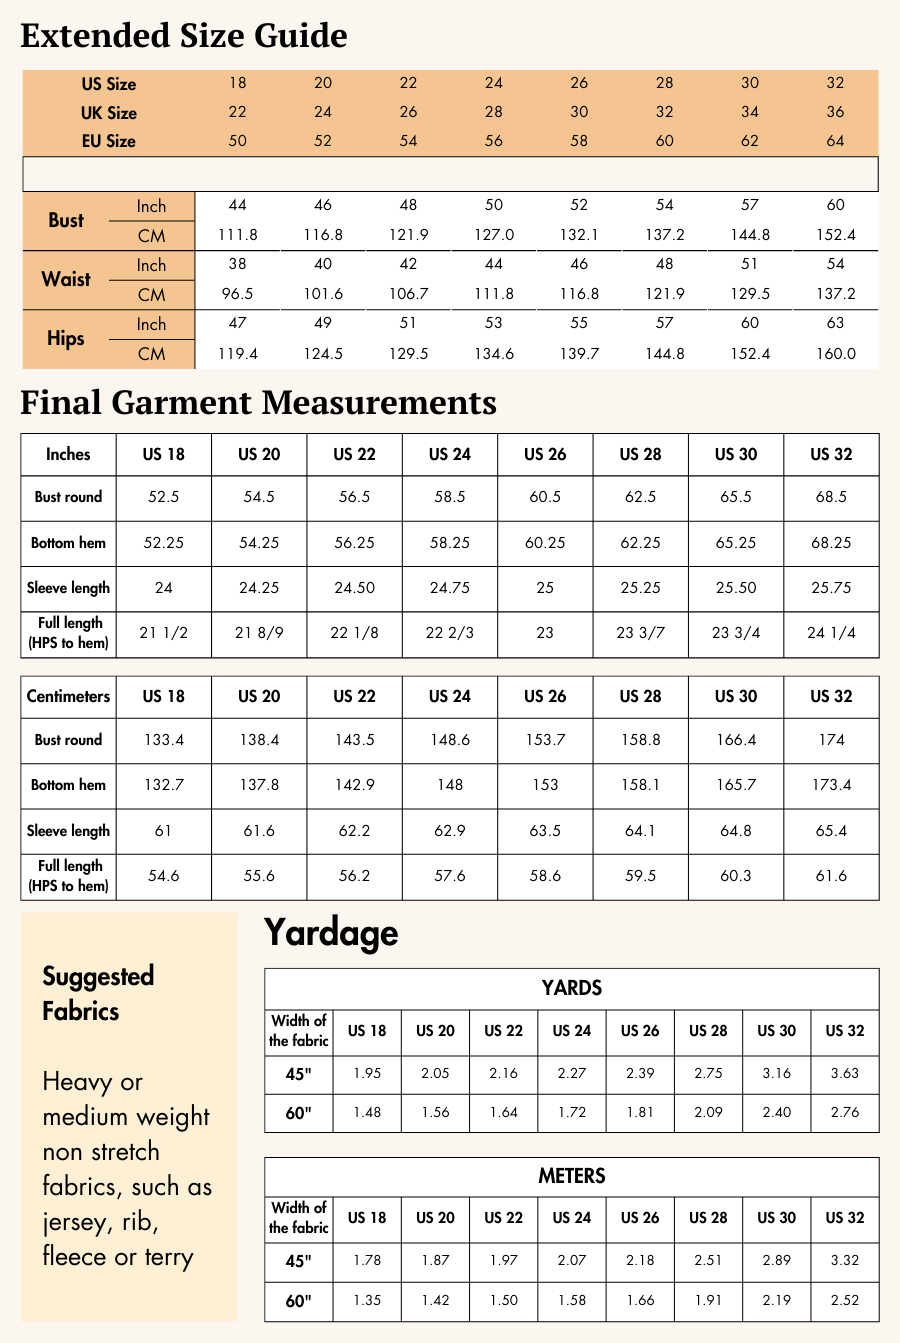
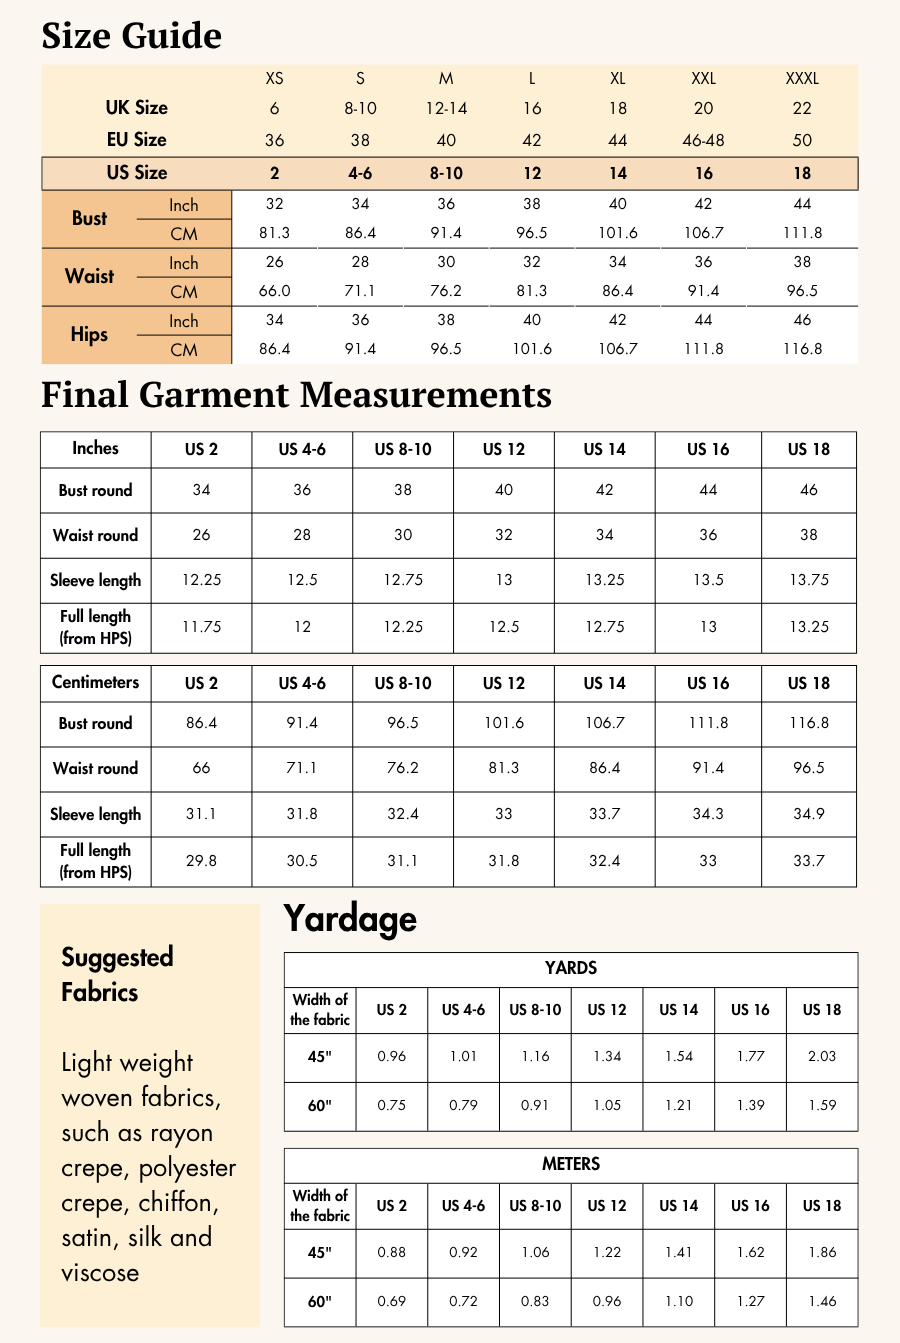
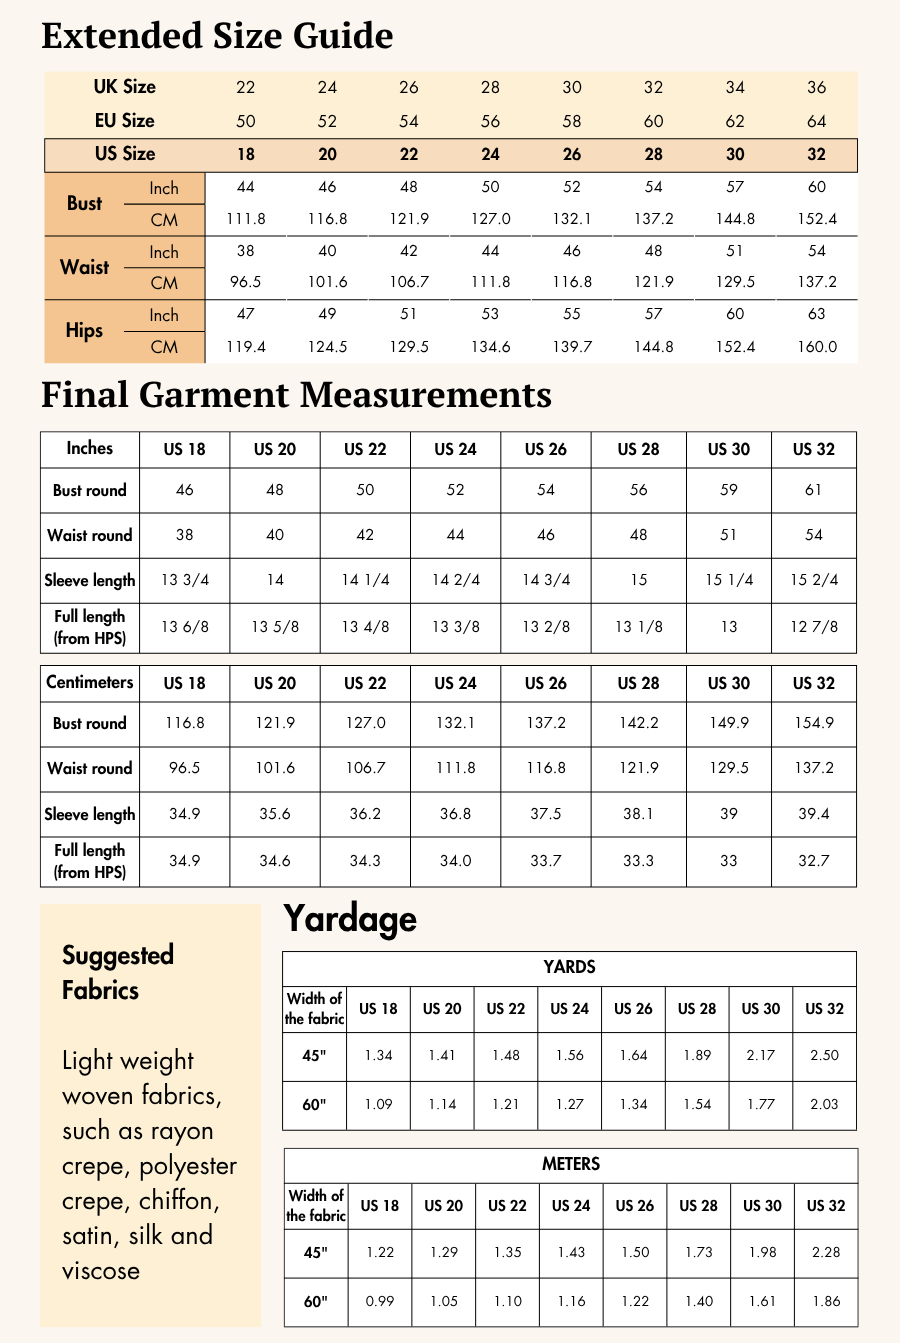
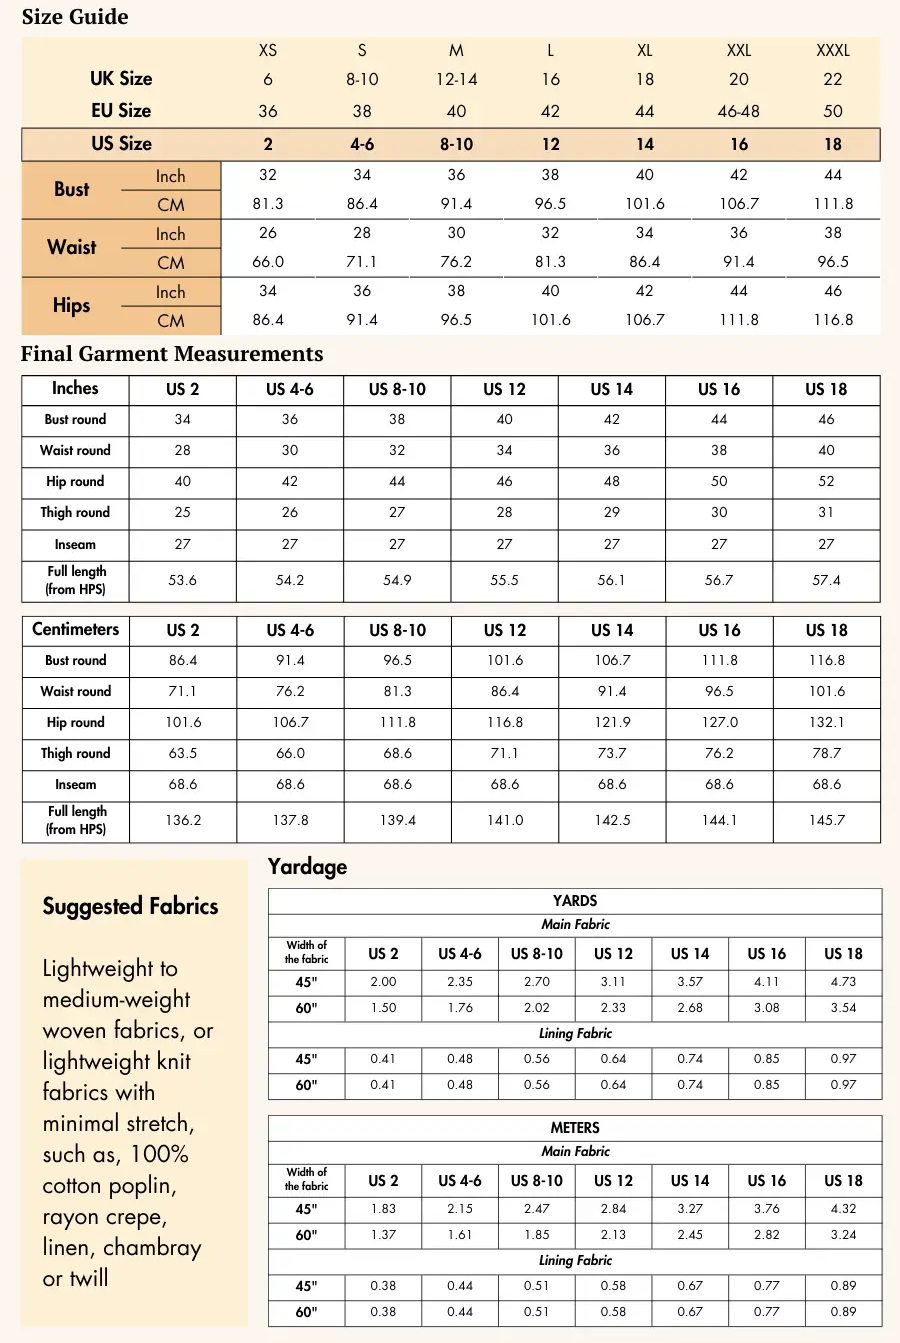
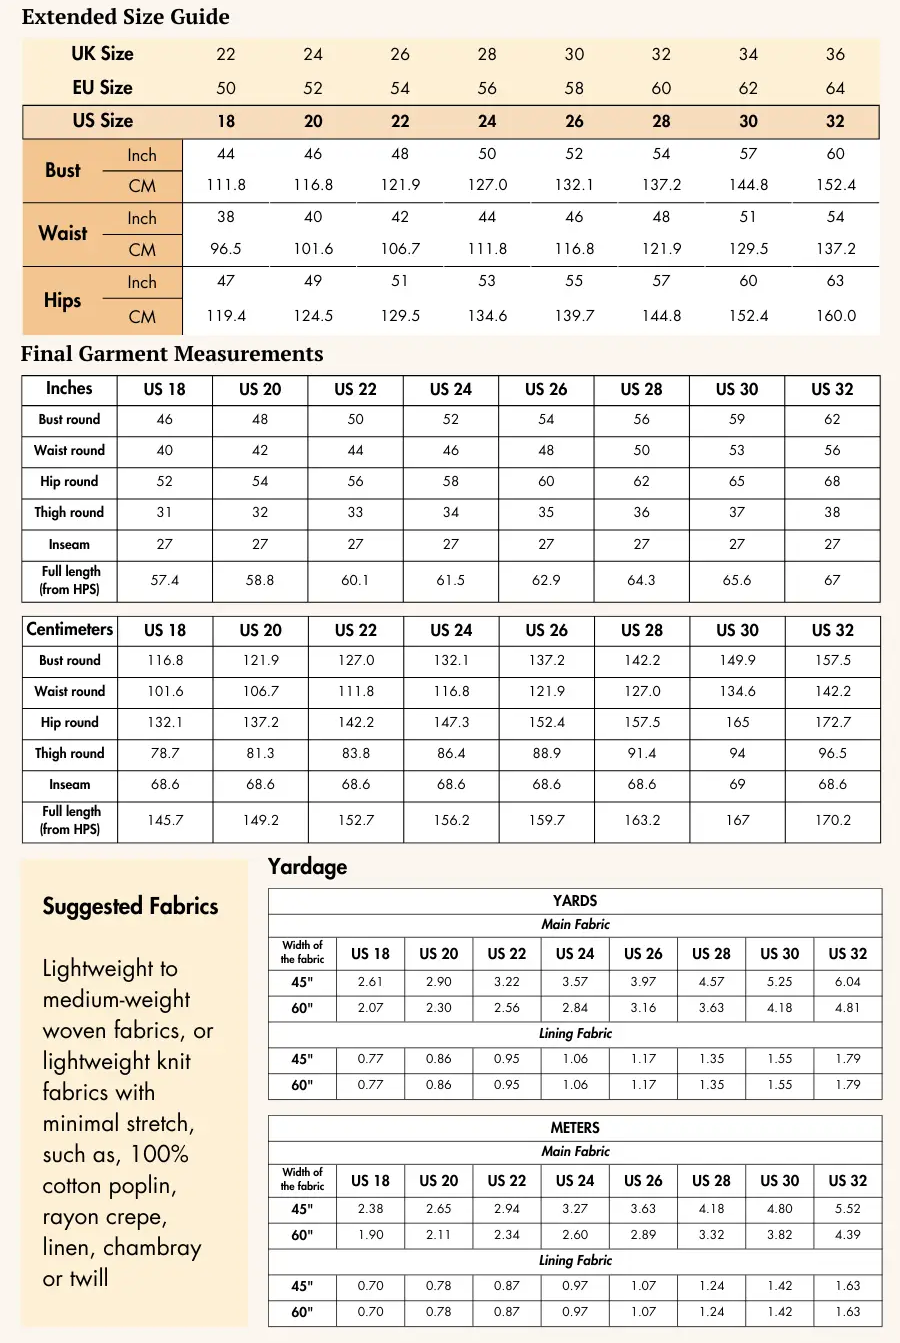
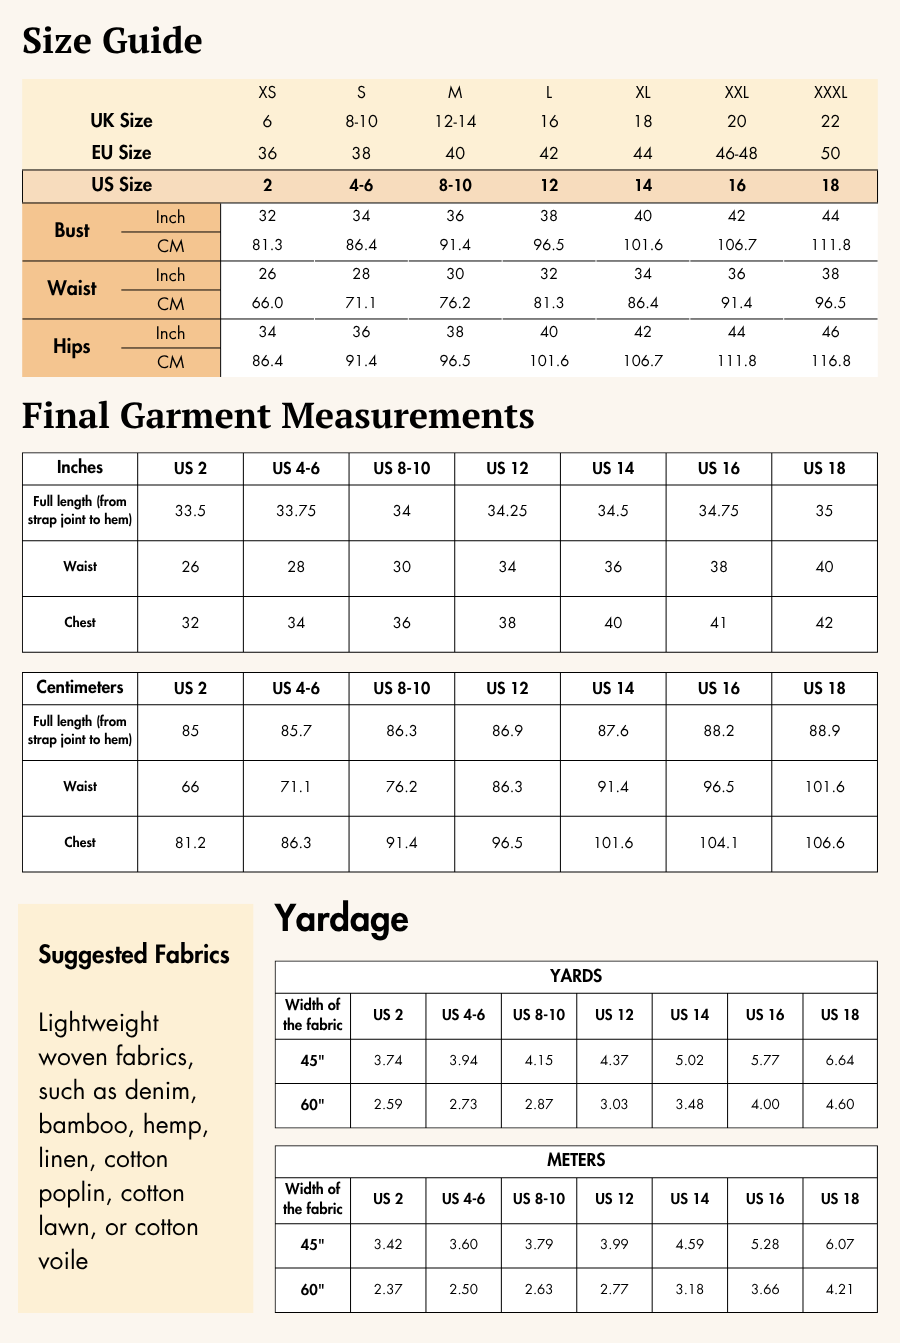
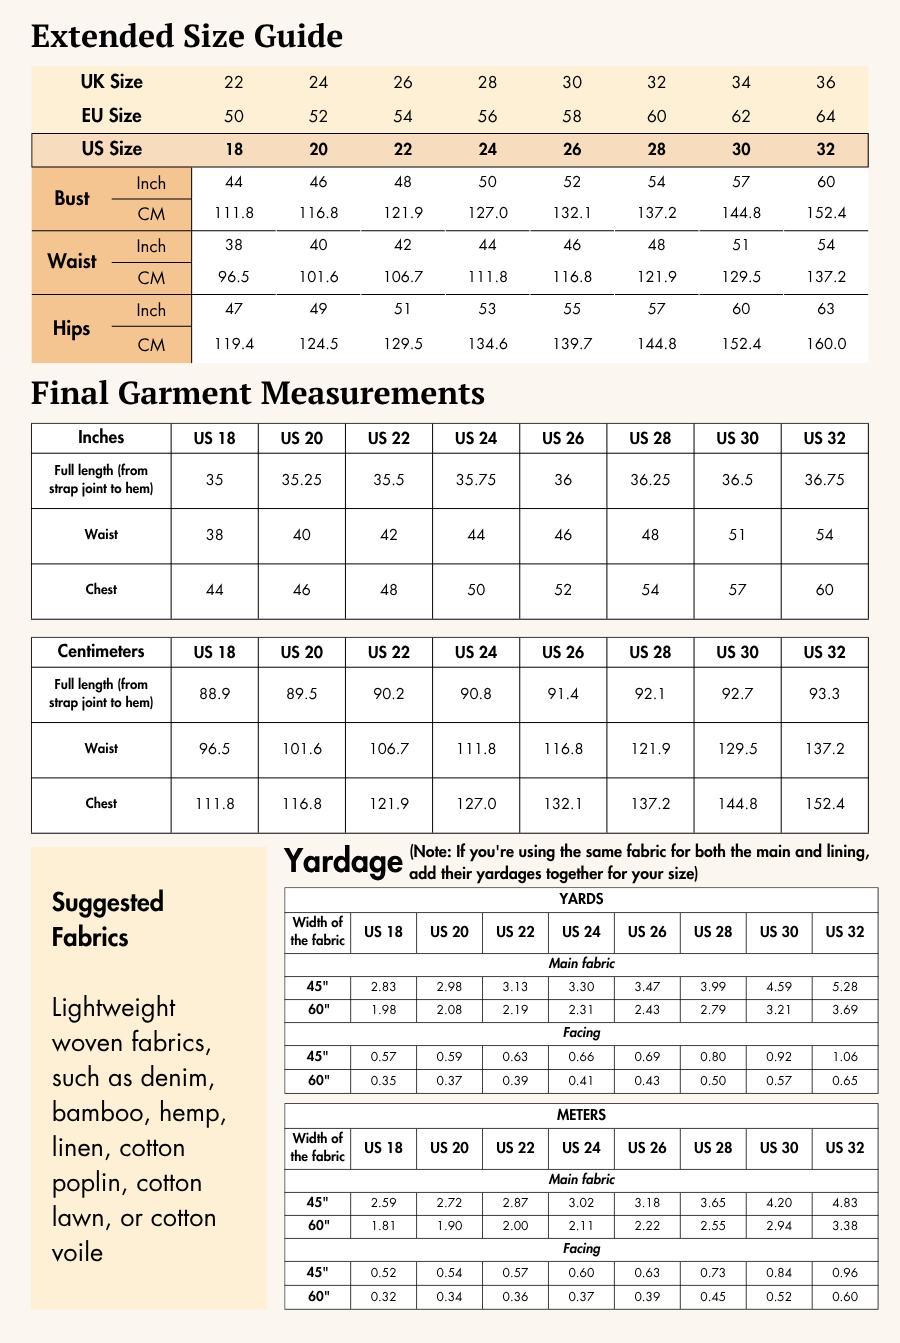
The Violet Dress pattern is available for sizes US 02 - US 32 | UK 06 - UK 36 | EU 36 - EU 64. Check the Violet Dress Size Chart and measure yourself to select the correct size (see the garment and body measurement tables).
Verify how much fabric you need by referencing the fabric yield table.
Step 3: Printing Your Digital Sewing Pattern
Before cutting your fabric, print your digital pattern at 100% scale on the correct paper size (usually A0 or A4/US Letter). Once printed, trim and tape the pages together following the pattern guide. Now your pattern is ready to use!
If you want to learn more about how to Print Digital Sewing Patterns, click here.
Step 4: Pattern Inventory: What Pieces to Prepare
For sewing the Violet Midi Dress, cut all of these pieces:
A. Side front panel - cut x2 fabric
B. Center front panel - cut x2 fabric
C. Side back panel - cut x2 fabric
D. Center back panel - cut x2 fabric
E. Front neckline facing - cut x2 fabric
F. Back neckline facing - cut x2 fabric
G. Center hem facing - cut x4 fabric
H. Side hem facing - cut x4 fabric

Step 5: Pattern Marking

-
Lay out all pattern pieces according to the cutting diagrams. Ensure the grainline arrow for each piece runs parallel to the selvage for best drape.
-
Transfer all markings: Notches, grainlines, center fronts/backs, fold lines, circles, buttonholes, and strap/zipper placements, using chalk, pen, or tailor’s tacks onto the wrong side of your fabric.
-
Cut notches anywhere they appear on the pattern edge—these are crucial for proper alignment and assembly.
-
Mark the center front on all pieces cut on the fold.
Step 6: Cutting Layout
- Reference the correct layout diagram in the Violet Sewing Guide for your chosen size and fabric width (45” or 60”).

-
If using fabric with nap or a directional print, buy extra yardage and align pattern pieces accordingly.
-
Pin or use pattern weights to secure each piece for accurate cutting.
-
Trace the shapes and cut along the outlines, carefully removing any marking lines after cutting.
Step 7: Fabric Cutting and Preparation
-
Cut out every required piece per your size from your main fabric. For pieces needing two cuts, fold fabric as shown in cutting diagram.
-
Cut all notches as shown on the pattern.
-
Double-check that you have all pieces before you start sewing.
Seam allowance: Follow the seam allowances as indicated on the pattern file layers. These are provided specifically for each piece to ensure accurate construction. This pattern uses a 1.1 cm (or 0.45 inch) seam allowance all around, 1.1 cm (or 0.45 inch) at the hem, 1 cm (or 0.38 inch) at the neck.
Step 8: Step by Step Instructions to sew a Strappy Midi Dress

1. For preparing front and back bodice panels:
1a. Place one center front panel on one of the side front panels with right sides facing together. Align the side front panel notches and stitch along the seamline. Repeat the same process to attach the other side and center front panels, and for the back panels.

1b. Place the two front blocks prepared in the previous step right sides together, matching the center front panel notches. Stitch along the center front seam line to prepare the front. Press open to achieve figure 1b.
1c. Place the two back blocks prepared in the previous step right sides together, matching
the center back panel notches. Stitch along the center back seam from the zip notch to the hem line.

2. For attaching the concealed zipper:
2a. Position the open zipper on the center back seam, with right sides together. Pin them or use basting stitches to hold them in place. Sew on the dent using a zipper foot between zipper teeth and zipper tape. Repeat the same with the other side of zipper tape, placing it on the right side of the back right side panel.
2b. Turn the dress wrong side out and close the zipper. Sew along the side seam, starting 1-2 cm above the zipper notch and ending at the zipper notch. Pivot your fabric so that you can sew horizontally across the bottom of the zipper tape to secure it in place. You’ll want to sew a few stitches back and forth to ensure its firmly anchored.

2c. Turn the dress right side out and topstitch along the edge of the zipper, covering the
zipper seam.

3. For attaching facing to front and back panels:
3a. Place front facing panels, with their right sides together. Align the center front seamline and stitch along the seam.
3b. Finish the hem of the facing by folding it twice with an equal width of 0.5”. Repeat the same process for back facing panels.

3c. Place the prepared front facing on the front bodice with right sides together. Align the neckline, then stitch along the seamline.

3d. Place right side of the back facing panel on the right side of the back bodice with right
sides together, similarly place left side of the back facing on left side of the back bodice. Align the neckline and center back, covering the zip, then stitch along the neck seamline.

4. For making sleeve straps:
4a. Cut two strips for the front, each 1.8 inches wide and 15 inches long, following the grain line. Cut two strips for the back, each 1.8 inches wide and 20 inches long, following the grain line.
4b. Fold each strip lengthwise with the right sides together and press them flat with an iron.
4c. Sew along the open side, maintaining a 0.4-inch seam allowance.
4d. Turn the fabric tubes right side out using a darning needle or a slender stick.

5. For attaching straps to the dress:
5a. Remove the stitches from the front facing at the two notches of straps using a seam ripper (optional) and place the ends of the front straps between the front fabric and front facing.
5b. Sew these straps securely with back stitches and iron them. Repeat the same for attaching the straps to back. (Attach back straps 20” in length to back bodice).

5c. Turn the facing towards the wrong side. Fold the center back seam inwards from the
seamline and topstitch. Stitch the facing together on the side seams.

6. For attaching hem facing to front and back panels:
6a. Place one of the center hem facing panel on one side hem facing panel, with their right sides together. Align the side seamline and stitch along the seam. Repeat the same process for remaining hem facing panels.
6b. Place hem facing panels prepared in step 6a, with their right sides together. Align both
the center hem facing panel and stitch along the center front seam.

6c. Finish hem of the facing by folding it twice with an equal width of 0.5”. Repeat the same for back hem facing panels.
6d. Place the front facing on the front bodice with right sides together. Align the hem, then stitch along the seamline.
6e. Turn the hem towards the wrong side and iron it properly. Use a hand needle to sew
blind hem stitch on top edge of the facing. Repeat the same for the back bodice.


7. Place the front bodice on top of the back bodice right on right side, aligning the side seam, and stitch along the seamline.

Winslet’s sewing guide for Violet Dress includes clear diagrams that walk you through each step, making it easy to follow and complete your project with confidence.
For an overview of Winslet’s Sewing Guides, click here.
Why We Recommend the Violet Midi Dress Pattern
The Violet Midi Dress Pattern is ideal for beginner sewists looking to create something both simple and stylish.
✅ Tie straps = no fussing with fit
✅ Princess seams for a flattering shape
✅ Invisible zipper and facing for a professional finish
✅ No lining needed—lightweight and breathable
✅ Easy-to-follow guide with visuals
👉 Download the Violet Midi Dress Pattern here and make your next go-to dress today.
Show Off Your Make!
Show your creation on Instagram or Facebook with #MadeWithWinslets for a chance to be featured! For any questions or issues, email the Winslet’s support team at support@winslets.com.

 Get the pattern


