When it comes to sewing, one of the most crucial yet often overlooked aspects is seam allowance. Seam allowances play a vital role in the fit and finish of your garments and understanding them can make a significant difference in the outcome of your projects. Let’s dive into what seam allowances are, why they matter, and how to handle them effectively.
What is a Seam Allowance?

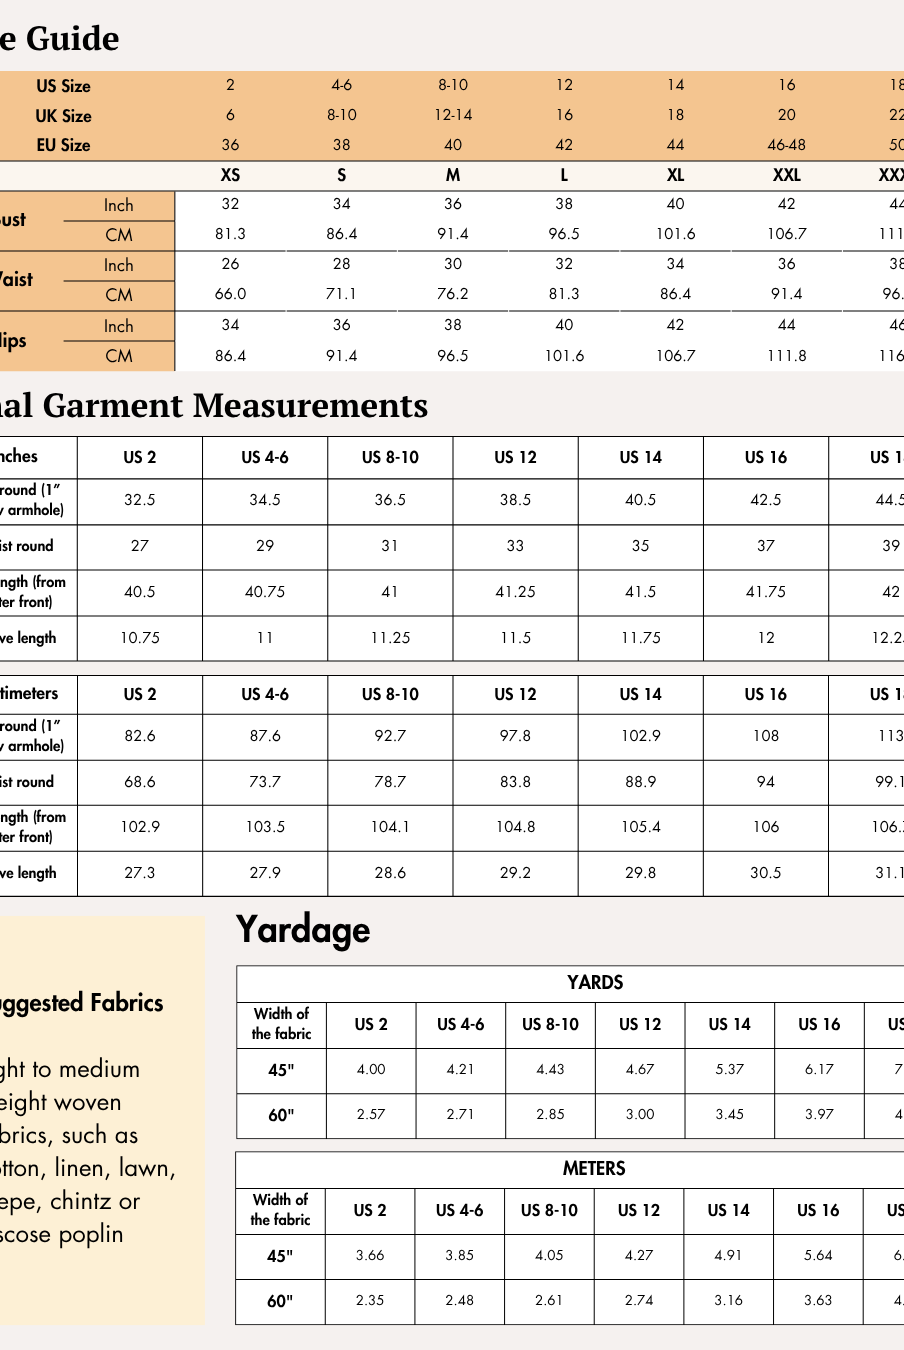
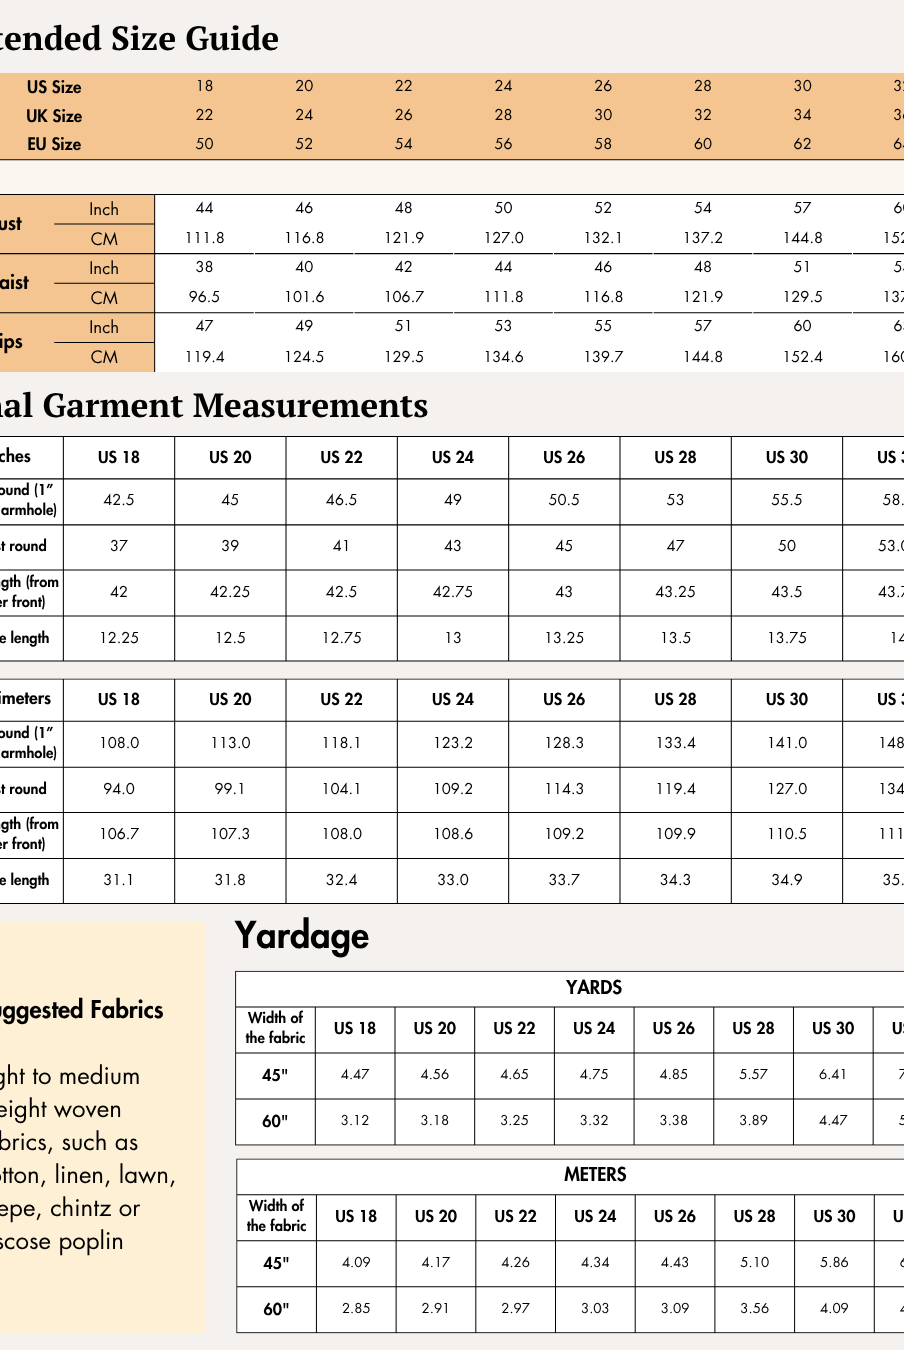
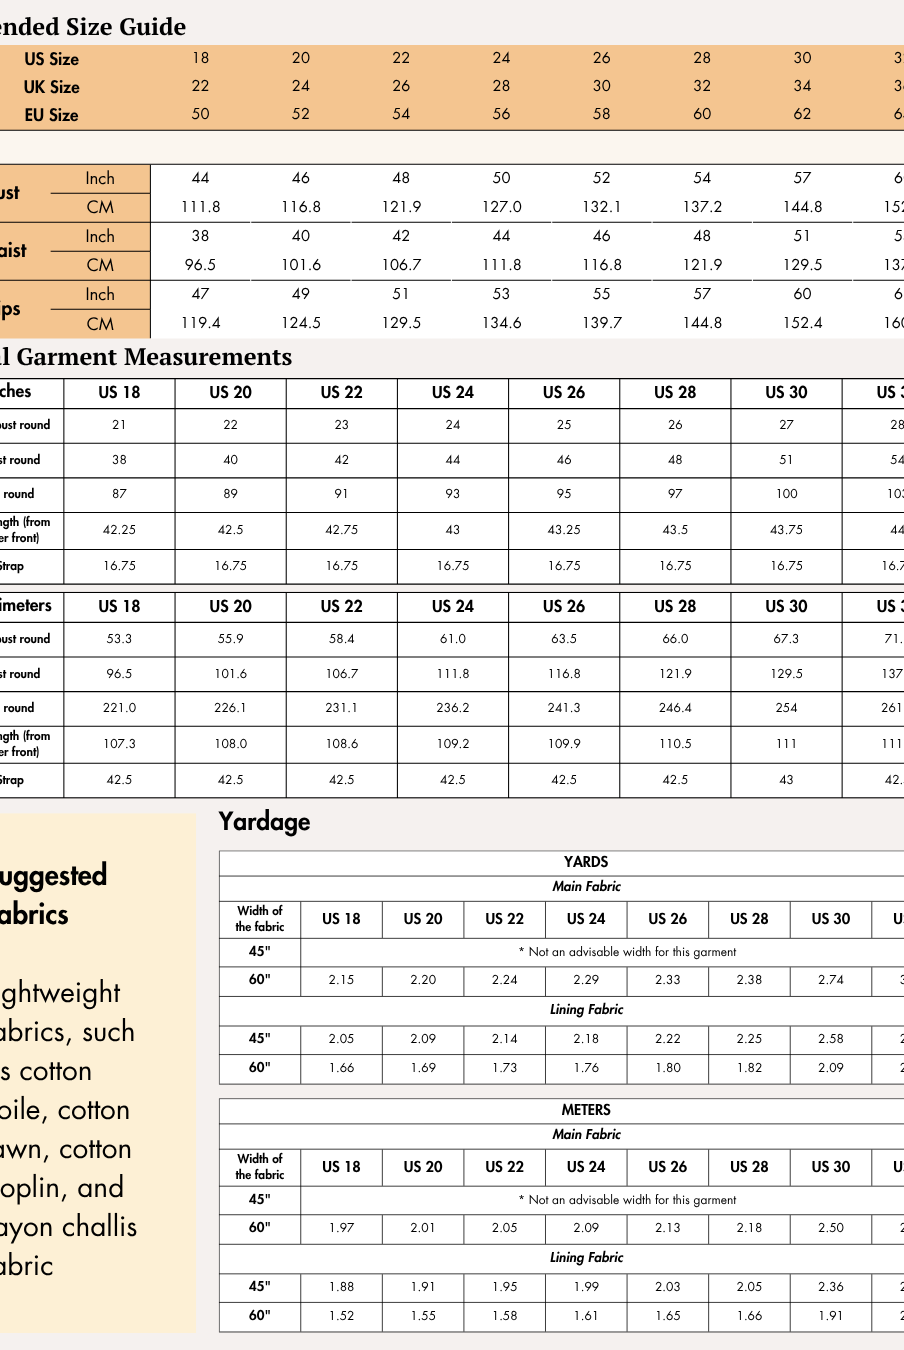
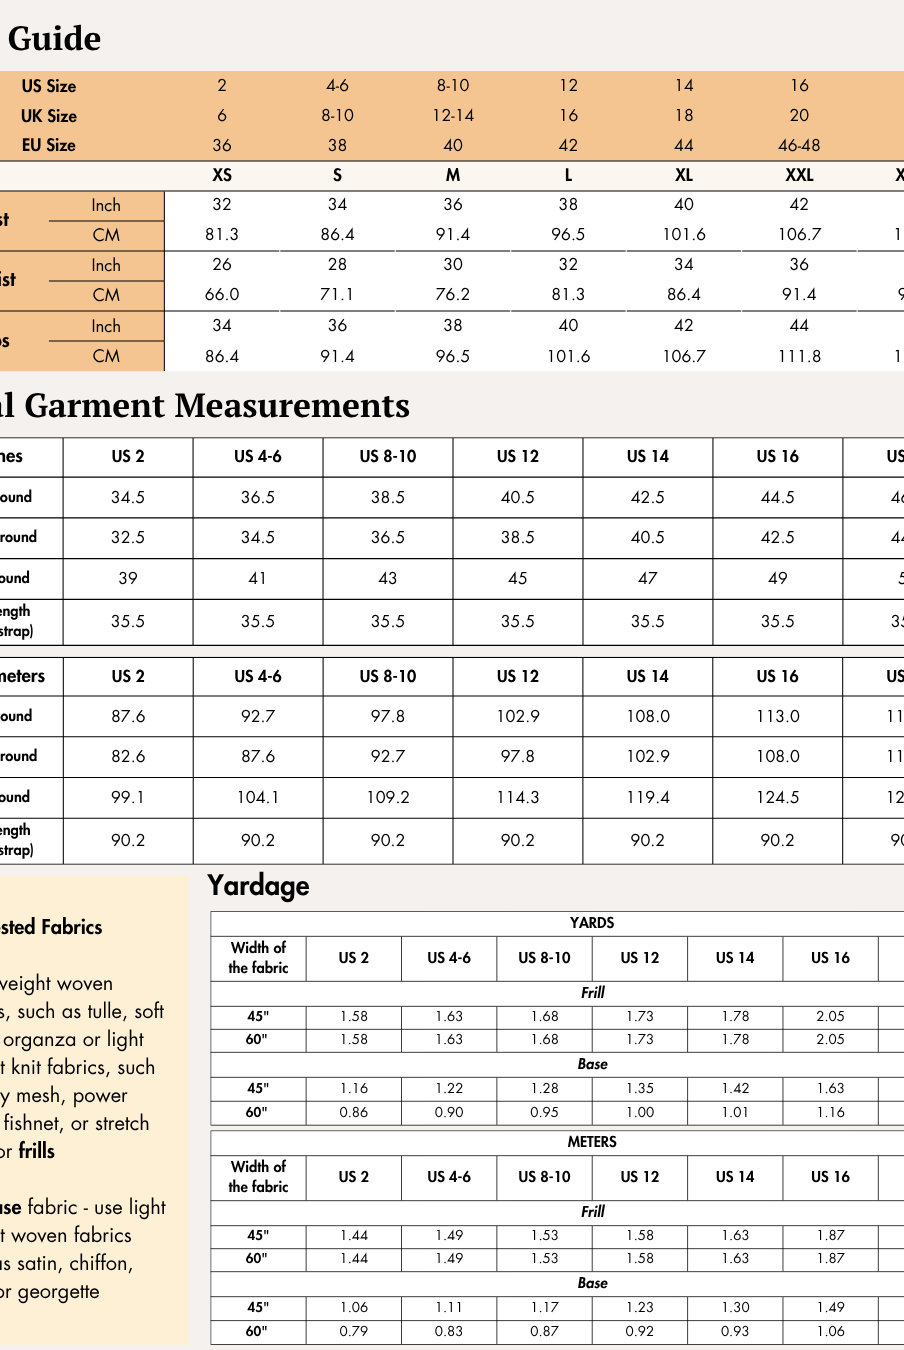
Source: Seam Allowances
A seam allowance is the area between the fabric edge and the seam line, where the fabric is sewn together. It is the space you leave when you sew two pieces of fabric together. This allowance is crucial because it gives you enough fabric to sew and finish the seam without affecting the overall fit of the garment.
Why Seam Allowances Matter?
- Fit and Comfort: Seam allowances ensure that the garment fits correctly. If the seam allowance is too small, the garment might be too tight or the seam might not hold properly. Conversely, too large a seam allowance can lead to a bulky seam and affect the fit.
- Seam Finishing: Proper seam allowances are essential for finishing seams. They allow you to trim, grade, and press seams without compromising the garment’s integrity.
- Consistency: Consistent seam allowances contribute to the overall appearance and durability of your garment. They help in achieving a professional look and prevent issues like puckering or uneven hems.
Standard Seam Allowances
Different patterns and sewing techniques may require different seam allowances. Here are some common allowances:
- 1/4 inch: Often used for quilting and delicate fabrics where minimal seam bulk is desired.
- 3/8 inch: Common in many commercial patterns for garments, providing a balance between ease and fit.
- 1/2 inch: Standard for most home sewing patterns, providing ample space for seam finishing.
- 5/8 inch: Often used in commercial patterns and for garments with more structure.
Tips for Working with Seam Allowances
Follow the Pattern Instructions:
Always check the pattern instructions for the recommended seam allowance, as different designs may use different widths for the best fit and finish.
Use Your Sewing Machine Guides:
Most sewing machines have engraved seam allowance markings on the metal throat plate. Aligning your fabric edge with these guides helps keep stitching accurate and consistent.
Press Your Seams Properly:
Pressing sets stitches and shapes the garment. Most seams are pressed open to reduce bulk, while some are pressed to one side depending on fabric type or pattern instructions.
Trim and Grade Where Needed:
Trimming removes extra fabric bulk, while grading cuts seam layers to different lengths so thick areas lie flat—especially helpful around collars, waistbands, and curves.
Finish Raw Edges:
Techniques such as zigzag stitching, serging, or pinking shears help prevent fabric from fraying and increase garment durability.
Avoid Guessing Measurements:
Estimating seam allowances can lead to poor fit and mismatched pieces. Measuring accurately ensures consistency and professional results.
Test Fit When Adjusting:
If altering seam allowances or working with a new pattern, making a test garment (muslin) helps confirm fit before cutting final fabric.
Seam allowance on Winslet’s Digital Sewing Patterns
Winslet’s Digital Sewing Patterns include clearly marked seam allowances and seamlines within every PDF file. The seam allowance area is visually highlighted in diagrams, and a detailed legend explains each line for every size. Many patterns use a standard 3/8 inch allowance, with variations clearly noted. Winslet’s also provides tools like grading icons, directional pressing arrows, and seamline toggles for easier customization.
If you are sewing using a Winslet’s Digital Pattern, then please head to this article which explains how to use layered pdf patterns and customize the seam allowance if needed
Additional Seam Allowance Techniques You Should Know
French Seams
-
Sewn twice to fully enclose raw edges
-
Ideal for lightweight or sheer fabrics
-
Creates a clean, professional finish inside garments
Winslet’s offers a French Seam Calculator to guide both stitching passes accurately.
Topstitching
-
Visible stitching on the outside of garments
-
Adds strength and decorative detail (common on jeans and collars)
Winslet’s marks topstitching lines in blue on pattern pieces for easy identification.
Understitching
-
Secures seam allowance to the facing
-
Prevents facings from rolling outward
Winslet’s refers to this as the “Roll-Stop Stitch” in beginner-friendly guides.
Stitching in the Ditch
-
Sewing directly into the seam groove from the front
-
Hides stitches while catching layers underneath
Winslet’s recommends specific presser feet for cleaner ditch stitching.
Common Seam Allowance Problems and Fixes
Garment Feels Too Tight:
Likely caused by sewing with a larger seam allowance than specified.
Seams Look Bulky:
Trimming and grading can reduce thickness.
Puckered or Wrinkled Seams:
Often due to tight thread tension or pulling fabric while sewing—let the machine feed naturally.
Winslet’s includes tension testing tools to help adjust machines before sewing final garments.
Summary
Understanding and correctly using seam allowances is fundamental to sewing. They influence fit, comfort, seam strength, and the overall professional look of garments. From choosing the right width to trimming, pressing, and finishing properly, consistent seam allowance practices make sewing easier and results more polished. With clear markings, visual guides, and customizable tools, Winslet’s Digital Sewing Patterns simplify seam allowance handling for beginners and experienced sewists alike.
Frequently Asked Questions about Seam Allowance
What Is a Seam Allowance and Is It Already Included in Sewing Patterns?
A seam allowance is the space between the fabric edge and the stitching line that holds garments together and affects both fit and durability, and most modern sewing brands like Simplicity, McCall’s, Burda, and Winslet’s include it directly in their patterns. Winslet’s digital sewing patterns visually highlight the seam allowance in grey and include a clear legend in every sewing guide to show both the seamline and allowance for each size.
Where Should You Stitch and How Do You Choose the Correct Seam Allowance Width?
When sewing garments, stitching should always be done at a specific distance from the fabric edge rather than directly on it, with standard allowances like ¼”, ⅜”, ½”, and ⅝” commonly used across brands such as Vogue Patterns, Butterick, and Winslet’s. Winslet’s often uses a standard ⅜” seam allowance while marking seamlines directly on every pattern piece so you can follow the correct measurement easily.
How Do You Measure Seam Allowance Accurately on a Sewing Machine?
Most sewing machines include engraved guide lines on the metal throat plate that help align fabric to maintain consistent seam allowances, a technique recommended by brands like Singer, Brother, Janome, and Winslet’s. Winslet’s points out these built-in machine markings in their sewing guides and ensures you know exactly which line matches the seam allowance used in each pattern.
What Happens If You Sew with a Larger Seam Allowance or Guess Instead of Measuring?
Using a larger seam allowance than specified will make garments tighter and smaller than intended, while guessing instead of measuring often causes mismatched pieces, puckering, and poor fit—issues commonly addressed by sewing brands like Burda, Simplicity, and Winslet’s. Winslet’s eliminates the need for estimation by listing precise seam allowances for every pattern edge within each digital sewing product.
What Does Trimming or Grading Seam Allowances Mean and Why Is It Important?
Trimming removes excess seam allowance fabric after stitching to reduce bulk, while grading cuts fabric layers to different lengths so thick seams lie flat and look professional, a standard technique used in garment construction taught by Vogue Patterns, Craftsy, and Winslet’s. Winslet’s instructions clearly indicate when grading is needed using an easy-to-recognize “staircase” icon in their sewing guides.
Should Seam Allowances Be Pressed Open or to One Side?
In most garments, seam allowances are pressed open to reduce bulk and create a smooth, comfortable finish, while some fabrics like knits or specific construction steps require pressing to one side as recommended by brands like McCall’s, Burda, and Winslet’s. Winslet’s includes directional arrows directly on the pattern pieces themselves, showing exactly which way to press for the best results.
What Is a French Seam and When Should It Be Used?
A French seam encloses raw fabric edges by sewing the seam twice, creating a clean, durable finish ideal for lightweight or delicate fabrics, a method commonly taught by premium pattern brands like Vogue and Winslet’s. Winslet’s simplifies this technique with a built-in French Seam Calculator that guides you on where to sew both stitching passes without complicated measurements.
What Are Topstitching, Understitching, and Stitching in the Ditch?
Topstitching is a visible line of stitching used for decoration or strength, understitching secures facings inside garments, and stitching in the ditch hides stitches within seam grooves—techniques widely used by designers and brands like Butterick, Burda, and Winslet’s. Winslet’s marks topstitching lines in blue, explains understitching as the “Roll-Stop Stitch,” and recommends specific machine feet for clean ditch stitching.
Why Do Sewn Seams Pucker or Wrinkle After Sewing?
Seam puckering usually occurs due to tight thread tension, inconsistent seam allowances, or pulling the fabric while sewing, a common beginner issue across machines from Singer, Brother, and Winslet’s. Winslet’s helps prevent this problem by including a practical Tension Test fabric strip in their kits so sewists can adjust machine settings before working on the final garment.


