Puff sleeve crop tops are a timeless wardrobe staple that combine feminine styling with everyday versatility. Sewists love making them because they offer beautiful shaping details, gathered elements, and statement sleeves while remaining approachable for beginners looking to build their garment-making skills.
The Winslet's Puff Sleeve Crop Top Pattern is a great project for creating a stylish gathered crop top with puff sleeves and a square neckline. With its easy skill level and elegant design details, it is an enjoyable sewing project that can be dressed up or down for a variety of occasions.

Why Sew a Puff Sleeve Crop Top?
-
Creates a stylish and feminine silhouette.
-
Features statement puff sleeves for added volume and interest.
-
Includes a flattering square neckline.
-
Comfortable gathered construction allows ease of wear.
-
Works well for casual outings, vacations, brunches, and summer wardrobes.
-
A great project for practicing gathers, pleats, and elastic application.
-
Easy skill level makes it suitable for beginner and intermediate sewists.
Why Choose the Winslet's Puff Sleeve Crop Top Pattern Pattern?

-
Skill Level: Easy
-
Gathered crop top design
-
Puff sleeves
-
Square neckline
-
Elasticated hem and sleeve details
-
Available Sizes: US 02 - US 32 | UK 06 - UK 36 | EU 36 - EU 64
Supplies & Notions
You will need:
-
Fabric
-
3-ply polyester thread
-
Elastic band
-
Sewing machine needles
-
Shears
-
Iron
-
Tape measure
-
Chalk
-
Thread cutter
-
Pins
Fabric Recommendations
Consider using:
-
Cotton blend
-
Modal satin
-
Satin
-
Organza
The sample garment shown in the guide is sewn using 100% viscose fabric.
Recommended characteristics of the sample fabric:
-
Soft and pleasant to the touch
-
Warm in winter and cool in summer
-
Has the appearance of silk with the feel of cotton
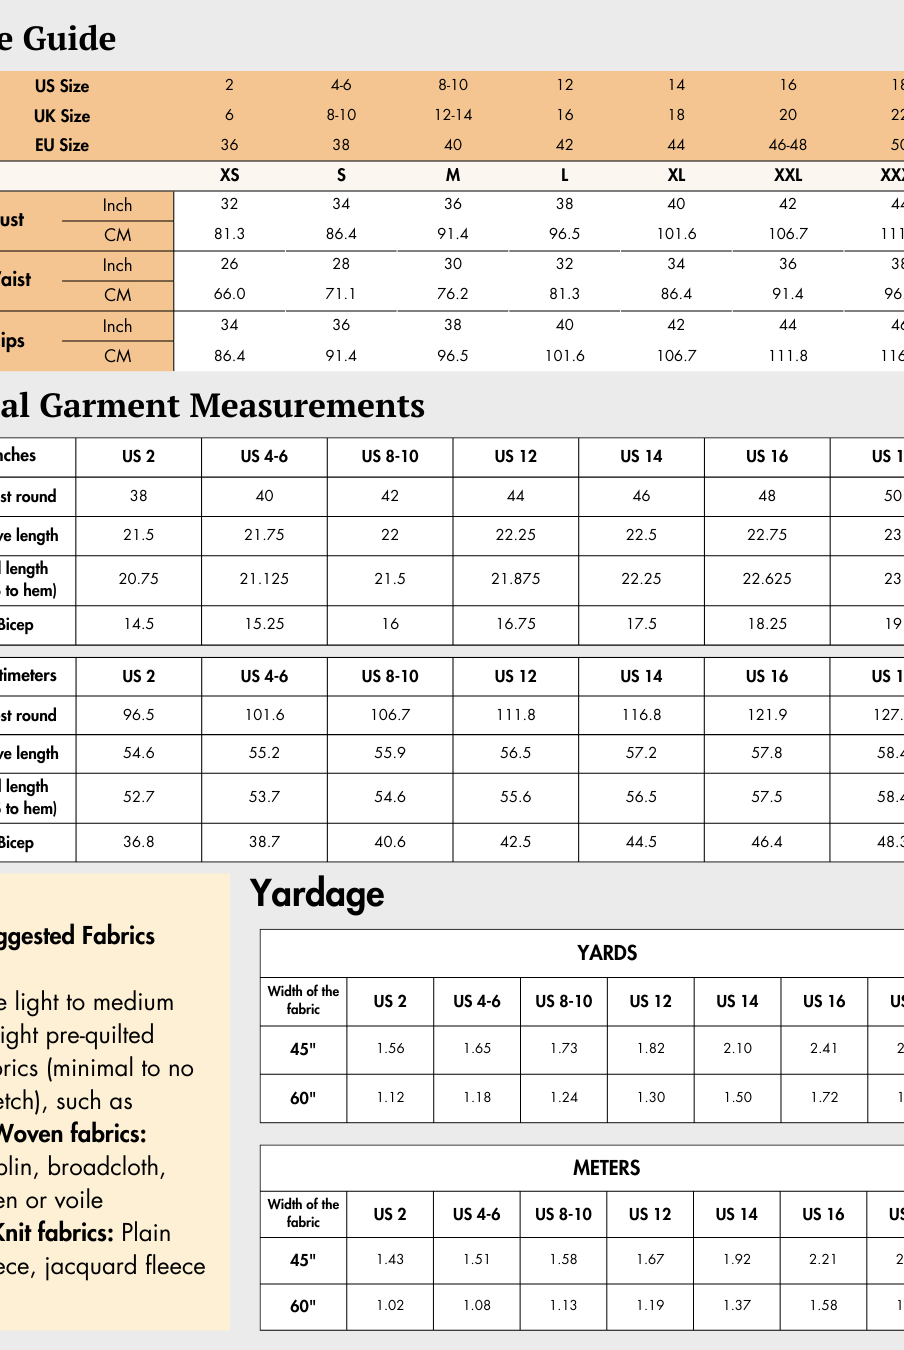
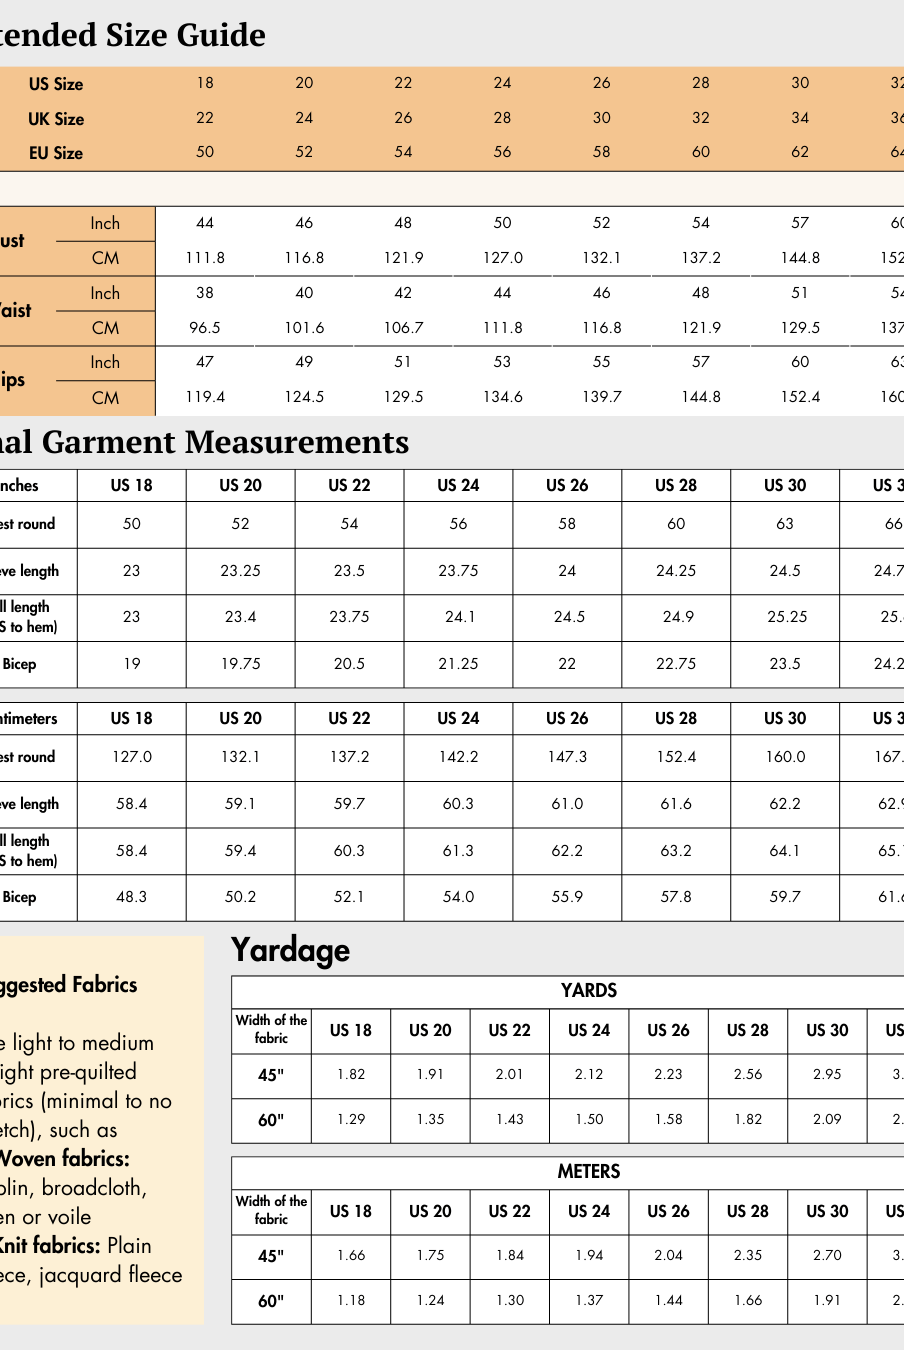
Size Charts
Check the size charts and measure yourself to select the correct size, using the garment and body measurement tables in the guide.
Verify how much fabric you need by referencing the fabric yield table in the guide.
Pattern Inventory: What Pieces to Prepare

Prepare the following pattern pieces:
-
Front bodice – cut x1 fabric
-
Back bodice – cut x1 fabric
-
Front body lining – cut x1 fabric
-
Back body lining – cut x1 fabric
-
Sleeve – cut x2 fabric
-
Sleeve body lining – cut x2 fabric
In the guide, the lining pieces are created using the same fabric as the main garment. You may substitute a different lining fabric if preferred.
Pattern Marking


The pattern includes the following markings:
-
Grainline
-
Neckline
-
Armhole
-
Side seam
-
Hem
-
Gather guideline
-
Front armhole notch
-
Back armhole notch
-
Shoulder marking
-
Pleat notches
Transfer all markings carefully before sewing to ensure accurate assembly.
Cutting Layout


The guide includes cutting layouts for both 45-inch and 60-inch fabric widths.
-
Arrange pattern pieces according to the layout diagrams provided.
-
Ensure grainline arrows run parallel to the fabric selvage.
-
Pin pattern pieces securely before cutting.
-
The layouts are non-directional.
-
Purchase additional fabric when working with fabrics that have a nap or directional print.
-
The illustrated layouts use a medium size for representation.
Fabric Cutting and Preparation
Arrange the pattern pieces according to the cutting layout diagrams. Begin by positioning the pieces on the fabric, ensuring that the grainline arrow runs parallel to the selvage.
Cut the fabric carefully using fabric shears after tracing the pattern pieces if required. Remove any visible marking lines during cutting and cut all notches accurately, as these markings help align pieces during assembly.
Transfer all pattern markings, including circles, buttonholes, fold lines, and center front markings, to the wrong side of the fabric using chalk, a marking pen, or a fabric pencil.
Seam Allowance
Please follow the seam allowances as indicated on the pattern file layers. These are provided specifically for each piece to ensure accurate construction.
This pattern uses a 1 cm (or 0.4 inch) seam allowance all around.
Step-by-Step Sewing Instructions
1. Create the Neckline Gathers
- Baste stitch on the neckline of the back and front bodice.
- Pull the threads from the end to create gathers. Even out the gathers, ensuring the length matches the lining neckline. Topstitch and lock the gathers.
- Repeat the same process for the back bodice.
2. Attach the Front and Back Linings
- Align the front bodice and front lining piece, facing right sides together, and stitch along the hem seamline.
- Follow the same steps for the back bodice.
3. Sew the Side Seams
- Open the bodice and lining fabric and place the front bodice and back bodice together, facing right sides together.
- Stitch along the side seam.
4. Apply the Bodice Elastic
- Stitch a required length of elastic band on the wrong side of the hem by placing the elastic on the hem of the bodice.
- Begin stitching the elastic, locking it on the side seam, and pull the elastic while stitching on the fabric.
- Set the machine tension dial to 4 or 5.
- Once you reach the other end, lock stitch the elastic.
Elastic lengths:
-
XS – 24
-
S – 26
-
M – 28
-
L – 30
-
XL – 31
-
XXL – 32
-
XXXL – 33
4a. Press the Bodice
Turn the bodice front side out and steam iron the gathers.
5. Create the Sleeve Pleats
- Prepare the sleeve by creating knife pleats on the sleeve shoulder.
- Use pleat notches as a guide, matching one notch to the other by folding the sleeve fabric.
- Refer to the pattern markings for the correct fold direction.
- Complete all pleats on the sleeve.
6. Assemble the Sleeves
- Place the sleeve on the sleeve lining, facing right sides together.
- Stitch on the shoulder and sleeve hem seamline.
7. Attach Elastic to the Sleeves
- Attach an elastic band, cut to the length specified in Table 7a, to the wrong side of the sleeve fabric.
- Place the elastic along the hem and extend it up to the shoulder, matching the required length.
- Start sewing at one end and secure the elastic with a lock stitch.
- As you sew, gently stretch the elastic to align with the fabric.
- Adjust your sewing machine tension to between 4 and 5.
- Secure the opposite end with a lock stitch.
7a. Attach Shoulder Elastic
Similarly, attach the required length of elastic on the shoulder.
Elastic lengths:
| Size | Sleeve Hem | Shoulder |
|---|---|---|
| XS | 8 | 11 |
| S | 9 | 12 |
| M | 10 | 13 |
| L | 11 | 14 |
| XL | 12 | 15 |
| XXL | 13 | 16 |
| XXXL | 14 | 17 |
8. Sew the Sleeve Seam
- Turn the sleeve right sides of the fabric facing out.
- Fold the sleeve in half, aligning the side seam of the sleeve so the front sides face each other.
- Stitch along the sleeve side seamline.
9. Attach the Sleeves to the Bodice
- Attach the sleeve to the bodice.
- Place the sleeve on the bodice, aligning the sleeve armhole with the bodice armhole, facing right sides together.
- Ensure the front armhole notch aligns with the front bodice armhole and the back armhole notch aligns with the back bodice armhole.
9a. Stitch the Armhole
- Stitch along the armhole seamline.
- Repeat the same process for the second sleeve.
10. Final Pressing
- Turn the top right side out.
- Steam iron the gathers to create a clean finished appearance.


Ready to Sew Your Own Puff Sleeve Crop Top?


The Winslet's Puff Sleeve Crop Top Pattern combines a flattering gathered bodice, statement puff sleeves, and a classic square neckline in an easy-to-sew project. With simple construction techniques and detailed instructions, it is an excellent choice for sewists looking to create a stylish handmade crop top.
Whether you are sewing your first gathered garment or adding another versatile piece to your wardrobe, this pattern offers a rewarding project with beautiful results. Download the pattern today and start sewing your own puff sleeve crop top.
Explore More Sewing Patterns
• Browse our Crop Top Sewing Pattern Collection for more stylish handmade tops perfect for warm-weather wardrobes.
Join the Community & Get Support
Share your finished Puff Sleeve Crop Top Pattern on social media with #MadeWithWinslets. If you have questions, feedback, or customization requests, contact the Winslet's team at support@winslets.com.