RHEA Hoodie
Long Sleeve Sweatshirt with Kangaroo Pocket and Hoodie • Polyester Fleece Fabric
Sewing Guide Pattern SW004 ★ Skill Level: Very EasyContents
- Pattern Flats — p. 1
- Sewing Supplies — p. 2
- Size Charts — p. 3
- Pattern Marking — p. 5
- Pattern Inventory — p. 7
- Cutting Layout — p. 8
- Fabric Cutting & Preparation — p. 9
- Glossary — p. 10
- Instructions — p. 11
- Final Look — p. 16
Pattern Flats

Front and back pattern flats for the Rhea Hoodie (SW004)
Sewing Supplies
Consider using medium weight knits with no to minimal stretch such as fleece, jersey, rib or terry. The model is wearing a hoodie made of 280 gsm polyester fleece — warm, water-resistant, and easy to sew.
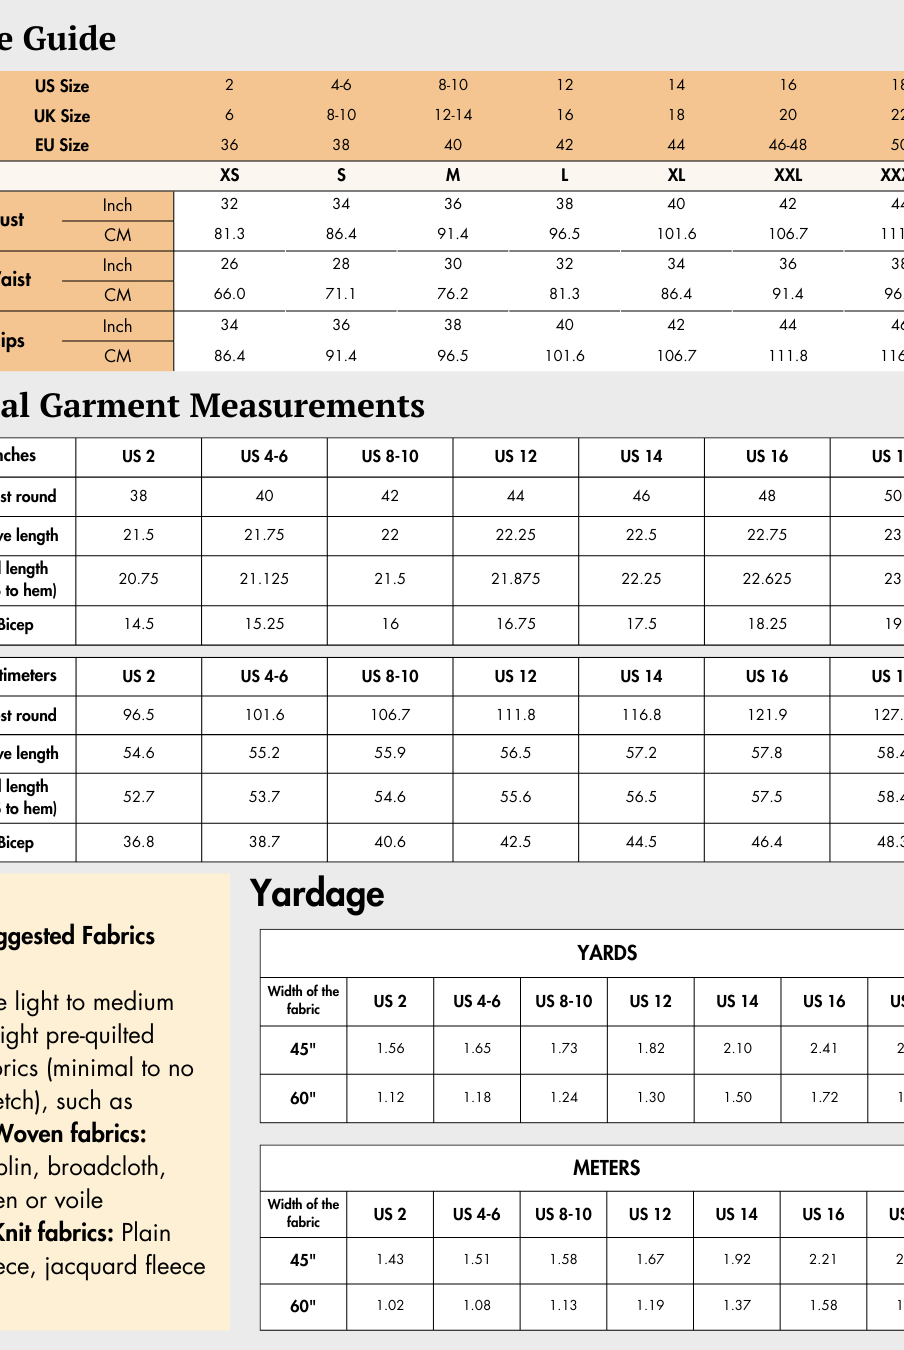
Size Charts
| US Size | 2 | 4–6 | 8–10 | 12 | 14 | 16 | 18 |
|---|---|---|---|---|---|---|---|
| UK Size | 6 | 8–10 | 12–14 | 16 | 18 | 20 | 22 |
| EU Size | 36 | 38 | 40 | 42 | 44 | 46–48 | 50 |
| Letter | XS | S | M | L | XL | XXL | XXXL |
| Bust | 32 | 34 | 36 | 38 | 40 | 42 | 44 |
| Waist | 26 | 28 | 30 | 32 | 34 | 36 | 38 |
| Hip | 34 | 36 | 38 | 40 | 42 | 44 | 46 |
| Width | XS | S | M | L | XL | XXL | XXXL |
|---|---|---|---|---|---|---|---|
| 45″ | 2.36 | 2.48 | 2.61 | 2.75 | 3.16 | 3.63 | 4.18 |
| 60″ | 1.77 | 1.86 | 1.96 | 2.06 | 2.37 | 2.73 | 3.13 |
| Measurement | XS | S | M | L | XL | XXL | XXXL |
|---|---|---|---|---|---|---|---|
| Chest round | 40 | 42 | 44 | 46 | 48 | 50 | 52 |
| Bottom hem | 39 | 41 | 43 | 45 | 47 | 49 | 51 |
| Sleeve length | 26 | 26.25 | 26.5 | 26.75 | 27 | 27.25 | 27.5 |
| Full length (HPS) | 26.5 | 26.88 | 27.25 | 27.63 | 28 | 28.38 | 28.75 |
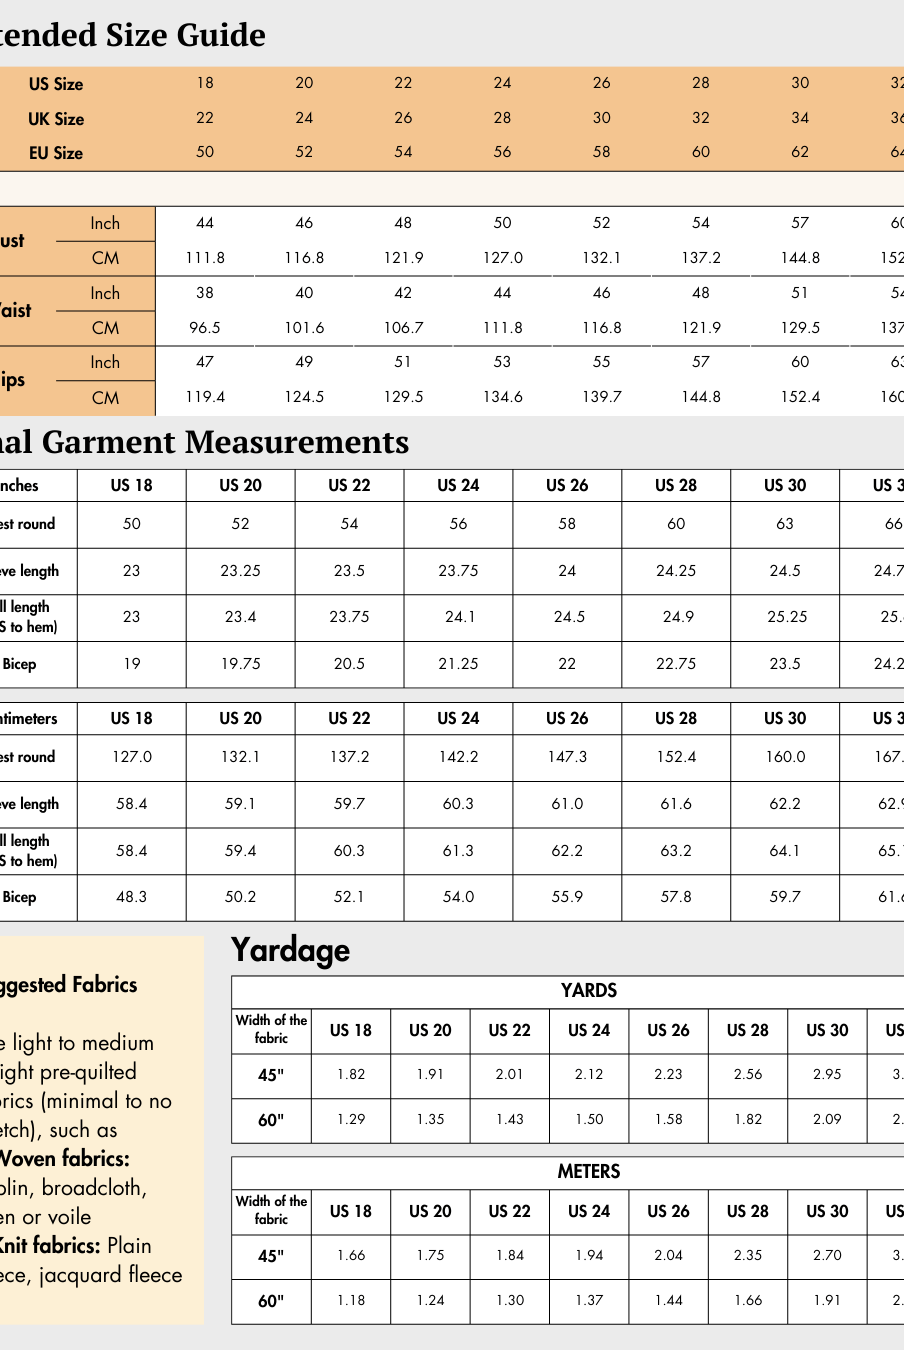
| US Size | 2 | 4–6 | 8–10 | 12 | 14 | 16 | 18 |
|---|---|---|---|---|---|---|---|
| UK Size | 6 | 8–10 | 12–14 | 16 | 18 | 20 | 22 |
| EU Size | 36 | 38 | 40 | 42 | 44 | 46–48 | 50 |
| Letter | XS | S | M | L | XL | XXL | XXXL |
| Bust | 81.3 | 86.4 | 91.4 | 96.5 | 101.6 | 106.7 | 111.8 |
| Waist | 66.0 | 71.1 | 76.2 | 81.3 | 86.4 | 91.4 | 96.5 |
| Hip | 86.4 | 91.4 | 96.5 | 101.6 | 106.7 | 111.8 | 116.8 |
| Width | XS | S | M | L | XL | XXL | XXXL |
|---|---|---|---|---|---|---|---|
| 45″ | 2.15 | 2.27 | 2.39 | 2.51 | 2.89 | 3.32 | 3.82 |
| 60″ | 1.62 | 1.70 | 1.79 | 1.88 | 2.17 | 2.49 | 2.87 |
| Measurement | XS | S | M | L | XL | XXL | XXXL |
|---|---|---|---|---|---|---|---|
| Chest round | 101.6 | 106.7 | 111.8 | 116.8 | 121.9 | 127.0 | 132.1 |
| Bottom hem | 99.1 | 104.1 | 109.2 | 114.3 | 119.4 | 124.5 | 129.5 |
| Sleeve length | 66.0 | 66.7 | 67.3 | 67.9 | 68.6 | 69.2 | 69.9 |
| Full length (HPS) | 67.3 | 68.3 | 69.2 | 70.2 | 71.1 | 72.1 | 73.0 |
This pattern includes no negative ease.
Pattern Marking

Pattern marking diagram — Pieces A (Front), B (Back), C (Sleeve)

Pattern marking diagram — Pieces D (Waistband), E (Cuff), F (Hoodie), G (Pocket)
Pattern Inventory

All 7 pattern pieces (A–G) laid out for reference
Cutting Layout
The correct pattern layout ensures your garment is cut on-grain. These layouts are non-directional.

Cutting layout for 45″ wide (top) and 60″ wide (bottom) fabric. Large size shown for reference.
Fabric Cutting & Preparation
Arrange pieces according to the cutting layout diagrams, ensuring the grainline arrow runs parallel to the selvage.
Trace and cut out pattern pieces, cutting away chalk lines. Cut out any notches on the edges — these help line up pieces during assembly.
Use marking pen, pencil, or chalk to transfer markings to the wrong side of the fabric. Mark the center front of pieces cut on the fold.
Glossary
Instructions

Stitch legend and Step 1 — Pocket preparation (steps 1a–1c)
Fold both pocket opening seam allowances to the wrong side. Iron flat.
Use a cover stitch to sew along the seam allowance edge so two stitch lines appear on the right side.
Fold the pocket top seamline and sides to the wrong side. Iron flat.
Place the prepared pocket on the front pocket marking. Pin. Sew along the pocket top edge, sides, and hemline with a lock stitch.
Place front and back pieces right sides together. Align shoulder seams and overlock. Repeat for the second shoulder seam.
Spread open the sweatshirt and press the shoulder seam. Align the center armhole notch of the sleeve with the shoulder seam, right sides together. Ensure the back armhole notch is aligned with the back armhole.
Pin the sleeve armhole to the sweatshirt armhole. Overlock the armhole seam.
Repeat for the other sleeve.
Before sewing the hood pieces together, mark and create drawstring openings on two hood pieces using eyelets or buttonholes. Insert the drawstring after attaching the hoodie to the sweatshirt.
Place 2 mirror-imaged hood pieces right sides together.
Align the hoodie curve and pin. Overlock the hoodie curve. Repeat for the other two hoodie pieces.
Insert one pair of hoodie pieces inside the other, right sides facing each other.
Align the hoodie lining seamline. Pin. Sew with a lock stitch along the hoodie lining seamline.
Turn the hoodie right side out.
Sew along the hoodie opening seamline using a lockstitch.
Place the prepared hoodie onto the sweatshirt neckline, right sides together. Align neckline notches to shoulder seams and pin. Overlap the neckline ends (left under right). Overlock the neckline together.
Align both side seams, right sides together. Overlock from the sleeve hem down to the bottom hem.
Place the waistband pieces right sides together.
Align side edges and overlock together.
Fold the waistband in half lengthwise, right side facing out.
Fold the cuff in half at the center notch, right sides together.
Overlock the side edge to close the cuff.
Fold the cuff in half, right side facing out.
Place the open waistband edge along the right side of the hemline. Align the center notch with the center front/back and match side seams. Pin evenly and overlock. Repeat for each cuff on each sleeve hem.
Sew along the edge of the waistband and cuffs with the seam allowance underneath for a clean finish (understitch). See Glossary.
Share your creation with the Winslet’s sewing community!
Find us on:
@winsletspatterns WinsletsPatterns#madewithwinslets
Questions or feedback? Write to us at support@winslets.com